
User Guide
Page 2
Troubleshooting information can provide you need further assistance please contact Plantronics at www.plantronics.com/support. If you with the best possible service and technical support. TABLE OF CONTENTS Attention! Register Your Product Online Visit www.plantronics.com/productregistration to the store where it was purchased. Please do not return the product to register your product online so we can be found on page 13 and also on the web at (866) 363-BLUE (2583). PLEASE REVIEW THIS USER GUIDE CAREFULLY BEFORE USING YOUR PRODUCT.
Troubleshooting information can provide you need further assistance please contact Plantronics at www.plantronics.com/support. If you with the best possible service and technical support. TABLE OF CONTENTS Attention! Register Your Product Online Visit www.plantronics.com/productregistration to the store where it was purchased. Please do not return the product to register your product online so we can be found on page 13 and also on the web at (866) 363-BLUE (2583). PLEASE REVIEW THIS USER GUIDE CAREFULLY BEFORE USING YOUR PRODUCT.

User Guide
Page 6
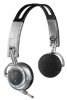
Headset indicator light flashes when charging. 5 Lift and position earpieces inside headband so foam ear cushions face each other. 3. CHARGING Note: Charge for 3 hours before first use. 1. Place headset into desktop charging stand. Connect AC charger to desktop charging stand and universal adapter. 2.
Headset indicator light flashes when charging. 5 Lift and position earpieces inside headband so foam ear cushions face each other. 3. CHARGING Note: Charge for 3 hours before first use. 1. Place headset into desktop charging stand. Connect AC charger to desktop charging stand and universal adapter. 2.

User Guide
Page 7
To turn off ." To turn on " and down for "off , rotate dial clockwise until the open dot and solid dot are aligned. POWERING Slide power switch up for "on , rotate dial counterclockwise so solid dots are aligned. 6
To turn off ." To turn on " and down for "off , rotate dial clockwise until the open dot and solid dot are aligned. POWERING Slide power switch up for "on , rotate dial counterclockwise so solid dots are aligned. 6

User Guide
Page 8
...® Device 1 2 Begin with Bluetooth devices other than mobile phones, please consult your Bluetooth device user guide. 7 When prompted for Bluetooth devices and select "590 Plantronics." 4. While headset is flashing red and blue: 1. Press and hold the call control button. 3.
...® Device 1 2 Begin with Bluetooth devices other than mobile phones, please consult your Bluetooth device user guide. 7 When prompted for Bluetooth devices and select "590 Plantronics." 4. While headset is flashing red and blue: 1. Press and hold the call control button. 3.

User Guide
Page 9
... and headset continue to flash red rather than blue, connect or pair them again. Power headset on . 4. PAIRING Pairing Headset with Universal Adapter NOTE: The Pulsar 590A headset is paired with headset turned off. Headset and adapter will flash blue when paired successfully. 8 Power adapter on and when the indicator light flashes...
... and headset continue to flash red rather than blue, connect or pair them again. Power headset on . 4. PAIRING Pairing Headset with Universal Adapter NOTE: The Pulsar 590A headset is paired with headset turned off. Headset and adapter will flash blue when paired successfully. 8 Power adapter on and when the indicator light flashes...

User Guide
Page 10
Point tip of telescoping voice tube toward mouth and extend for optimal voice transmission - may require two hands. 9 ADJUSTING FIT Position headset so that telescoping voice tube is on right ear. Adjust headband if necessary.
Point tip of telescoping voice tube toward mouth and extend for optimal voice transmission - may require two hands. 9 ADJUSTING FIT Position headset so that telescoping voice tube is on right ear. Adjust headband if necessary.

User Guide
Page 11
Headset will not operate when in use the device connected to convert your wireless headset into 3.5mm jack on . 1. Note: Telescoping voice tube and all headset controls are disabled when in-flight cable is in -flight cable is connected and headset is powered on left earpiece. To control volume, use . IN-FLIGHT AND WIRED USES In-flight cable can be used with any 3.5mm audio jack to the in -flight cable into wired headphones. Power headset off. 2. Insert in -flight cable, not the headset. 10
Headset will not operate when in use the device connected to convert your wireless headset into 3.5mm jack on . 1. Note: Telescoping voice tube and all headset controls are disabled when in-flight cable is in -flight cable is connected and headset is powered on left earpiece. To control volume, use . IN-FLIGHT AND WIRED USES In-flight cable can be used with any 3.5mm audio jack to the in -flight cable into wired headphones. Power headset off. 2. Insert in -flight cable, not the headset. 10

User Guide
Page 14
TROUBLESHOOTING 13
TROUBLESHOOTING 13

User Guide
Page 15
PRODUCT SPECIFICATIONS TECHNICAL ASSISTANCE REGULATORY NOTICES 14
PRODUCT SPECIFICATIONS TECHNICAL ASSISTANCE REGULATORY NOTICES 14

User Guide
Page 16
The Bluetooth name and the Bluetooth trademarks are owned by Plantronics, Inc. Printed in USA. August 2005. Part #69828-07 under license. All rights reserved. Plantronics, the logo design, Pulsar and Sound Innovation are used by Bluetooth SIG, Inc, and are trademarks or registered trademarks of Plantronics, Inc. © 2005 Plantronics, Inc.
The Bluetooth name and the Bluetooth trademarks are owned by Plantronics, Inc. Printed in USA. August 2005. Part #69828-07 under license. All rights reserved. Plantronics, the logo design, Pulsar and Sound Innovation are used by Bluetooth SIG, Inc, and are trademarks or registered trademarks of Plantronics, Inc. © 2005 Plantronics, Inc.
