User Guide
Page 2
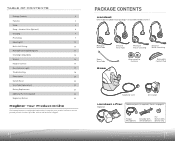
... Comfort Pad Telephone Cord AC Charger Handset Lifter (Optional) Additional parts (if required). Handset Lifter (Optional) 8 Charging 9 Positioning 9 Adjusting Fit 10 Multi-shift Pairing 10 Making/Answering/Ending Calls 11 Checking Compatibility 13 Volume 14 Headset Controls... 16 Base Indicator Lights 17 Troubleshooting 18 Subscription 20 System Reset 20 Voice Tube Replacement 20 Battery Replacement 21 Additional Parts (if required) 22 Regulatory Notices 23 Register Your Product Online Visit www.plantronics.com/productregistration to register ...
... Comfort Pad Telephone Cord AC Charger Handset Lifter (Optional) Additional parts (if required). Handset Lifter (Optional) 8 Charging 9 Positioning 9 Adjusting Fit 10 Multi-shift Pairing 10 Making/Answering/Ending Calls 11 Checking Compatibility 13 Volume 14 Headset Controls... 16 Base Indicator Lights 17 Troubleshooting 18 Subscription 20 System Reset 20 Voice Tube Replacement 20 Battery Replacement 21 Additional Parts (if required) 22 Regulatory Notices 23 Register Your Product Online Visit www.plantronics.com/productregistration to register ...
User Guide
Page 5
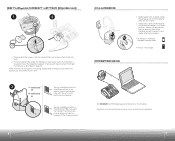
... lifter into handset lifter jack on page 22. NOTE: Remove only a tiny piece of the telephone speaker. Amber charge indicator light on base will flash while charging and will need to move it later. 3 IntelliStand™ Set the IntelliStand switch to solid amber when fully... charged. • 20 minutes = minimum chargeto continue setup • 3 hours = full charge 12" 6" The minimum recommended separation distance is located on ...
... lifter into handset lifter jack on page 22. NOTE: Remove only a tiny piece of the telephone speaker. Amber charge indicator light on base will flash while charging and will need to move it later. 3 IntelliStand™ Set the IntelliStand switch to solid amber when fully... charged. • 20 minutes = minimum chargeto continue setup • 3 hours = full charge 12" 6" The minimum recommended separation distance is located on ...
User Guide
Page 6
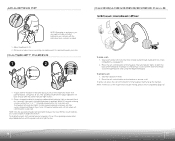
...Adjust headband to enable or disable this feature. To pair another headset to the same base, you must NOT be in charging cradle and red indicator light on base will work with the alternative foam cushions included. 1. Dial tone should sound through headset. Dial using the ...have trouble hearing, please check compatibility (page 13). 11 Long press (5 sec.) the speaking volume minor adjust up the handset. Place a charged headset in talk mode (i.e. ADJUSTING FIT 1 2 NOTE: Depending on preference, you can replace the pre-installed leatherette ear cushions with the base...
...Adjust headband to enable or disable this feature. To pair another headset to the same base, you must NOT be in charging cradle and red indicator light on base will work with the alternative foam cushions included. 1. Dial tone should sound through headset. Dial using the ...have trouble hearing, please check compatibility (page 13). 11 Long press (5 sec.) the speaking volume minor adjust up the handset. Place a charged headset in talk mode (i.e. ADJUSTING FIT 1 2 NOTE: Depending on preference, you can replace the pre-installed leatherette ear cushions with the base...
User Guide
Page 9
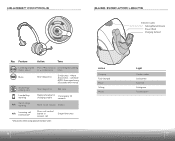
...repeat every 30 seconds when muted. Answering/ ending calls Short key press Mid tone Low battery warning Replace headset in 1 tone every 10 charging cradle seconds Out of range N/A warning Move closer to base 2 tones N/A Incoming call notification* Press call * Only works when using optional...Short key press Single tone, 3 tones at limit Solid green Flashes green 17 HEADSET CONTROLS BASE INDICATOR LIGHTS Indicator Lights Talking/Muted (Green) Power (Red) Charging (Amber) Key Feature Action Tone Listening volume Press + to increase Ascending/descending minor adjust or -
...repeat every 30 seconds when muted. Answering/ ending calls Short key press Mid tone Low battery warning Replace headset in 1 tone every 10 charging cradle seconds Out of range N/A warning Move closer to base 2 tones N/A Incoming call notification* Press call * Only works when using optional...Short key press Single tone, 3 tones at limit Solid green Flashes green 17 HEADSET CONTROLS BASE INDICATOR LIGHTS Indicator Lights Talking/Muted (Green) Power (Red) Charging (Amber) Key Feature Action Tone Listening volume Press + to increase Ascending/descending minor adjust or -
User Guide
Page 11
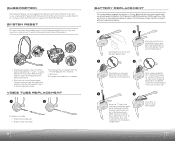
...and both the "+" and "-" volume buttons for 5 seconds. 4. The talk indicator light will again blink briefly to indicate the headset is complete. Slide in the battery compartment....other . SYSTEM RESET To recover from battery door until battery moves out from the AC charging jack for 5 seconds. Once battery is included with your replacement battery. 1 2 Use ... supplied should replace the battery. Tuck all buttons. 2. Disconnect the AC charger from behind post. Call Plantronics at (800) 544-4660 ext. 5538 to replace. the battery cannot be re-subscribed. Close door so...
...and both the "+" and "-" volume buttons for 5 seconds. 4. The talk indicator light will again blink briefly to indicate the headset is complete. Slide in the battery compartment....other . SYSTEM RESET To recover from battery door until battery moves out from the AC charging jack for 5 seconds. Once battery is included with your replacement battery. 1 2 Use ... supplied should replace the battery. Tuck all buttons. 2. Disconnect the AC charger from behind post. Call Plantronics at (800) 544-4660 ext. 5538 to replace. the battery cannot be re-subscribed. Close door so...


