User Guide
Page 2
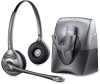
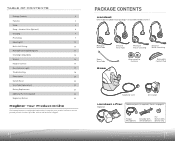
... 20 System Reset 20 Voice Tube Replacement 20 Battery Replacement 21 Additional Parts (if required) 22 Regulatory Notices 23 Register Your Product Online Visit www.plantronics.com/productregistration to register your product online so we can provide you with Stabilizers For Nortel i2004 phones only 3 TABLE OF CONTENTS Package Contents 3 Features...
... 20 System Reset 20 Voice Tube Replacement 20 Battery Replacement 21 Additional Parts (if required) 22 Regulatory Notices 23 Register Your Product Online Visit www.plantronics.com/productregistration to register your product online so we can provide you with Stabilizers For Nortel i2004 phones only 3 TABLE OF CONTENTS Package Contents 3 Features...
User Guide
Page 3
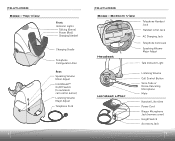
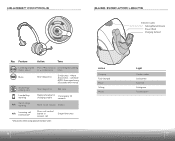
T- B- oBtottotmomViVew iew TeleTpehleopnheoHneanHdasnedt set JacJkack HanHdasnedtsLeitftLeirftJearcJkack AC ACChaCrhgainrgiJnagcJkack HeHaedasdestet TeleTpehleopnheoCneorCdoJradcJkack SpeSapkeinagkiVnogluVmolueme MajMorajAodrjAusdtjust TalkTaInlkdIicnadtiocratLoirghLtight HaHnadnsdesteLtifLtifetrer ListLeinstinengiVnogluVmolueme CalCl aClolnCtoronltrBoultBtountton VoicVeoiTcuebTeuobre or NoiNseo-isCea-nCcaenlicnegling MicMroicprhoopnheone MuMteute HanHdasnedtsLeitftLeirftAerrmArm PowPeorwCeorrCdord RinRgeinrgMericMroicprhoopnheone JacJka(crkem(reomveocvoevceor)ver) HeiHghetigShwt ...
T- B- oBtottotmomViVew iew TeleTpehleopnheoHneanHdasnedt set JacJkack HanHdasnedtsLeitftLeirftJearcJkack AC ACChaCrhgainrgiJnagcJkack HeHaedasdestet TeleTpehleopnheoCneorCdoJradcJkack SpeSapkeinagkiVnogluVmolueme MajMorajAodrjAusdtjust TalkTaInlkdIicnadtiocratLoirghLtight HaHnadnsdesteLtifLtifetrer ListLeinstinengiVnogluVmolueme CalCl aClolnCtoronltrBoultBtountton VoicVeoiTcuebTeuobre or NoiNseo-isCea-nCcaenlicnegling MicMroicprhoopnheone MuMteute HanHdasnedtsLeitftLeirftAerrmArm PowPeorwCeorrCdord RinRgeinrgMericMroicprhoopnheone JacJka(crkem(reomveocvoevceor)ver) HeiHghetigShwt ...
User Guide
Page 4
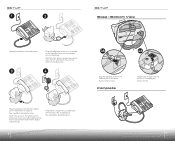
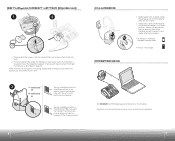
Put the cord only in the jack from phone. NOTE: The access to the handset jack is connected to do this step. See step 4A for detailed location. Bottom View Unplug the handset cord from which the handset came. 3 4 Plug the handset cord into jack in the bottom of the base. See step 3A for detailed location. 6 3A 4A !9v Plug the handset handset cord into the handset jack in the base. Plug the AC charger into an outlet and into the base's AC charging jack. Complete Plug the AC charger into the base's AC charging jack. SETUP 1 2 SETUP Base - Plug the telephone ...
Put the cord only in the jack from phone. NOTE: The access to the handset jack is connected to do this step. See step 4A for detailed location. Bottom View Unplug the handset cord from which the handset came. 3 4 Plug the handset cord into jack in the bottom of the base. See step 3A for detailed location. 6 3A 4A !9v Plug the handset handset cord into the handset jack in the base. Plug the AC charger into an outlet and into the base's AC charging jack. Complete Plug the AC charger into the base's AC charging jack. SETUP 1 2 SETUP Base - Plug the telephone ...
User Guide
Page 5
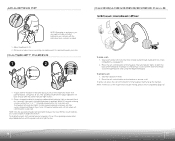
Verify that headset is in correct position. Set the IntelliStand switch to IntelliStand on (=) if you will change to attach the ringer microphone as described on base. CHARGING 1 2 POSITIONING 1. Gently press down on top of mounting tape backing to automatically pick up when you want the handset to temporarily stick lifter into charging cradle; Important: Incorrect positioning can cause noise and interference problems. 8 9 the earpiece with the call control button on lifter with the microphone goes into the cradle. 2. Amber charge indicator light on your ...
Verify that headset is in correct position. Set the IntelliStand switch to IntelliStand on (=) if you will change to attach the ringer microphone as described on base. CHARGING 1 2 POSITIONING 1. Gently press down on top of mounting tape backing to automatically pick up when you want the handset to temporarily stick lifter into charging cradle; Important: Incorrect positioning can cause noise and interference problems. 8 9 the earpiece with the call control button on lifter with the microphone goes into the cradle. 2. Amber charge indicator light on your ...
User Guide
Page 6
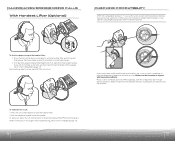
Within 10 seconds of base until the power indicator light flashes. 10 MAKING/ANSWERING/ENDING CALLS Without Handset lifter 1 2 To make a call control button on the headset to indicate pairing mode, and goes out after successful pairing. on a call . Take your chin. To answer a call control button is pressed. Take the handset off -hook. To pair another headset to the same base, you can replace the pre-installed leatherette ear cushions with the base. Place a charged headset in talk mode (i.e. MULTI-SHIFT PAIRING 1 2 Enable Disable OR 1. Dial tone should sound ...
Within 10 seconds of base until the power indicator light flashes. 10 MAKING/ANSWERING/ENDING CALLS Without Handset lifter 1 2 To make a call control button on the headset to indicate pairing mode, and goes out after successful pairing. on a call . Take your chin. To answer a call control button is pressed. Take the handset off -hook. To pair another headset to the same base, you can replace the pre-installed leatherette ear cushions with the base. Place a charged headset in talk mode (i.e. MULTI-SHIFT PAIRING 1 2 Enable Disable OR 1. Dial tone should sound ...
User Guide
Page 7
While speaking, turn the telephone configuration dial until you can. Use the telephone keypad to someone you know. However, if you do not hear a dial tone, you may need to lower the handset lifter. (Phone will hang up of "1" is set up .) NOTE: If either you or the recipient is having trouble hearing, or if you experience buzzing/hissing, please follow the directions below. 2 4 3 4 1 1 2 2 To first test proper set at the factory to turn the configuration dial through your headset, use a coin or small screwdriver to work with the position indicator. Make sure that ...
While speaking, turn the telephone configuration dial until you can. Use the telephone keypad to someone you know. However, if you do not hear a dial tone, you may need to lower the handset lifter. (Phone will hang up of "1" is set up .) NOTE: If either you or the recipient is having trouble hearing, or if you experience buzzing/hissing, please follow the directions below. 2 4 3 4 1 1 2 2 To first test proper set at the factory to turn the configuration dial through your headset, use a coin or small screwdriver to work with the position indicator. Make sure that ...
User Guide
Page 8
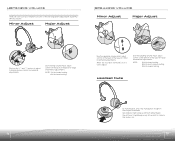
NOTE: 1 is the loudest setting. 4 is the most common setting. Use the speaking volume major adjust control on the "+" and "-" buttons to unmute. Minor Adjust Major Adjust SPEAKING VOLUME Minor Adjust Headset Mute Major Adjust Push on the bottom of the base for minor incremental adjustments. Use the speaking volume minor adjust control on . 14 15 Headset Mute To mute headset, press the mute button straight in talk mode (i.e. Talk indicator light on base will hear 3 rapid beeps every 30 seconds to indicate that mute is on the back of the base for large incremental ...
NOTE: 1 is the loudest setting. 4 is the most common setting. Use the speaking volume major adjust control on the "+" and "-" buttons to unmute. Minor Adjust Major Adjust SPEAKING VOLUME Minor Adjust Headset Mute Major Adjust Push on the bottom of the base for minor incremental adjustments. Use the speaking volume minor adjust control on . 14 15 Headset Mute To mute headset, press the mute button straight in talk mode (i.e. Talk indicator light on base will hear 3 rapid beeps every 30 seconds to indicate that mute is on the back of the base for large incremental ...
User Guide
Page 9
to answer call control button to decrease tones Mute Short key press 3 mid tones = Mute 3 low tones = Unmute NOTE: Tones repeat every 30 seconds when muted. Answering/ ending calls Short key press Mid tone Low battery warning Replace headset in 1 tone every 10 charging cradle seconds Out of range N/A warning Move closer to base 2 tones N/A Incoming call notification* Press call * Only works when using optional Handset Lifter. 3 repetitive tones 16 A Base Features Key Feature 123ActLiiosntening volume 4 major adjust B C D ChaSrgpienagking volume Fullmy Cahjoarrgaeddjust...
to answer call control button to decrease tones Mute Short key press 3 mid tones = Mute 3 low tones = Unmute NOTE: Tones repeat every 30 seconds when muted. Answering/ ending calls Short key press Mid tone Low battery warning Replace headset in 1 tone every 10 charging cradle seconds Out of range N/A warning Move closer to base 2 tones N/A Incoming call notification* Press call * Only works when using optional Handset Lifter. 3 repetitive tones 16 A Base Features Key Feature 123ActLiiosntening volume 4 major adjust B C D ChaSrgpienagking volume Fullmy Cahjoarrgaeddjust...
User Guide
Page 10
....uTbrsyctroiprteiosnet. wall outlet. • Check tha•t tChheeAcCkcthatrgtheer iAsCthcehamrogdeer lissuthpeplmieoddbeyl sPulapnptlrieodnibcys.Plantronics. My headsetMdoyehseadset does• Check tha•t tChheepchkotnheaitsthcoenpnheocntedistocothnenebcatseedutonitth'sepbhaosneeucnoitr'ds phone cord ...directly. • Picking up•aPnoictkhienrgruapdiaonforethqeurernacdyi.oCfarellqtuhenPclya.nCtarollntihces Plantronics Technical AsTseicshtannicaelCAesnstiesrtafnorceanCeRnFtefirltfeorr. the headsett.he headset. Handset liftHearnisdsinesttlaifltlerdis...
....uTbrsyctroiprteiosnet. wall outlet. • Check tha•t tChheeAcCkcthatrgtheer iAsCthcehamrogdeer lissuthpeplmieoddbeyl sPulapnptlrieodnibcys.Plantronics. My headsetMdoyehseadset does• Check tha•t tChheepchkotnheaitsthcoenpnheocntedistocothnenebcatseedutonitth'sepbhaosneeucnoitr'ds phone cord ...directly. • Picking up•aPnoictkhienrgruapdiaonforethqeurernacdyi.oCfarellqtuhenPclya.nCtarollntihces Plantronics Technical AsTseicshtannicaelCAesnstiesrtafnorceanCeRnFtefirltfeorr. the headsett.he headset. Handset liftHearnisdsinesttlaifltlerdis...
User Guide
Page 11
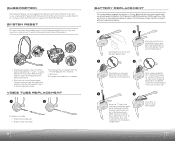
... it , follow directions below to use a replacement headset with headset. 21 To perform the system reset, follow the instructions on page 10 for 5 seconds. Call Plantronics at (800) 544-4660 ext. 5538 to normal operation mode. 3. Reconnect. To do not pull hard. 5 6 Using the "Y" end of the tool, press the battery...
... it , follow directions below to use a replacement headset with headset. 21 To perform the system reset, follow the instructions on page 10 for 5 seconds. Call Plantronics at (800) 544-4660 ext. 5538 to normal operation mode. 3. Reconnect. To do not pull hard. 5 6 Using the "Y" end of the tool, press the battery...
User Guide
Page 12
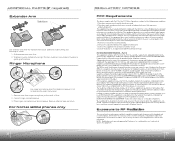
...harm to the network, the telephone company may request that could void the user's authority to your line, as possible. Visit www.plantronics.com for a Class B digital device, pursuant to which can be connected to radio communications. R1i.nSlgideeextrendMer aircm ronoto lpiftehr. This...company will be determined by ACTA. The digits represented by ### are very destructive to customer terminal equipment connected to correct interference by Plantronics, Inc. DO NOT DISASSEMBLE THIS EQUIPMENT: it is encouraged to try to AC power sources. Operation is separately shown on a ...
...harm to the network, the telephone company may request that could void the user's authority to your line, as possible. Visit www.plantronics.com for a Class B digital device, pursuant to which can be connected to radio communications. R1i.nSlgideeextrendMer aircm ronoto lpiftehr. This...company will be determined by ACTA. The digits represented by ### are very destructive to customer terminal equipment connected to correct interference by Plantronics, Inc. DO NOT DISASSEMBLE THIS EQUIPMENT: it is encouraged to try to AC power sources. Operation is separately shown on a ...
User Guide
Page 13
...other rights that do not conform to state. Clean the equipment with the original purchase receipt. • We will, at www.plantronics.com/support. Australia 147229; Unplug the unit from the telephone and the AC charger from the date of purchase of the products...6-9 months (voice tube models only). 2. France 651,857-651,865; Germany 40108524.4; All other trademarks are trademarks or registered trademarks of Plantronics, Inc. WARRANTY Limited Warranty • This warranty covers defects in materials and workmanship of products manufactured, sold or certified by this limited ...
...other rights that do not conform to state. Clean the equipment with the original purchase receipt. • We will, at www.plantronics.com/support. Australia 147229; Unplug the unit from the telephone and the AC charger from the date of purchase of the products...6-9 months (voice tube models only). 2. France 651,857-651,865; Germany 40108524.4; All other trademarks are trademarks or registered trademarks of Plantronics, Inc. WARRANTY Limited Warranty • This warranty covers defects in materials and workmanship of products manufactured, sold or certified by this limited ...
