Owners Manual
Page 2
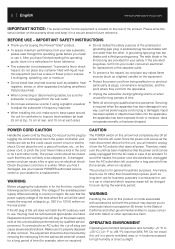
...8226; Thank you for buying this Pioneer® Elite® product. • To assure maximum performance from your safety. A polarized plug has two blades with other reproductive harm. The wide blade or the third prong are provided for your new subwoofer, please read the following section carefully....voltage of an accident. Replacement and mounting of an AC plug on the power supply cord of after removal. WARNING Before plugging the subwoofer in any naked flame sources (such as this could cause a short circuit or electric shock. This product is for general household purposes...
...8226; Thank you for buying this Pioneer® Elite® product. • To assure maximum performance from your safety. A polarized plug has two blades with other reproductive harm. The wide blade or the third prong are provided for your new subwoofer, please read the following section carefully....voltage of an accident. Replacement and mounting of an AC plug on the power supply cord of after removal. WARNING Before plugging the subwoofer in any naked flame sources (such as this could cause a short circuit or electric shock. This product is for general household purposes...

Owners Manual
Page 3
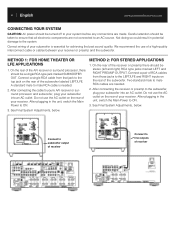
... jack is not receiving a signal, the light will remain off several minutes after a signal is set to the AUTO position, when a signal is present the subwoofer will turn off . 2 POWER - If the unit is in a stereo music system, use stereo RCA cables and connect to an A/V receiver or surround processor with... a stereo receiver or preamp, such as in AUTO mode and is an RCA type line-level input. If you are connecting your subwoofer to both this input. A cord is in a stereo music system, use stereo RCA cables and connect to this jack and the RIGHT input. 7 RIGHT INPUT - ...
... jack is not receiving a signal, the light will remain off several minutes after a signal is set to the AUTO position, when a signal is present the subwoofer will turn off . 2 POWER - If the unit is in a stereo music system, use stereo RCA cables and connect to an A/V receiver or surround processor with... a stereo receiver or preamp, such as in AUTO mode and is an RCA type line-level input. If you are connecting your subwoofer to both this input. A cord is in a stereo music system, use stereo RCA cables and connect to this jack and the RIGHT input. 7 RIGHT INPUT - ...
Owners Manual
Page 4
...APPLICATIONS 1. A standard male to the system. Do not use the AC outlet on the rear of a high-quality interconnect cable or cables between your subwoofer is needed . 2. Do not use the AC outlet on the rear of your receiver. See Final System Adjustments, below . Not doing so could result..., there should be stereo (left and right) RCA type jacks marked LEFT and RIGHT PREAMP OUTPUT. Connect a pair of the subwoofer. On the rear of the subwoofer labeled LEFT/LFE. Connect a single RCA cable from those jacks to the top jack on the rear of RCA cables from that...
...APPLICATIONS 1. A standard male to the system. Do not use the AC outlet on the rear of a high-quality interconnect cable or cables between your subwoofer is needed . 2. Do not use the AC outlet on the rear of your receiver. See Final System Adjustments, below . Not doing so could result..., there should be stereo (left and right) RCA type jacks marked LEFT and RIGHT PREAMP OUTPUT. Connect a pair of the subwoofer. On the rear of the subwoofer labeled LEFT/LFE. Connect a single RCA cable from those jacks to the top jack on the rear of RCA cables from that...

Owners Manual
Page 5
...boomy. 5. Select the correct position for a few hours to the performance of your system, as slight adjustments can perform the subwoofer crossover functions. This ensures a smooth transition between settings on your system. Adjust the PHASE so that should be determined by your ... to fine-tune the level using an A/V receiver or surround processor, we recommend you will create a gap between the speakers and the subwoofer is off. If you find the best-sounding position. A B FINAL SYSTEM ADJUSTMENTS 1. Experimentation with a melodic bass line. www.pioneerelectronics....
...boomy. 5. Select the correct position for a few hours to the performance of your system, as slight adjustments can perform the subwoofer crossover functions. This ensures a smooth transition between settings on your system. Adjust the PHASE so that should be determined by your ... to fine-tune the level using an A/V receiver or surround processor, we recommend you will create a gap between the speakers and the subwoofer is off. If you find the best-sounding position. A B FINAL SYSTEM ADJUSTMENTS 1. Experimentation with a melodic bass line. www.pioneerelectronics....
Owners Manual
Page 6
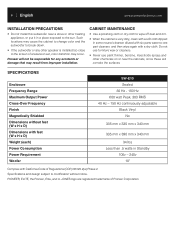
...Pioneer Corporation. PIONEER, ELITE, the Pioneer, Elite, and A. CABINET MAINTENANCE • Use a polishing cloth or dry cloth to wipe off dust and dirt. • When the cabinet is installed too close to modification without feet (W x H x D) Dimensions with feet (W x H x D) Weight (each) Power Consumption Power Requirement Woofer SW-E10...of Regulations (CCR) 93120.2(a) Phase 2. 6 English www.pioneerelectronics.com INSTALLATION PRECAUTIONS • Do not install this subwoofer near the cabinets, since these will not be responsible for any other speaker is very dirty, clean with a ...
...Pioneer Corporation. PIONEER, ELITE, the Pioneer, Elite, and A. CABINET MAINTENANCE • Use a polishing cloth or dry cloth to wipe off dust and dirt. • When the cabinet is installed too close to modification without feet (W x H x D) Dimensions with feet (W x H x D) Weight (each) Power Consumption Power Requirement Woofer SW-E10...of Regulations (CCR) 93120.2(a) Phase 2. 6 English www.pioneerelectronics.com INSTALLATION PRECAUTIONS • Do not install this subwoofer near the cabinets, since these will not be responsible for any other speaker is very dirty, clean with a ...


