
Owner's Manual
Page 4
... For A Lifetime Used wisely, your hearing "comfort level" adapts to Part 15 of the following measures: - After all, we want you can be determined by turning the equipment off and on a circuit different from loud noise is included for a lifetime. THE FOLLOWING NOISES CAN BE DANGEROUS UNDER CONSTANT EXPOSURE 90 Subway...
... For A Lifetime Used wisely, your hearing "comfort level" adapts to Part 15 of the following measures: - After all, we want you can be determined by turning the equipment off and on a circuit different from loud noise is included for a lifetime. THE FOLLOWING NOISES CAN BE DANGEROUS UNDER CONSTANT EXPOSURE 90 Subway...

Owner's Manual
Page 9
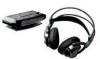
...indicator is unlit when the transmitter is on. 3 CHARGE indicator Lights when the rechargeable batteries are fully charged. 4 DOLBY HEADPHONE button Press to select the Dolby Headphone mode (DH1 / DH2 / DH3 / OFF). 5 DOLBY PRO LOGIC II button Press to select the Dolby Pro Logic...). 6 INPUT button Press to select the source input (DIGITAL 1 / DIGITAL 2 / ANALOG). 7 VOLUME control Use to adjust volume level of headphones (sold separately) connected to recharge the supplied rechargeable batteries. 9 En Before you start 01 Controls and displays Transmitter (top) English 1 STANDBY/ON button...
...indicator is unlit when the transmitter is on. 3 CHARGE indicator Lights when the rechargeable batteries are fully charged. 4 DOLBY HEADPHONE button Press to select the Dolby Headphone mode (DH1 / DH2 / DH3 / OFF). 5 DOLBY PRO LOGIC II button Press to select the Dolby Pro Logic...). 6 INPUT button Press to select the source input (DIGITAL 1 / DIGITAL 2 / ANALOG). 7 VOLUME control Use to adjust volume level of headphones (sold separately) connected to recharge the supplied rechargeable batteries. 9 En Before you start 01 Controls and displays Transmitter (top) English 1 STANDBY/ON button...
Owner's Manual
Page 12
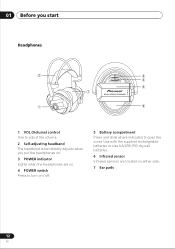
01 Before you start Headphones 1 VOL (Volume) control Use to open the cover. Use with the supplied rechargeable batteries or size AA/LR6 (R6) dry-cell batteries. 6 Infrared sensor Infrared sensors are on. 4 POWER switch Press to turn on / off. 5 Battery compartment Press and slide where indicated to adjust the volume. 2 Self-adjusting headband The headband automatically adjusts when you put the headphones on. 3 POWER indicator Lights when the headphones are located on either side. 7 Ear pads 12 En
01 Before you start Headphones 1 VOL (Volume) control Use to open the cover. Use with the supplied rechargeable batteries or size AA/LR6 (R6) dry-cell batteries. 6 Infrared sensor Infrared sensors are on. 4 POWER switch Press to turn on / off. 5 Battery compartment Press and slide where indicated to adjust the volume. 2 Self-adjusting headband The headband automatically adjusts when you put the headphones on. 3 POWER indicator Lights when the headphones are located on either side. 7 Ear pads 12 En
Owner's Manual
Page 20
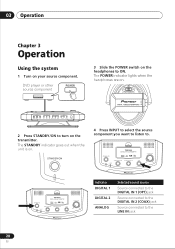
...POWER indicator lights when the headphones are on. 2 Press STANDBY/ON to the LINE IN jack 20 En Indicator DIGITAL 1 DIGITAL 2 ANALOG Selected sound source Source connected to the DIGITAL IN 1 (OPT) jack Source connected to the DIGITAL IN 2 (COAX) jack Source connected to turn on . 4 Press ...INPUT to select the source component you want to listen to ON. 03 Operation Chapter 3 Operation Using the system 1 Turn on the headphones to . The STANDBY indicator goes out when the unit is on the ...
...POWER indicator lights when the headphones are on. 2 Press STANDBY/ON to the LINE IN jack 20 En Indicator DIGITAL 1 DIGITAL 2 ANALOG Selected sound source Source connected to the DIGITAL IN 1 (OPT) jack Source connected to the DIGITAL IN 2 (COAX) jack Source connected to turn on . 4 Press ...INPUT to select the source component you want to listen to ON. 03 Operation Chapter 3 Operation Using the system 1 Turn on the headphones to . The STANDBY indicator goes out when the unit is on the ...

Owner's Manual
Page 24
...DTS. Should any problems using this headphone system, refer to analog. Symptom Cause and remedy No sound. ! Turn on . ! Use the headphones nearer to the transmitter, or change the connection to the following checklist. The headphones are playing back a DVD disc recorded... to direct sunlight. Raise the headphone volume. ! Batteries are no obstacles between the transmitter and headphones. 04 Additional information Chapter 4 Additional information Troubleshooting If you run into any problem persist, consult your nearest Pioneer service center or your hands and...
...DTS. Should any problems using this headphone system, refer to analog. Symptom Cause and remedy No sound. ! Turn on . ! Use the headphones nearer to the transmitter, or change the connection to the following checklist. The headphones are playing back a DVD disc recorded... to direct sunlight. Raise the headphone volume. ! Batteries are no obstacles between the transmitter and headphones. 04 Additional information Chapter 4 Additional information Troubleshooting If you run into any problem persist, consult your nearest Pioneer service center or your hands and...

Owner's Manual
Page 26
... extremely hightemperature locations. - If something is wrong with the product, or if a foreign object gets inside the unit, immediately turn off the power and consult your nearest Pioneer service center. ! Cleaning Use a soft and dry cloth for an extended period can result in any of the ear pad ...If you are not going to use the system for a long time, unplug the AC power adaptor from the headphones when listening at high volume for cleaning. When taking the system to Pioneer service center, be careful not to set the volume too high, especially when listening in a car with all...
... extremely hightemperature locations. - If something is wrong with the product, or if a foreign object gets inside the unit, immediately turn off the power and consult your nearest Pioneer service center. ! Cleaning Use a soft and dry cloth for an extended period can result in any of the ear pad ...If you are not going to use the system for a long time, unplug the AC power adaptor from the headphones when listening at high volume for cleaning. When taking the system to Pioneer service center, be careful not to set the volume too high, especially when listening in a car with all...