
Owner's Manual
Page 4
... them in a safe place for future reference. Contents 01 Before you start Checking what's in the box 5 Inserting the battery 5 Cleaning the unit 5 Range of the remote control unit 6 Regarding interference with this Pioneer product. Please read through these operating instructions so that ...Top and front panel 7 Rear panel 7 03 Connecting up Connecting the system to your AV receiver or TV 8 04 Getting started iPod playback features 9 Using the on-screen display 10 05 Additional information Troubleshooting 11 Specifications 11 Register your product at www.pioneerelectronics.com ...
... them in a safe place for future reference. Contents 01 Before you start Checking what's in the box 5 Inserting the battery 5 Cleaning the unit 5 Range of the remote control unit 6 Regarding interference with this Pioneer product. Please read through these operating instructions so that ...Top and front panel 7 Rear panel 7 03 Connecting up Connecting the system to your AV receiver or TV 8 04 Getting started iPod playback features 9 Using the on-screen display 10 05 Additional information Troubleshooting 11 Specifications 11 Register your product at www.pioneerelectronics.com ...
Owner's Manual
Page 5
Caution When using lithium batteries, please observe the following supplied accessories: • Remote control • Lithium battery (CR2025) • iPod type adapter x6 • AC adapter • Audio cable (2 m / 6.6 ft.) red/white • Video cable (2 m / 6.6 ft.) yellow • SR cable (2 m / 6.6 ...manufacturer. • Do not use thinners, benzine, insecticide sprays or other excessively hot place, such as shown right. Before you start 01 English Deutsch Français Italiano Nederlands Español Chapter 1 Before you start Checking what's in the box Please check that ...
Caution When using lithium batteries, please observe the following supplied accessories: • Remote control • Lithium battery (CR2025) • iPod type adapter x6 • AC adapter • Audio cable (2 m / 6.6 ft.) red/white • Video cable (2 m / 6.6 ft.) yellow • SR cable (2 m / 6.6 ...manufacturer. • Do not use thinners, benzine, insecticide sprays or other excessively hot place, such as shown right. Before you start 01 English Deutsch Français Italiano Nederlands Español Chapter 1 Before you start Checking what's in the box Please check that ...

Owner's Manual
Page 6
...; When using fifth generation iPod models with this system, please use the iPod type adapter supplied with Dock Connector' available for purchase from an original iPod dock. • When using a third generation iPod model with this system, please use an 'Apple iPod Universal Dock adapter 3-pack for iPod with your model of about 7 meters (23 feet). 01 Before you will result...
...; When using fifth generation iPod models with this system, please use the iPod type adapter supplied with Dock Connector' available for purchase from an original iPod dock. • When using a third generation iPod model with this system, please use an 'Apple iPod Universal Dock adapter 3-pack for iPod with your model of about 7 meters (23 feet). 01 Before you will result...
Owner's Manual
Page 7
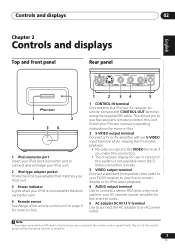
...) video cable to your TV/AV receiver to view the on-screen display or for iPod video playback. 4 AUDIO output terminal Use to connect a stereo RCA/phono terminal cable to your iPod is connected to the dock connector port. 4 Remote sensor See Range of the remote control unit on page 6 for... two-channel audio. 5 AC adapter DC IN 12 V terminal Use to connect the AC adapter to control this unit at the remote sensor of the connected receiver or amplifier. 7 En Check your Pioneer...
...) video cable to your TV/AV receiver to view the on-screen display or for iPod video playback. 4 AUDIO output terminal Use to connect a stereo RCA/phono terminal cable to your iPod is connected to the dock connector port. 4 Remote sensor See Range of the remote control unit on page 6 for... two-channel audio. 5 AC adapter DC IN 12 V terminal Use to connect the AC adapter to control this unit at the remote sensor of the connected receiver or amplifier. 7 En Check your Pioneer...
Owner's Manual
Page 8
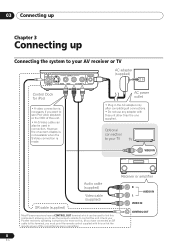
Optional connection to your TV TV VIDEO IN Audio cable (supplied) Video cable (supplied) SR cable (supplied) Most Pioneer receivers have connected an SR cable to this terminal, you to use any adapter with this unit at the remote sensor of this unit. • ... or TV IN OUTPUT DC IN 12 V AC adapter (supplied) CONTROL S - VIDEO VIDEO R AUDIO L Control Dock for more on -screen display is not available when the S-Video connection is necessary if you want to see iPod video playback or the OSD of the connected receiver or amplifier.) Receiver or amplifier R AUDIO IN...
Optional connection to your TV TV VIDEO IN Audio cable (supplied) Video cable (supplied) SR cable (supplied) Most Pioneer receivers have connected an SR cable to this terminal, you to use any adapter with this unit at the remote sensor of this unit. • ... or TV IN OUTPUT DC IN 12 V AC adapter (supplied) CONTROL S - VIDEO VIDEO R AUDIO L Control Dock for more on -screen display is not available when the S-Video connection is necessary if you want to see iPod video playback or the OSD of the connected receiver or amplifier.) Receiver or amplifier R AUDIO IN...

Owner's Manual
Page 9
To use your TV or monitor. 3 Start playback. Check the table in Basic remote controls below for an introduction to your iPod dock. 1 Place your AV receiver (or power amplifier). Press and hold during playback to the previous/next song. Shuffle Press repeatedly to switch between ...on the video component to which you have connected. Follow the steps below for more on this ). 2 Select the proper input on your iPod into the dock connector port. Make sure you have connected everything, you're ready to starting watching videos and listening to music. Returns to move the cursor...
To use your TV or monitor. 3 Start playback. Check the table in Basic remote controls below for an introduction to your iPod dock. 1 Place your AV receiver (or power amplifier). Press and hold during playback to the previous/next song. Shuffle Press repeatedly to switch between ...on the video component to which you have connected. Follow the steps below for more on this ). 2 Select the proper input on your iPod into the dock connector port. Make sure you have connected everything, you're ready to starting watching videos and listening to music. Returns to move the cursor...
Owner's Manual
Page 10
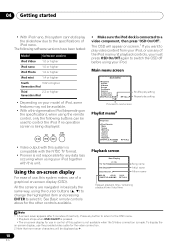
...On/Off • Video output with this system is compatible with the NTSC TV format. • Pioneer is not responsible for the other controls available. • Make sure the iPod dock is made. Main menu screen MAIN MENU >Playlists Artists Albums Songs Podcasts Genres Composers Audiobooks SHUFFLE:ALBUMS... (1/8) R P T: A L L Shuffle play setting Repeat play video content from your iPod together with this system is not ...
...On/Off • Video output with this system is compatible with the NTSC TV format. • Pioneer is not responsible for the other controls available. • Make sure the iPod dock is made. Main menu screen MAIN MENU >Playlists Artists Albums Songs Podcasts Genres Composers Audiobooks SHUFFLE:ALBUMS... (1/8) R P T: A L L Shuffle play setting Repeat play video content from your iPod together with this system is not ...
Owner's Manual
Page 11
... without notice, due to carry out repair work. The on -screen display, use in another component. Published by Pioneer Corporation. Additional information 05 English Deutsch Français Italiano Nederlands Español Chapter 5 Additional information Troubleshooting Incorrect ... the supplied adapter DC 12 V Dimensions. . . . . 99 mm (W) x 33 mm (H) x 74 mm (D) 3.9 in. (W) x 1.3 in. (H) x 2.9 in the iPod connector dock. • Make sure you are often mistaken for the video connection. Problem Remedy No sound/no picture. • Make sure your dealer to improvements. All...
... without notice, due to carry out repair work. The on -screen display, use in another component. Published by Pioneer Corporation. Additional information 05 English Deutsch Français Italiano Nederlands Español Chapter 5 Additional information Troubleshooting Incorrect ... the supplied adapter DC 12 V Dimensions. . . . . 99 mm (W) x 33 mm (H) x 74 mm (D) 3.9 in. (W) x 1.3 in. (H) x 2.9 in the iPod connector dock. • Make sure you are often mistaken for the video connection. Problem Remedy No sound/no picture. • Make sure your dealer to improvements. All...