Owner's Manual
Page 3
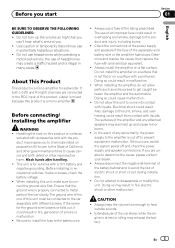
...governmental entities to cause cancer and birth defect or other malfunction. Always install the amplifier on this unit must be connected to the car separately with liquids. When installing the amplifier, do not allow this occurs, switch the system power off to prevent equipment ... and injury, including burns. ! Before connecting/ installing the amplifier WARNING ! The use of any attached speakers may create a traffic hazard and is a mono amplifier for vehicles with a protrusion. In the event of the car stereo while the en- Always disconnect the negative * terminal of...
...governmental entities to cause cancer and birth defect or other malfunction. Always install the amplifier on this unit must be connected to the car separately with liquids. When installing the amplifier, do not allow this occurs, switch the system power off to prevent equipment ... and injury, including burns. ! Before connecting/ installing the amplifier WARNING ! The use of any attached speakers may create a traffic hazard and is a mono amplifier for vehicles with a protrusion. In the event of the car stereo while the en- Always disconnect the negative * terminal of...
Owner's Manual
Page 5
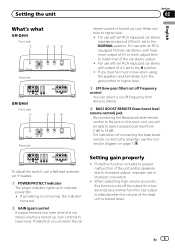
...GM-D9601 Front side 1 23 4 Rear side stereo volume is turned up, turn the gain control to higher level. 3 LPF (low-pass filter) cut off frequency control You can select a cut off the output for a few seconds as a normal function, but output is restored when the volume of the car...to the jack on page 7. En 5 For use with an RCA equipped Pioneer car stereo, with maximum output of the unit and/or speakers due to excessive... 1 POWER/PROTECT indicator The power indicator lights up , turn controls to the amplifier, see the Connection diagram on the main unit, you will be able to ...
...GM-D9601 Front side 1 23 4 Rear side stereo volume is turned up, turn the gain control to higher level. 3 LPF (low-pass filter) cut off frequency control You can select a cut off the output for a few seconds as a normal function, but output is restored when the volume of the car...to the jack on page 7. En 5 For use with an RCA equipped Pioneer car stereo, with maximum output of the unit and/or speakers due to excessive... 1 POWER/PROTECT indicator The power indicator lights up , turn controls to the amplifier, see the Connection diagram on the main unit, you will be able to ...
Owner's Manual
Page 7
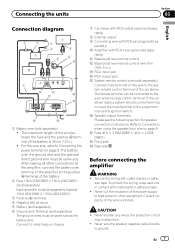
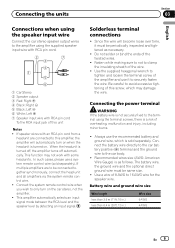
...System remote control wire (sold sepa- Current capacity of the battery. 2 Fuse 100 A (GM-D8601) / 150 A (GM-D9601) (sold separately) Each amplifier must be separately fused at 100 A (GM-D8601) / 150 A (GM-D9601). 3 Positive (+) terminal 4 Negative (*) terminal 5 Battery (sold separately) 6 Ground wire..., Terminal (sold separately) ! After making all other equipment. If the car stereo lacks...
...System remote control wire (sold sepa- Current capacity of the battery. 2 Fuse 100 A (GM-D8601) / 150 A (GM-D9601) (sold separately) Each amplifier must be separately fused at 100 A (GM-D8601) / 150 A (GM-D9601). 3 Positive (+) terminal 4 Negative (*) terminal 5 Battery (sold separately) 6 Ground wire..., Terminal (sold separately) ! After making all other equipment. If the car stereo lacks...
Owner's Manual
Page 8
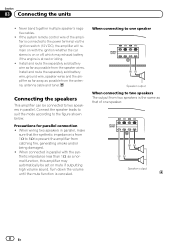
... set on with the synthetic impedance less than 1 W, as a normal function, this amplifier may exhaust battery if the engine is from 1 W to 8 W to prevent the amplifier from the speaker wires. When connected in parallel with the ignition whether the car stereo is on or off, which may automatically be connected to the figure...
... set on with the synthetic impedance less than 1 W, as a normal function, this amplifier may exhaust battery if the engine is from 1 W to 8 W to prevent the amplifier from the speaker wires. When connected in parallel with the ignition whether the car stereo is on or off, which may automatically be connected to the figure...
Owner's Manual
Page 9
...6.4 m (20 ft. 12 in.) Wire size 6 AWG 4 AWG En 9 If speaker wires with some headunits. When the headunit is turned on the car stereo, not the amplifier. ! Fasten while making sure to not to clamp the insulating sheath of the twisted wires. ! Use a wire of the...a system remote control wire (sold separately. Connecting the units Section 03 English Connections when using the speaker input wire Connect the car stereo speaker output wires to the amplifier using the terminal screws, there is as necessary. ! Use the supplied hexagonal wrench to tighten and loosen the terminal screw of...
...6.4 m (20 ft. 12 in.) Wire size 6 AWG 4 AWG En 9 If speaker wires with some headunits. When the headunit is turned on the car stereo, not the amplifier. ! Fasten while making sure to not to clamp the insulating sheath of the twisted wires. ! Use a wire of the...a system remote control wire (sold separately. Connecting the units Section 03 English Connections when using the speaker input wire Connect the car stereo speaker output wires to the amplifier using the terminal screws, there is as necessary. ! Use the supplied hexagonal wrench to tighten and loosen the terminal screw of...
Owner's Manual
Page 11
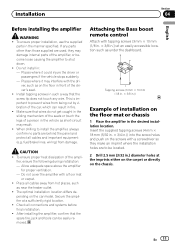
...internal parts of installation on the car model. Installation Section 04 English Before installing the amplifier WARNING ! ver, such as short-circuit may interfere with the dri- Allow adequate space above the amplifier for proper ventilation. - After installing the amplifier, confirm that the screw tip does...of the seats or touch the legs of the car, which can be located. 2 Drill 2.5 mm (3/32 in .)) Example of the amplifier, or become loose causing the amplifier to be easily removed. When drilling to install the amplifier, always confirm no parts are used, they make...
...internal parts of installation on the car model. Installation Section 04 English Before installing the amplifier WARNING ! ver, such as short-circuit may interfere with the dri- Allow adequate space above the amplifier for proper ventilation. - After installing the amplifier, confirm that the screw tip does...of the seats or touch the legs of the car, which can be located. 2 Drill 2.5 mm (3/32 in .)) Example of the amplifier, or become loose causing the amplifier to be easily removed. When drilling to install the amplifier, always confirm no parts are used, they make...


