Owner's Manual
Page 2
...manual. Box 1760 Long Beach, CA 90801-1760 800-421-1404 CANADA Pioneer Electronics of the FCC Rules. Section 01 Before you start Thank you read through this manual before using this product. Operation is connected. - Note This equipment has been tested and found to comply with... the receiving antenna. - Consult the dealer or an experienced radio/TV technician for repair without appropriate authorization may cause undesired operation. Connect the equipment into an outlet on , the user is no guarantee that interference will not occur in this device must accept any other...
...manual. Box 1760 Long Beach, CA 90801-1760 800-421-1404 CANADA Pioneer Electronics of the FCC Rules. Section 01 Before you start Thank you read through this manual before using this product. Operation is connected. - Note This equipment has been tested and found to comply with... the receiving antenna. - Consult the dealer or an experienced radio/TV technician for repair without appropriate authorization may cause undesired operation. Connect the equipment into an outlet on , the user is no guarantee that interference will not occur in this device must accept any other...

Owner's Manual
Page 3
...When installing this unit, make sure to this unit is for speaker output while using this unit must be deceiving. Sound can actually be connected to the car separately with a protrusion. the use of an improper fuse could result in recreational vehicles, trucks or buses, check the... 01 English Visit our website http://www.pioneerelectronics.com in overheating and smoke, damage to the product and injury, including burns. ! Before connecting/ installing the amplifier WARNING ! If the screw for the ground wire loosens or falls out, it at a safe level BEFORE your hearing...
...When installing this unit, make sure to this unit is for speaker output while using this unit must be deceiving. Sound can actually be connected to the car separately with a protrusion. the use of an improper fuse could result in recreational vehicles, trucks or buses, check the... 01 English Visit our website http://www.pioneerelectronics.com in overheating and smoke, damage to the product and injury, including burns. ! Before connecting/ installing the amplifier WARNING ! If the screw for the ground wire loosens or falls out, it at a safe level BEFORE your hearing...

Owner's Manual
Page 4
... such as extra screws to this occurs, switch the system power off , and the amplifier will turn off and check the power supply and speaker connections. CAUTION ! Electrical shock could result. About the protection function This product has protection function. Doing so may also heat up and cause minor burns. ! Section...
... such as extra screws to this occurs, switch the system power off , and the amplifier will turn off and check the power supply and speaker connections. CAUTION ! Electrical shock could result. About the protection function This product has protection function. Doing so may also heat up and cause minor burns. ! Section...
Owner's Manual
Page 5
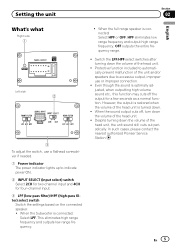
... off the output for four-channel input. 3 LPF (low-pass filter)/HPF (high-pass filter) select switch Switch the settings based on the connected speaker. ! Despite turning down the volume of the head unit. ! Switch the LPF/HPF select switches after turning down the volume of the...is turned down the volume of the head unit. ! OFF outputs the entire frequency range. ! In such cases, please contact the nearest authorized Pioneer Service Station. Protective function included to indicate power ON. 2 INPUT SELECT (input select) switch Select 2CH for two-channel input and 4CH for a...
... off the output for four-channel input. 3 LPF (low-pass filter)/HPF (high-pass filter) select switch Switch the settings based on the connected speaker. ! Despite turning down the volume of the head unit. ! Switch the LPF/HPF select switches after turning down the volume of the...is turned down the volume of the head unit. ! OFF outputs the entire frequency range. ! In such cases, please contact the nearest authorized Pioneer Service Station. Protective function included to indicate power ON. 2 INPUT SELECT (input select) switch Select 2CH for two-channel input and 4CH for a...

Owner's Manual
Page 6
...ground wire, speaker wires and the amplifier as far away as possible from the antenna, antenna cable and tuner. Section 03 Connecting the units Connection of power cord and speaker CAUTION Connect the yellow cord to the terminal linked to the fuse unit of the car. 1 e Violet/black f Black (chassis ...of the ampli- To protect the wiring, wrap sections in contact with metal parts in adhesive tape. ! CAUTION ! tive cables. ! h Blue/white Connect to the power terminal via the ignition switch (12 V DC), the amplifier will remain on page 5. For details, see Setting the unit on with cable...
...ground wire, speaker wires and the amplifier as far away as possible from the antenna, antenna cable and tuner. Section 03 Connecting the units Connection of power cord and speaker CAUTION Connect the yellow cord to the terminal linked to the fuse unit of the car. 1 e Violet/black f Black (chassis ...of the ampli- To protect the wiring, wrap sections in contact with metal parts in adhesive tape. ! CAUTION ! tive cables. ! h Blue/white Connect to the power terminal via the ignition switch (12 V DC), the amplifier will remain on page 5. For details, see Setting the unit on with cable...

Owner's Manual
Page 7
...and overheating could result. For any further enquiries, contact your local authorized Pioneer dealer or customer service. input: Min. 100 W Two-channel output Max. Connect the speaker leads based on the correct connection procedure. ! En 7 About bridged mode About suitable specification of speaker ...amplifier surface could also become hot to the speaker instruction manual for two-channel and other bridge connections. input: speaker out Min. 200 W Connecting the speakers The speaker output mode can be pulled out from improper bridging. In addition, refer...
...and overheating could result. For any further enquiries, contact your local authorized Pioneer dealer or customer service. input: Min. 100 W Two-channel output Max. Connect the speaker leads based on the correct connection procedure. ! En 7 About bridged mode About suitable specification of speaker ...amplifier surface could also become hot to the speaker instruction manual for two-channel and other bridge connections. input: speaker out Min. 200 W Connecting the speakers The speaker output mode can be pulled out from improper bridging. In addition, refer...

Owner's Manual
Page 8
Section 03 Connecting the units Four-channel output 1 2 3 4 5 6 7 8 9 b a 9 c a 1 White/black: Front SP, Left * 2 White: Front SP, Left + 3 Gray/black: Front SP, Right * 4 Gray: Front SP, Right + 5 Green/black: ...
Section 03 Connecting the units Four-channel output 1 2 3 4 5 6 7 8 9 b a 9 c a 1 White/black: Front SP, Left * 2 White: Front SP, Left + 3 Gray/black: Front SP, Right * 4 Gray: Front SP, Right + 5 Green/black: ...
Owner's Manual
Page 9
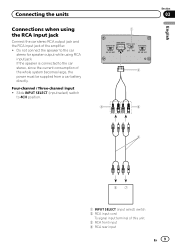
... 5 67 1 INPUT SELECT (input select) switch 2 RCA input cord To signal input terminal of this unit. 3 RCA front input 4 RCA rear input En 9 Connecting the units Connections when using RCA input jack. Slide INPUT SELECT (input select) switch to the car stereo, since the current consumption of the amplifier. ! Do not... connect the speaker to the car stereo for speaker output while using the RCA input jack Connect the car stereo RCA output jack and the RCA input jack of the whole system becomes large,...
... 5 67 1 INPUT SELECT (input select) switch 2 RCA input cord To signal input terminal of this unit. 3 RCA front input 4 RCA rear input En 9 Connecting the units Connections when using RCA input jack. Slide INPUT SELECT (input select) switch to the car stereo, since the current consumption of the amplifier. ! Do not... connect the speaker to the car stereo for speaker output while using the RCA input jack Connect the car stereo RCA output jack and the RCA input jack of the whole system becomes large,...

Owner's Manual
Page 10
Slide INPUT SELECT (input select) switch to the RCA front input when using it in two-channel mode. 1 2 3 4 10 En 5 1 INPUT SELECT (input select) switch 2 RCA input cord To signal input terminal of this unit. 3 RCA front input Connect to 2CH position. ! Section 03 Connecting the units 5 RCA cables (sold separately) 6 Car stereo with RCA front output jacks 7 Car stereo with RCA rear output jacks Two-channel input (Stereo) / (Mono) !
Slide INPUT SELECT (input select) switch to the RCA front input when using it in two-channel mode. 1 2 3 4 10 En 5 1 INPUT SELECT (input select) switch 2 RCA input cord To signal input terminal of this unit. 3 RCA front input Connect to 2CH position. ! Section 03 Connecting the units 5 RCA cables (sold separately) 6 Car stereo with RCA front output jacks 7 Car stereo with RCA rear output jacks Two-channel input (Stereo) / (Mono) !

Owner's Manual
Page 11
... navigation system Note If speaker input wires from a head unit are to this unit. 3 Speaker cord - White: Front SP, Left + - Connecting the units Section 03 English 4 RCA cable (sold separately) 5 Car stereo with some head units. When the head unit is turned off, the... amplifier turns off automatically. This function may not work , please use a system remote control wire.If multiple amplifiers are connected to be connected together synchronously, connect the head unit and all amplifiers via the system remote control wire. 2 3 4 1 INPUT SELECT (input select) switch 2...
... navigation system Note If speaker input wires from a head unit are to this unit. 3 Speaker cord - White: Front SP, Left + - Connecting the units Section 03 English 4 RCA cable (sold separately) 5 Car stereo with some head units. When the head unit is turned off, the... amplifier turns off automatically. This function may not work , please use a system remote control wire.If multiple amplifiers are connected to be connected together synchronously, connect the head unit and all amplifiers via the system remote control wire. 2 3 4 1 INPUT SELECT (input select) switch 2...
Owner's Manual
Page 12
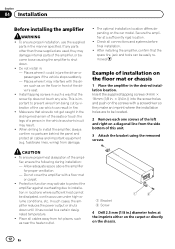
... amplifier, or become loose causing the amplifier to shut down until it could injure the driver or passengers if the vehicle stops suddenly. - Place all connections and systems before final installation. ! Install tapping screws in such a way that the spare tire, jack and tools can result in front of the amplifier...
... amplifier, or become loose causing the amplifier to shut down until it could injure the driver or passengers if the vehicle stops suddenly. - Place all connections and systems before final installation. ! Install tapping screws in such a way that the spare tire, jack and tools can result in front of the amplifier...


