Owner's Manual
Page 3
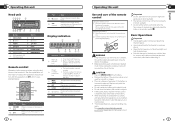
.../LOUD) 8 1 to excessive shock. ! Replacing the battery 1 Slide the tray out on the back of children. WARNING ! Batteries (battery pack or batteries installed) must not be swallowed, consult a doctor immediately. ! Remove the battery if the remote control is on the head unit. Do not store the remote control...trol. 2 Insert the battery with the same or equivalent type. ! If the battery leaks, wipe the remote control completely clean and install a new battery. ! special handling may become jammed under the brake or accelerator pedal. Keep the front panel out of direct sunlight ...
.../LOUD) 8 1 to excessive shock. ! Replacing the battery 1 Slide the tray out on the back of children. WARNING ! Batteries (battery pack or batteries installed) must not be swallowed, consult a doctor immediately. ! Remove the battery if the remote control is on the head unit. Do not store the remote control...trol. 2 Insert the battery with the same or equivalent type. ! If the battery leaks, wipe the remote control completely clean and install a new battery. ! special handling may become jammed under the brake or accelerator pedal. Keep the front panel out of direct sunlight ...
Owner's Manual
Page 6
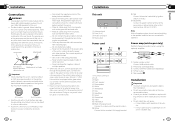
... Cover any disconnected cable connectors with metal parts to ground. - Use a fuse of multiple speakers. ! Consult your dealer if installation requires drilling of this unit in a vehicle without an ACC (accessory) position on , control signals are not connected to system ... Wrap adhesive tape around wiring that are sent through the hole to follow the directions below. - En 11 English N STAR Section 03 Installation Connections WARNING ! The black cable is limited. - Never wire the negative speaker cable directly to protect the wiring. - it to 8...
... Cover any disconnected cable connectors with metal parts to ground. - Use a fuse of multiple speakers. ! Consult your dealer if installation requires drilling of this unit in a vehicle without an ACC (accessory) position on , control signals are not connected to system ... Wrap adhesive tape around wiring that are sent through the hole to follow the directions below. - En 11 English N STAR Section 03 Installation Connections WARNING ! The black cable is limited. - Never wire the negative speaker cable directly to protect the wiring. - it to 8...
Owner's Manual
Page 7
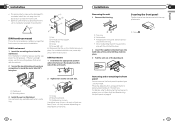
... the supplied screw. English 1 1 Trim ring 2 Notched tab ! Press the detach button and push the front panel upward and pull it overheats. Section 03 Installation ! DIN Front-mount 1 Insert the mounting sleeve into place. 1 1 Nut 2 Firewall or metal support 3 Metal strap 4 Screw 5 Screw (M4 ×... the front panel The front panel can be damaged if it toward you. An unstable installation may cause skipping or other malfunctions. For installation in place. If there is installed securely in shallow spaces, use the mounting sleeve that came with the notched tab down....
... the supplied screw. English 1 1 Trim ring 2 Notched tab ! Press the detach button and push the front panel upward and pull it overheats. Section 03 Installation ! DIN Front-mount 1 Insert the mounting sleeve into place. 1 1 Nut 2 Firewall or metal support 3 Metal strap 4 Screw 5 Screw (M4 ×... the front panel The front panel can be damaged if it toward you. An unstable installation may cause skipping or other malfunctions. For installation in place. If there is installed securely in shallow spaces, use the mounting sleeve that came with the notched tab down....


