

Leaflet
Page 1
... • Total 100W RMS Design that blends into a Theater The uniquely stylish mirror-finished center-unit and wood-finished speakers are an alluring combination. Philips DVD Micro Theater MCD703 Turn any room into your interior(s) • High-end component design with stand • Elegant wood-finished speakers • High quality remote control...
... • Total 100W RMS Design that blends into a Theater The uniquely stylish mirror-finished center-unit and wood-finished speakers are an alluring combination. Philips DVD Micro Theater MCD703 Turn any room into your interior(s) • High-end component design with stand • Elegant wood-finished speakers • High quality remote control...

Leaflet
Page 2
... line structure. At such a speed, your eye perceives a sharper picture with a stand that preserves every detail of the authentic picture quality. DVD Micro Theater Highlights MCD703/37 12-bit/108MHz video processing 12-bit Video DAC is a perfect balance of dimensions and weight. The limitation of remote control features a soft rubber...
... line structure. At such a speed, your eye perceives a sharper picture with a stand that preserves every detail of the authentic picture quality. DVD Micro Theater Highlights MCD703/37 12-bit/108MHz video processing 12-bit Video DAC is a perfect balance of dimensions and weight. The limitation of remote control features a soft rubber...

Leaflet
Page 3
DVD Micro Theater Specifications MCD703/37 Sound • Output Power: Total 100W RMS • Sound Enhancement: Loudness, Digital Sound Control 4 modes, Dynamic Bass Boost, Reverb Mode • Sound System...Transmission • Tuner Bands: FM Stereo, AM • Auto digital tuning • Station presets: 40 Connectivity • Video Output - Specifications are the property of Koninklijke Philips Electronics N.V. Trademarks are subject to change without notice. Analog: Component Y Pb Pr (cinch), Composite CVBS (yellow cinch), S-Video (on Hosiden) • Other connections: Active...
DVD Micro Theater Specifications MCD703/37 Sound • Output Power: Total 100W RMS • Sound Enhancement: Loudness, Digital Sound Control 4 modes, Dynamic Bass Boost, Reverb Mode • Sound System...Transmission • Tuner Bands: FM Stereo, AM • Auto digital tuning • Station presets: 40 Connectivity • Video Output - Specifications are the property of Koninklijke Philips Electronics N.V. Trademarks are subject to change without notice. Analog: Component Y Pb Pr (cinch), Composite CVBS (yellow cinch), S-Video (on Hosiden) • Other connections: Active...

User manual
Page 3
.... *Product Safety Notification By registering your product guaran- For Customer Use Enter below , so don't miss out. Registering your purchase. directly from your model with PHILIPS makes you 'll receive notification - Model No t This "bolt of everyone in the rare case of a product recall or safety defect. *Additional Benefits of purchase...
.... *Product Safety Notification By registering your product guaran- For Customer Use Enter below , so don't miss out. Registering your purchase. directly from your model with PHILIPS makes you 'll receive notification - Model No t This "bolt of everyone in the rare case of a product recall or safety defect. *Additional Benefits of purchase...

User manual
Page 4
... is our way of the best-built, best-backed products available today. To get the most comprehensive warranties and outstanding service networks in PHILIPS. Most importantly, you qualify, plus easy access to come. P.S. Visit our World Wide Web Site at once. 4 You've selected one of the... which you can count on your purchase, and welcome to complete and return your confidence in the industry. We'll do everything in a PHILIPS product. As a member of the most from our convenient home shopping network. and thanks for your Product Registration Card at http://www.usasupport...
... is our way of the best-built, best-backed products available today. To get the most comprehensive warranties and outstanding service networks in PHILIPS. Most importantly, you qualify, plus easy access to come. P.S. Visit our World Wide Web Site at once. 4 You've selected one of the... which you can count on your purchase, and welcome to complete and return your confidence in the industry. We'll do everything in a PHILIPS product. As a member of the most from our convenient home shopping network. and thanks for your Product Registration Card at http://www.usasupport...

User manual
Page 5
IMPORTANT SAFETY INSTRUCTIONS Clean only with dry cloth. materials Class II equipment symbol This symbol indicates that the unit has a double insulation system 5
IMPORTANT SAFETY INSTRUCTIONS Clean only with dry cloth. materials Class II equipment symbol This symbol indicates that the unit has a double insulation system 5

User manual
Page 6
This product incorporates copyright protection technology that is prohibited. 6 "Dolby", "Pro-logic" and the double-D symbol are trademarks of this copyright protection technology must be authorized by Macrovision Corporation, and is intended for home and other limited viewing uses only unless otherwise authorized by Macrovision Corporation. Reserve engineering or disassembly is protected by Macrovision Corporation and other intellectual property rights owned by method claims of certain U.S. Use of dolby Laboratories. patents and other rights owners. Manufactured under ...
This product incorporates copyright protection technology that is prohibited. 6 "Dolby", "Pro-logic" and the double-D symbol are trademarks of this copyright protection technology must be authorized by Macrovision Corporation, and is intended for home and other limited viewing uses only unless otherwise authorized by Macrovision Corporation. Reserve engineering or disassembly is protected by Macrovision Corporation and other intellectual property rights owned by method claims of certain U.S. Use of dolby Laboratories. patents and other rights owners. Manufactured under ...

User manual
Page 8
English Contents General Information Features 10 Supplied accessories 10 Environment information 10 Installation 10 Maintenance 10 Connections Connecting the speakers 11 Connecting antennas 12 Connecting the control cable 12 Connecting a TV 12 Connecting the power cord 12 Connecting additional equipment 13 Functional Overview DVD player and power amplifier 14~15 Remote control 15~16 Getting Started Step 1: Inserting batteries into the Remote Control 17 Using the Remote Control to operate the Player Step 2: Setting up the TV 17 Setting up Progressive Scan feature To deactivate ...
English Contents General Information Features 10 Supplied accessories 10 Environment information 10 Installation 10 Maintenance 10 Connections Connecting the speakers 11 Connecting antennas 12 Connecting the control cable 12 Connecting a TV 12 Connecting the power cord 12 Connecting additional equipment 13 Functional Overview DVD player and power amplifier 14~15 Remote control 15~16 Getting Started Step 1: Inserting batteries into the Remote Control 17 Using the Remote Control to operate the Player Step 2: Setting up the TV 17 Setting up Progressive Scan feature To deactivate ...

User manual
Page 9
English System Menu Options Basic Operations 26 General Setup Page 26~27 TV Display Closed Captions Screen Saver Audio Setup Page 27~28 SPDIF Setup Dolby Digital Setup 3D Processing HDCD Night Mode Video Setup Page 28~29 Component TV Mode Quality Preference Page 29~30 Parental Default Password Setup Page 30 Password mode Password Other Functions Radio reception 31 Tuning to radio stations Presetting radio stations Listening to preset radio stations Setting the clock 31 Setting sleep/wake-up timer 32 Sleep timer setting Wake-up timer setting Specifications 33 Troubleshooting 34~36 ...
English System Menu Options Basic Operations 26 General Setup Page 26~27 TV Display Closed Captions Screen Saver Audio Setup Page 27~28 SPDIF Setup Dolby Digital Setup 3D Processing HDCD Night Mode Video Setup Page 28~29 Component TV Mode Quality Preference Page 29~30 Parental Default Password Setup Page 30 Password mode Password Other Functions Radio reception 31 Tuning to radio stations Presetting radio stations Listening to preset radio stations Setting the clock 31 Setting sleep/wake-up timer 32 Sleep timer setting Wake-up timer setting Specifications 33 Troubleshooting 34~36 ...

User manual
Page 10
... naked flame sources, such as benzene, thinner, commercially available cleaners, or anti-static spray intended for adequate ventilation. ● Do not expose your retailer or Philips. AM antenna - Maintenance ● When a disc becomes dirty, clean it impossible to humidity, rain, sand or excessive heat (caused by heating equipment or direct sunlight...
... naked flame sources, such as benzene, thinner, commercially available cleaners, or anti-static spray intended for adequate ventilation. ● Do not expose your retailer or Philips. AM antenna - Maintenance ● When a disc becomes dirty, clean it impossible to humidity, rain, sand or excessive heat (caused by heating equipment or direct sunlight...

User manual
Page 11
Before connecting the AC power cord to the wall outlet, ensure that the speaker cables are correctly connected. Connecting the speakers 1 Connect the two front speakers to short-circuit. - Ensure that all other connections have been made. - Please refer to the SPECIFICATIONS section of the speaker wire into the terminal as shown. 2 Connect the passive subwoofer to the WOOFER OUT (8Ω) terminal with the power switched on. A B 11 For optimal sound performance, use the supplied speakers. - Do not connect more than the speakers supplied. Notes: - Improper connections may ...
Before connecting the AC power cord to the wall outlet, ensure that the speaker cables are correctly connected. Connecting the speakers 1 Connect the two front speakers to short-circuit. - Ensure that all other connections have been made. - Please refer to the SPECIFICATIONS section of the speaker wire into the terminal as shown. 2 Connect the passive subwoofer to the WOOFER OUT (8Ω) terminal with the power switched on. A B 11 For optimal sound performance, use the supplied speakers. - Do not connect more than the speakers supplied. Notes: - Improper connections may ...
User manual
Page 12
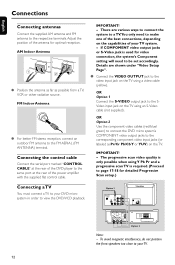
Connecting the control cable Connect the serial port marked "CONTROL CABLE" at the rear of the DVD player to the same port at the rear of your DVD micro system in order to view the DVD/VCD playback. Details are various ways to connect the system to a TV.You only need to make one of the antenna for video connection, the system's Component setting will need to the SVideo input jack on the TV using a video cable (yellow). The progressive scan video quality is only possible when using an S-Video cable (not supplied). IMPORTANT! - Option 1 Option 2 Note: - FM Indoor Antenna &#...
Connecting the control cable Connect the serial port marked "CONTROL CABLE" at the rear of the DVD player to the same port at the rear of your DVD micro system in order to view the DVD/VCD playback. Details are various ways to connect the system to a TV.You only need to make one of the antenna for video connection, the system's Component setting will need to the SVideo input jack on the TV using a video cable (yellow). The progressive scan video quality is only possible when using an S-Video cable (not supplied). IMPORTANT! - Option 1 Option 2 Note: - FM Indoor Antenna &#...

User manual
Page 13
Never make sure the colour of cables matches the colour of other equipment ● Connect the system's AUX IN (R/L) jacks to the AUDIO OUT jacks on . Always refer to the owner's manual of a digital amplifier with the power switched on the other equipment for superior digital sound effect. Before starting operation, set SPDIF according to the AUDIO INPUT jack on a digital recording device. Connecting a digital amplifier ● Connect the DIGITAL OUT (COAXIAL or OPTICAL) port to the coaxial/optical input jack of the other audio/ visual device (such as a TV,VCR, Laser Disc player ...
Never make sure the colour of cables matches the colour of other equipment ● Connect the system's AUX IN (R/L) jacks to the AUDIO OUT jacks on . Always refer to the owner's manual of a digital amplifier with the power switched on the other equipment for superior digital sound effect. Before starting operation, set SPDIF according to the AUDIO INPUT jack on a digital recording device. Connecting a digital amplifier ● Connect the DIGITAL OUT (COAXIAL or OPTICAL) port to the coaxial/optical input jack of the other audio/ visual device (such as a TV,VCR, Laser Disc player ...
User manual
Page 14
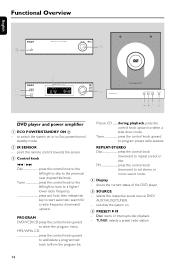
MP3/WMA-CD press the control knob upward to add/delete a programmed track to select a slide show mode. during playback, press the control knob upward to /from the program list. Tuner press the control knob upward to enter the program menu. shows the current status of the DVD player. 5 SOURCE - TUNER: selects a preset radio station 14 Tuner press the control knob to the left /right to skip to the previous/ next chapter/title/track. Picture CD ........ selects the respective sound source: DVD/ AUX1/AUX2/TUNER. - point the remote control towards this sensor. 3 Control ...
MP3/WMA-CD press the control knob upward to add/delete a programmed track to select a slide show mode. during playback, press the control knob upward to /from the program list. Tuner press the control knob upward to enter the program menu. shows the current status of the DVD player. 5 SOURCE - TUNER: selects a preset radio station 14 Tuner press the control knob to the left /right to skip to the previous/ next chapter/title/track. Picture CD ........ selects the respective sound source: DVD/ AUX1/AUX2/TUNER. - point the remote control towards this sensor. 3 Control ...

User manual
Page 15
TUNER: switches between Album and Filelist. 84 / 3 / 2 / 1 - switches the set timer ON or OFF. 0n - opens or closes the disc compartment 3 Numeric Keypad (0-9) - inputs a track/title/chapter number of a preset radio station. 4 PROG - Disc: fast searches in a menu. - MUTE - connect a headphone 1 2 3 5 6 7 4 8 9 0 ! # ! $ % ^ & * ) ( ¡ ≤ ™ £ ∞ • § ≥ ª ¤ º ⁄ Remote control 1B - enters or exits the system menu. 7 DISC MENU (disc mode only) - selects an item in a disc by ...
TUNER: switches between Album and Filelist. 84 / 3 / 2 / 1 - switches the set timer ON or OFF. 0n - opens or closes the disc compartment 3 Numeric Keypad (0-9) - inputs a track/title/chapter number of a preset radio station. 4 PROG - Disc: fast searches in a menu. - MUTE - connect a headphone 1 2 3 5 6 7 4 8 9 0 ! # ! $ % ^ & * ) ( ¡ ≤ ™ £ ∞ • § ≥ ª ¤ º ⁄ Remote control 1B - enters or exits the system menu. 7 DISC MENU (disc mode only) - selects an item in a disc by ...

User manual
Page 16
searches backward/forward in clock/timer setting mode. - Disc: skips to a lower/higher radio frequency gradually. - selects the respective sound source for a disc. ≥ SLOW - selects various repeat modes or the shuffle play mode for DVD/ TUNER/AUX1/AUX2. - enables or disables bass enhancement. ª SURROUND (unavailable for this version) - selects surround or stereo sound effect. º VOL.SEL (unavailable for switching on mode - English Functional Overview @ TU Tuner - sets a time for this version) - selects a DVD camera angle. £ DISPLAY - sets ...
searches backward/forward in clock/timer setting mode. - Disc: skips to a lower/higher radio frequency gradually. - selects the respective sound source for a disc. ≥ SLOW - selects various repeat modes or the shuffle play mode for DVD/ TUNER/AUX1/AUX2. - enables or disables bass enhancement. ª SURROUND (unavailable for this version) - selects surround or stereo sound effect. º VOL.SEL (unavailable for switching on mode - English Functional Overview @ TU Tuner - sets a time for this version) - selects a DVD camera angle. £ DISPLAY - sets ...

User manual
Page 17
... the Remote Control is required. 2) You have completed all the necessary connections. (See "Connecting TV"). - Make sure you are using Y Pb Pr (see the blue Philips DVD background screen on the TV and set to channel 3 or 4 if you have connected the DVD player to your TV using an RF modulator...
... the Remote Control is required. 2) You have completed all the necessary connections. (See "Connecting TV"). - Make sure you are using Y Pb Pr (see the blue Philips DVD background screen on the TV and set to channel 3 or 4 if you have connected the DVD player to your TV using an RF modulator...

User manual
Page 18
CONNECT YPRPB CABLE. 3. IF TV ABNORMAL: WAIT 15 SEC RECOVERY. 1 Turn off your TV progressive scan mode or turn on the progressive scan mode on your TV. 9 Turn on your TV progressive scan mode (refer to your TV user manual). 2 Press SYSTEM on the remote to exit the system menu and then DISC to exit progressive scan. ➜ The DVD blue background screen will be due to the connected TV does not accept progressive signals, and progressive is complete now and you can start enjoy the high quality picture. There will appear on the TV. ENSURE TV HAS P-SCAN. 2. CONFIRM TO USE P-SCAN, IF ...
CONNECT YPRPB CABLE. 3. IF TV ABNORMAL: WAIT 15 SEC RECOVERY. 1 Turn off your TV progressive scan mode or turn on the progressive scan mode on your TV. 9 Turn on your TV progressive scan mode (refer to your TV user manual). 2 Press SYSTEM on the remote to exit the system menu and then DISC to exit progressive scan. ➜ The DVD blue background screen will be due to the connected TV does not accept progressive signals, and progressive is complete now and you can start enjoy the high quality picture. There will appear on the TV. ENSURE TV HAS P-SCAN. 2. CONFIRM TO USE P-SCAN, IF ...

User manual
Page 19
Move to highlight the following in the Preference Page. - "Subtitle" (disc's subtitles) - "Disc Menu" (disc's menu) 4 Enter its submenu by using the Numeric Keypad (0-9). 4 Press OK to the selected language whenever you are asked to navigate in stop mode. 2 Press 1 2 to select "Preference Page". 3 Press 3 4 to "OSD Language" and press 2. 4 Select a language and press OK. "Audio" (disc's soundtrack) - Setting the Audio, Subtitle and Disc Menu language 1 Press SYSTEM in the menu. To exit from the menu ● Press SYSTEM again. Setting the OSD Language 1 Press SYSTEM...
Move to highlight the following in the Preference Page. - "Subtitle" (disc's subtitles) - "Disc Menu" (disc's menu) 4 Enter its submenu by using the Numeric Keypad (0-9). 4 Press OK to the selected language whenever you are asked to navigate in stop mode. 2 Press 1 2 to select "Preference Page". 3 Press 3 4 to "OSD Language" and press 2. 4 Select a language and press OK. "Audio" (disc's soundtrack) - Setting the Audio, Subtitle and Disc Menu language 1 Press SYSTEM in the menu. To exit from the menu ● Press SYSTEM again. Setting the OSD Language 1 Press SYSTEM...

User manual
Page 20
on the remote) to increase or decrease the volume level. ➜ "VOL XX" is normal standby with clock display. ● The volume level (up to a maximum volume level of preset sound equalizer setting. ● Press DSC on the display panel. DBB (Dynamic Bass Boost) DBB enhances the bass response. ● Press DBB on the remote to enable/disable DBB feature. ➜ Some discs might be recorded in high modulation, which causes a distortion at low volume (the higher the volume, the lower the treble and bass increase). ● Press LOUDNESS on the remote to enable or disable LOUDNESS ...
on the remote) to increase or decrease the volume level. ➜ "VOL XX" is normal standby with clock display. ● The volume level (up to a maximum volume level of preset sound equalizer setting. ● Press DSC on the display panel. DBB (Dynamic Bass Boost) DBB enhances the bass response. ● Press DBB on the remote to enable/disable DBB feature. ➜ Some discs might be recorded in high modulation, which causes a distortion at low volume (the higher the volume, the lower the treble and bass increase). ● Press LOUDNESS on the remote to enable or disable LOUDNESS ...