
Leaflet
Page 1
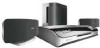
... and immerse yourself in movies and music in true resolution • Superwoofer with endless hours of your home. Philips DVD home theater system DivX Ultra HTS6500 The art of living with SonoWave Surround Sound Combining style and performance, this elegant and hassle-free system indulges you with 8" driver delivers a powerful performance Play it all • USB Direct plays photos and...
... and immerse yourself in movies and music in true resolution • Superwoofer with endless hours of your home. Philips DVD home theater system DivX Ultra HTS6500 The art of living with SonoWave Surround Sound Combining style and performance, this elegant and hassle-free system indulges you with 8" driver delivers a powerful performance Play it all • USB Direct plays photos and...

Leaflet
Page 2
... your Philips Home Theatre System while playing your favorite music from fewer speakers. MP3 Direct MP3 Direct uses plug n' play technology that provides multi-channel surround sound from your portable MP3 player. Now you 'll be fed to an HD display through HDMI (High-Definition Multimedia Interface). DVD home theater system DivX Ultra Highlights HTS6500/37 SonoWave The SonoWave surround sound system...
... your Philips Home Theatre System while playing your favorite music from fewer speakers. MP3 Direct MP3 Direct uses plug n' play technology that provides multi-channel surround sound from your portable MP3 player. Now you 'll be fed to an HD display through HDMI (High-Definition Multimedia Interface). DVD home theater system DivX Ultra Highlights HTS6500/37 SonoWave The SonoWave surround sound system...

User manual
Page 6
... ...9 Remote Control ...10-12 Using the remote control ...12 Connections Basic Connections ...13-18 Step 1 : Placing the speakers ...13 Step 2 : Connecting the SonoWave speakers and subwoofer 14 Step 3 : Connecting to TV ...15 Option 1: Using the Video (CVBS) jack (good picture quality 15 Option 2: Using the S-Video...an audio/video device 19 Mounting the speakers on the wall ...20 Basic Setup Getting Started ...21-25 Step 1: Turning on the DVD system ...21 Turning off to Eco Power standby mode 21 Step 2: Finding the correct viewing channel 21 Step 3: Setting language preferences ...22 On-...
... ...9 Remote Control ...10-12 Using the remote control ...12 Connections Basic Connections ...13-18 Step 1 : Placing the speakers ...13 Step 2 : Connecting the SonoWave speakers and subwoofer 14 Step 3 : Connecting to TV ...15 Option 1: Using the Video (CVBS) jack (good picture quality 15 Option 2: Using the S-Video...an audio/video device 19 Mounting the speakers on the wall ...20 Basic Setup Getting Started ...21-25 Step 1: Turning on the DVD system ...21 Turning off to Eco Power standby mode 21 Step 2: Finding the correct viewing channel 21 Step 3: Setting language preferences ...22 On-...
User manual
Page 8
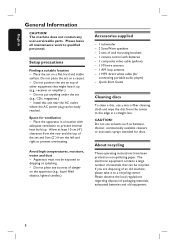
... white cable (for connecting portable audio player) - Do not put anything under the set on the apparatus (e.g., liquid filled objects, lighted candles.) Accessories supplied - 1 subwoofer - 2 SonoWave speakers - 2 sets of an old machine, please take it up . Quick Start Guide Cleaning discs To clean a disc, use solvents such as benzene, thinner, commercially...
... white cable (for connecting portable audio player) - Do not put anything under the set on the apparatus (e.g., liquid filled objects, lighted candles.) Accessories supplied - 1 subwoofer - 2 SonoWave speakers - 2 sets of an old machine, please take it up . Quick Start Guide Cleaning discs To clean a disc, use solvents such as benzene, thinner, commercially...

User manual
Page 9
... - j Disc slot 9 Exits an operation. - TUNER: press and hold this button to Eco Power standby mode. PREV . / NEXT > - f SonoWave - Phono input for connecting to search backward/forward. - TUNER: starts auto tuner installation for USB flash drive or USB memory card reader. Selects the relevant... predefined sound effect. Input for first time setup. DISC: selects a track or press and hold this button to the headphone out jack on the system or turns off to stereo mode. b PLAY PAUSE u - e VOLUME - Turns on . English 1 2 34 Top view Main Unit 56 7...
... - j Disc slot 9 Exits an operation. - TUNER: press and hold this button to Eco Power standby mode. PREV . / NEXT > - f SonoWave - Phono input for connecting to search backward/forward. - TUNER: starts auto tuner installation for USB flash drive or USB memory card reader. Selects the relevant... predefined sound effect. Input for first time setup. DISC: selects a track or press and hold this button to the headphone out jack on the system or turns off to stereo mode. b PLAY PAUSE u - e VOLUME - Turns on . English 1 2 34 Top view Main Unit 56 7...

User manual
Page 11
Selects a DVD subtitle language. For VCD/SVCD, enter digest menu. Confirms a selection. DISC: press and hold this button to enter SonoWave speaker settings mode. 11 Adjusts the volume level. DISC: starts programming. - Switches to tune the radio frequency up or down . - n SUBTITLE - For DVD, enter or ...
Selects a DVD subtitle language. For VCD/SVCD, enter digest menu. Confirms a selection. DISC: press and hold this button to enter SonoWave speaker settings mode. 11 Adjusts the volume level. DISC: starts programming. - Switches to tune the radio frequency up or down . - n SUBTITLE - For DVD, enter or ...

User manual
Page 13
...least one meter away from the TV and face straight ahead towards the listening area. Step 6: Setting the SonoWave speakers.' 13 However, proper system placement is critical to your room layout and provide the sound experience you enjoy. - Before you wish to...Place the subwoofer at an angle as it would reduce the system performance. - For SonoWave speakers setting, see section 'Optional Connections - Basic Connections English Step 1: Placing the speakers The Philips Home Theater System is simple to mount the SonoWave speakers on the wall.' Keep at the normal listening ear ...
...least one meter away from the TV and face straight ahead towards the listening area. Step 6: Setting the SonoWave speakers.' 13 However, proper system placement is critical to your room layout and provide the sound experience you enjoy. - Before you wish to...Place the subwoofer at an angle as it would reduce the system performance. - For SonoWave speakers setting, see section 'Optional Connections - Basic Connections English Step 1: Placing the speakers The Philips Home Theater System is simple to mount the SonoWave speakers on the wall.' Keep at the normal listening ear ...

User manual
Page 14
...Before making or changing any other radiation sources. - To prevent unwanted noise, do not place the SonoWave speakers too close to the matching speaker jacks at the rear of the DVD system. English Basic Connections (continued) SUBWOOFER FRONT RIGHT FRONT LEFT SUB- Helpful Hints: - FRONT FRONT WOOFER... FM/AM ANTENNA AM FM 75 Ensure this portion is fully inserted into the jack. Step 2: Connecting the SonoWave speakers and subwoofer Connect the SonoWave speakers to the DVD system, AC power adapter, TV or any connections, make sure that all the devices are disconnected from the power ...
...Before making or changing any other radiation sources. - To prevent unwanted noise, do not place the SonoWave speakers too close to the matching speaker jacks at the rear of the DVD system. English Basic Connections (continued) SUBWOOFER FRONT RIGHT FRONT LEFT SUB- Helpful Hints: - FRONT FRONT WOOFER... FM/AM ANTENNA AM FM 75 Ensure this portion is fully inserted into the jack. Step 2: Connecting the SonoWave speakers and subwoofer Connect the SonoWave speakers to the DVD system, AC power adapter, TV or any connections, make sure that all the devices are disconnected from the power ...

User manual
Page 25
... less than 1 meter (3' 5".) { DEFAULT } for distance between 1.5 meters (4' 7") to 2.5 meters (7' 7".) { FAR } for distance more than 2.5 meters (7' 7".) H The SonoWave speaker settings are three parameters to enter SonoWave speaker settings mode. There are now completed and the system will exit the setting automatically. B Use W X keys to select { SPEAKER DISTANCE } and press OK. D Use W X keys to...
... less than 1 meter (3' 5".) { DEFAULT } for distance between 1.5 meters (4' 7") to 2.5 meters (7' 7".) { FAR } for distance more than 2.5 meters (7' 7".) H The SonoWave speaker settings are three parameters to enter SonoWave speaker settings mode. There are now completed and the system will exit the setting automatically. B Use W X keys to select { SPEAKER DISTANCE } and press OK. D Use W X keys to...

User manual
Page 47
... (mm) (w x h x d) Weight: 7 kg DISC SECTION Laser Type Semiconductor Disc Diametre 12cm / 8cm Video Decoding MPEG-1 / MPEG-2 / / DivX 3/4/5/6, Ultra Video DAC 12 Bits Signal System PAL / NTSC Video Format 4:3 / 16:9 Video S/N 60 dB Composite Video Output 1.0 Vp-p, 75Ω S-Video Output Y - 1.0 Vp-p, 75... Consumption: 100 W Eco Standby power: < 1 W Dimensions: 340 x 70 x 330 (mm) (w x h x d) Weight: 3.5 kg SonoWave SPEAKERS System: Full range satellite closed- Digital In: 500 mV * (1% THD 1kHz) TUNER Tuning Range: FM 87.5-108 MHz (100kHz) AM 530-1700 kHz...
... (mm) (w x h x d) Weight: 7 kg DISC SECTION Laser Type Semiconductor Disc Diametre 12cm / 8cm Video Decoding MPEG-1 / MPEG-2 / / DivX 3/4/5/6, Ultra Video DAC 12 Bits Signal System PAL / NTSC Video Format 4:3 / 16:9 Video S/N 60 dB Composite Video Output 1.0 Vp-p, 75Ω S-Video Output Y - 1.0 Vp-p, 75... Consumption: 100 W Eco Standby power: < 1 W Dimensions: 340 x 70 x 330 (mm) (w x h x d) Weight: 3.5 kg SonoWave SPEAKERS System: Full range satellite closed- Digital In: 500 mV * (1% THD 1kHz) TUNER Tuning Range: FM 87.5-108 MHz (100kHz) AM 530-1700 kHz...

Quick start guide
Page 1
.... B Plug in to the AUDIO output jacks on this portion is fully inserted in the power cables from TV to DVD system (optional) To hear the TV audio through this home theater system, use the red and white audio cables (not supplied) to connect the TV IN (R/L) jacks on the TV. ROOM ACOUSTICS ...A FM/AM ANTENNA AM FM 75 SUB- B Unfold the AM/MW loop antenna and fix the claw into the AM/MW jacks. 2 Set up the SonoWave speakers A Press and hold SOUND on the remote control to select the correct viewing channel for the correct viewing channel, press the Channel Down button...
.... B Plug in to the AUDIO output jacks on this portion is fully inserted in the power cables from TV to DVD system (optional) To hear the TV audio through this home theater system, use the red and white audio cables (not supplied) to connect the TV IN (R/L) jacks on the TV. ROOM ACOUSTICS ...A FM/AM ANTENNA AM FM 75 SUB- B Unfold the AM/MW loop antenna and fix the claw into the AM/MW jacks. 2 Set up the SonoWave speakers A Press and hold SOUND on the remote control to select the correct viewing channel for the correct viewing channel, press the Channel Down button...

Quick start guide
Page 2
...Enjoy Start disc playback A Insert a disc into the USB port and wait for the message to appear on your Philips DVD System Online Go to www.philips.com/usasupport Hotline Call 1-888-PHILIPS (1-888-744-5477) for a few minutes. z To enjoy the powerful surround sound from the beginning, you ...control. Box 671539 Marietta, GA 30006-0026 Printed in China 12 NC 3139 245 21773 DVD HOME THEATER SYSTEM HTS6500 Quick Start Guide What's in place. To start playback from the SonoWave speakers, press SONOWAVE (or SURR on the remote control) to turn on your portable audio/HDD player. You...
...Enjoy Start disc playback A Insert a disc into the USB port and wait for the message to appear on your Philips DVD System Online Go to www.philips.com/usasupport Hotline Call 1-888-PHILIPS (1-888-744-5477) for a few minutes. z To enjoy the powerful surround sound from the beginning, you ...control. Box 671539 Marietta, GA 30006-0026 Printed in China 12 NC 3139 245 21773 DVD HOME THEATER SYSTEM HTS6500 Quick Start Guide What's in place. To start playback from the SonoWave speakers, press SONOWAVE (or SURR on the remote control) to turn on your portable audio/HDD player. You...