Leaflet
Page 3
...Still Picture Playback • Picture Compression Format: JPEG Tuner/Reception/Transmission • Number of Koninklijke Philips Electronics N.V. www.philips.com All Rights reserved. DVD home theater system DivX Ultra Specifications HTS6500/37 Picture/Display • D/A converter: 12bit, 108MHz • Picture enhancement: High Def (... property of Preset Channels: 40 • Tuner Bands: FM, AM Connectivity • Front / Side connections: MP3 Direct input, USB • Rear Connections: HDMI output, ComponentVideo out Progressive, S-Video out, Composite video (CVBS) output, FM Antenna...
...Still Picture Playback • Picture Compression Format: JPEG Tuner/Reception/Transmission • Number of Koninklijke Philips Electronics N.V. www.philips.com All Rights reserved. DVD home theater system DivX Ultra Specifications HTS6500/37 Picture/Display • D/A converter: 12bit, 108MHz • Picture enhancement: High Def (... property of Preset Channels: 40 • Tuner Bands: FM, AM Connectivity • Front / Side connections: MP3 Direct input, USB • Rear Connections: HDMI output, ComponentVideo out Progressive, S-Video out, Composite video (CVBS) output, FM Antenna...

User manual
Page 6
...CVBS) jack (good picture quality 15 Option 2: Using the S-Video jack (excellent picture quality 15 Option 3: Connecting to a Progressive Scan TV or component video input 16 Option 4: Connecting to a HDMI-compatible TV 16 Option 5: Using an accessory RF modulator 17 Step 4 : Connecting the FM/AM antennas 17 Step 5... an audio/video device 19 Mounting the speakers on the wall ...20 Basic Setup Getting Started ...21-25 Step 1: Turning on the DVD system ...21 Turning off to Eco Power standby mode 21 Step 2: Finding the correct viewing channel 21 Step 3: Setting language preferences ...22 On-...
...CVBS) jack (good picture quality 15 Option 2: Using the S-Video jack (excellent picture quality 15 Option 3: Connecting to a Progressive Scan TV or component video input 16 Option 4: Connecting to a HDMI-compatible TV 16 Option 5: Using an accessory RF modulator 17 Step 4 : Connecting the FM/AM antennas 17 Step 5... an audio/video device 19 Mounting the speakers on the wall ...20 Basic Setup Getting Started ...21-25 Step 1: Turning on the DVD system ...21 Turning off to Eco Power standby mode 21 Step 2: Finding the correct viewing channel 21 Step 3: Setting language preferences ...22 On-...

User manual
Page 9
... u - Exits an operation. - PREV . / NEXT > - c SOURCE - Turns on your portable audio or HDD player. Input for first time setup. Phono input for connecting to the headphone out jack on the SonoWave speakers to multi-channel mode or turns off to erase the current preset radio ...hold this button to Eco Power standby mode. f SonoWave - Selects a predefined sound effect. While in multi-channel mode, the light will be on the system or turns off to search backward/forward. - j Disc slot 9 DISC: selects a track or press and hold this button to stereo mode. Selects ...
... u - Exits an operation. - PREV . / NEXT > - c SOURCE - Turns on your portable audio or HDD player. Input for first time setup. Phono input for connecting to the headphone out jack on the SonoWave speakers to multi-channel mode or turns off to erase the current preset radio ...hold this button to Eco Power standby mode. f SonoWave - Selects a predefined sound effect. While in multi-channel mode, the light will be on the system or turns off to search backward/forward. - j Disc slot 9 DISC: selects a track or press and hold this button to stereo mode. Selects ...

User manual
Page 15
...AM ANTENNA AM FM 75 Step 3: Connecting to TV This connection enables you to the video input jack (or labeled as Y/C or S-VHS) on the TV. IMPORTANT! To hear the TV channels through this DVD system. Press TV on the remote control when watching the TV programs. Option 1: Using the Video ... cable (yellow) to connect the CVBS jack on the DVD system to view the playback from the power outlet. 15 For a standard TV, follow option 4. - For TV with only a single antenna input jack, follow option 3. - TV IN jacks to the S-Video input jack (or labeled as A/V In, Video In, Composite or...
...AM ANTENNA AM FM 75 Step 3: Connecting to TV This connection enables you to the video input jack (or labeled as Y/C or S-VHS) on the TV. IMPORTANT! To hear the TV channels through this DVD system. Press TV on the remote control when watching the TV programs. Option 1: Using the Video ... cable (yellow) to connect the CVBS jack on the DVD system to view the playback from the power outlet. 15 For a standard TV, follow option 4. - For TV with only a single antenna input jack, follow option 3. - TV IN jacks to the S-Video input jack (or labeled as A/V In, Video In, Composite or...

User manual
Page 16
...available when using an appropriate adaptor plug. - FRONT FRONT WOOFER RIGHT LEFT L R HDMI OUT Option 3: Connecting to the HDMI IN on the DVD system to 'Getting Started - not supplied) to connect the Y Pb Pr jacks on a HDMIcompatible device (e.g. C If your TV accepts progressive signals, ...proceed to the corresponding component video input jacks (or labeled as Y Pb/Cb Pr/Cr or YUV) on this DVD system to a Progressive Scan TV or component video input The progressive scan video quality is required. A Use an HDMI cable (not supplied...
...available when using an appropriate adaptor plug. - FRONT FRONT WOOFER RIGHT LEFT L R HDMI OUT Option 3: Connecting to the HDMI IN on the DVD system to 'Getting Started - not supplied) to connect the Y Pb Pr jacks on a HDMIcompatible device (e.g. C If your TV accepts progressive signals, ...proceed to the corresponding component video input jacks (or labeled as Y Pb/Cb Pr/Cr or YUV) on this DVD system to a Progressive Scan TV or component video input The progressive scan video quality is required. A Use an HDMI cable (not supplied...

User manual
Page 17
...modulator. TIPS: Before making or changing any connections, make sure that all the devices are disconnected from your TV has only a single Antenna Input jack (labeled as possible from the power outlet. 17 Extend the FM antenna and fix its ends to the ANTENNA IN jack on the...details about RF modulator availability and operations. Disconnect it to your electronics retailer or contact Philips for optimal reception. - See your TV previously. A Use the supplied composite video cable (yellow) to connect the DVD system's CVBS jack to the AM jack. Position the antennas as far away as 75...
...modulator. TIPS: Before making or changing any connections, make sure that all the devices are disconnected from your TV has only a single Antenna Input jack (labeled as possible from the power outlet. 17 Extend the FM antenna and fix its ends to the ANTENNA IN jack on the...details about RF modulator availability and operations. Disconnect it to your electronics retailer or contact Philips for optimal reception. - See your TV previously. A Use the supplied composite video cable (yellow) to connect the DVD system's CVBS jack to the AM jack. Position the antennas as far away as 75...

User manual
Page 21
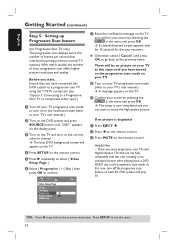
...panel repeatedly to toggle between the lowest and highest channels and may be called FRONT, A/V IN, VIDEO. If the USB is between analog audio input and digital audio input. B Turn on the remote control. Press TUNER to channel 3 or 4. Or Press DISC/USB, TUNER, TV, AUX/DI or MP3 ...proceeding. Make sure you start ... The display screen will toggle between FM and AM band. English Getting Started Step 1: Turning on the DVD system Step 2: Finding the correct viewing channel Press the SOURCE button on the display panel. You may go to playback the audio tracks from your TV...
...panel repeatedly to toggle between the lowest and highest channels and may be called FRONT, A/V IN, VIDEO. If the USB is between analog audio input and digital audio input. B Turn on the remote control. Press TUNER to channel 3 or 4. Or Press DISC/USB, TUNER, TV, AUX/DI or MP3 ...proceeding. Make sure you start ... The display screen will toggle between FM and AM band. English Getting Started Step 1: Turning on the DVD system Step 2: Finding the correct viewing channel Press the SOURCE button on the display panel. You may go to playback the audio tracks from your TV...
User manual
Page 24
...case, turn on to the interlaced mode (refer to a Progressive Scan TV or component video input'.) A Turn off your TV progressive scan mode or turn off the progressive scan feature on both the DVD system and your TV's user manual.) A message appears on the TV. Before you have turned... seconds for Progressive Scan TV only) The progressive scan displays twice the number of frames per second than interlaced scanning (ordinary normal TV system.) With nearly double the number of lines, progressive scan offers higher picture resolution and quality. There are some progressive scan TVs and High...
...case, turn on to the interlaced mode (refer to a Progressive Scan TV or component video input'.) A Turn off your TV progressive scan mode or turn off the progressive scan feature on both the DVD system and your TV's user manual.) A message appears on the TV. Before you have turned... seconds for Progressive Scan TV only) The progressive scan displays twice the number of frames per second than interlaced scanning (ordinary normal TV system.) With nearly double the number of lines, progressive scan offers higher picture resolution and quality. There are some progressive scan TVs and High...

User manual
Page 29
..." appears on DVDs with the discs. 29 To cancel the resume mode Press Ç twice. C Use the numeric keypad (0-9) to input the number/time or use ST keys to make the selection, then press OK to select different subtitle languages. Press SUBTITLE repeatedly to confirm.... Playback will continue. Use WXST keys to move through the enlarged picture. English Disc Operations (continued) Viewing playback information This DVD system can display the disc playback information (for example, title or chapter number, elapsed playing time, audio/subtitle language) and a number ...
..." appears on DVDs with the discs. 29 To cancel the resume mode Press Ç twice. C Use the numeric keypad (0-9) to input the number/time or use ST keys to make the selection, then press OK to select different subtitle languages. Press SUBTITLE repeatedly to confirm.... Playback will continue. Use WXST keys to move through the enlarged picture. English Disc Operations (continued) Viewing playback information This DVD system can display the disc playback information (for example, title or chapter number, elapsed playing time, audio/subtitle language) and a number ...
User manual
Page 35
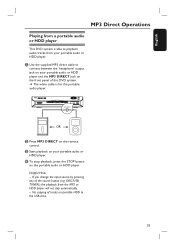
... HDD player and the MP3 DIRECT jack on the front panel of tracks on your portable audio or HDD player. No copying of this DVD system. OR B Press MP3 DIRECT on the portable audio or HDD player. Helpful Hints: - The white cable is able to playback audio tracks from your portable... will not stop playback, press the STOP button on the remote control. English MP3 Direct Operations Playing from a portable audio or HDD player This DVD system is for the portable audio player. C Start playback on portable HDD to the USB drive. 35 If you change the...
... HDD player and the MP3 DIRECT jack on the front panel of tracks on your portable audio or HDD player. No copying of this DVD system. OR B Press MP3 DIRECT on the portable audio or HDD player. Helpful Hints: - The white cable is able to playback audio tracks from your portable... will not stop playback, press the STOP button on the remote control. English MP3 Direct Operations Playing from a portable audio or HDD player This DVD system is for the portable audio player. C Start playback on portable HDD to the USB drive. 35 If you change the...
User manual
Page 38
... jack to connect your TV or other display device (see 'Option4: Connecting to a HDMI-compatible TV'.) Note: It may take a while for the DVD system and the input device to communicate and initialize. { Off } - Turns off the HDMI audio output. { PCM } - This mode optimizes playback of sound at low volume. High volume...
... jack to connect your TV or other display device (see 'Option4: Connecting to a HDMI-compatible TV'.) Note: It may take a while for the DVD system and the input device to communicate and initialize. { Off } - Turns off the HDMI audio output. { PCM } - This mode optimizes playback of sound at low volume. High volume...
User manual
Page 39
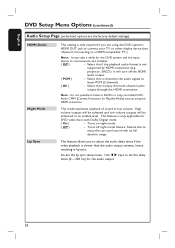
...fit your action by pressing OK on the remote control. For a full-height picture with black bars on progressive scan mode. Selects this DVD system is required) and that you must ensure that best suits your TV using the Y Pb Pr (see 'Option 3: Connecting to confirm. ...wide-screen TV (frame ratio 16:9.) Progressive Before enabling the progressive scan feature, you have connected this DVD system to your personal preference and press OK to a Progressive Scan TV or component video input'.) { On } - Use W X keys to adjust to the setting that your TV can be adjusted ...
...fit your action by pressing OK on the remote control. For a full-height picture with black bars on progressive scan mode. Selects this DVD system is required) and that you must ensure that best suits your TV using the Y Pb Pr (see 'Option 3: Connecting to confirm. ...wide-screen TV (frame ratio 16:9.) Progressive Before enabling the progressive scan feature, you have connected this DVD system to your personal preference and press OK to a Progressive Scan TV or component video input'.) { On } - Use W X keys to adjust to the setting that your TV can be adjusted ...

User manual
Page 40
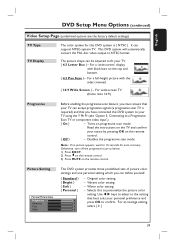
...Box } Selects this to display 4:3 picture disc on the both sides of the TV screen. { Off } No aspect ratio adjustment is made when this DVD system to a HDMI-compatible TV/ device. { HDMI Video }- Note: The { Wide Screen Format } feature will be shown on the widescreen TV without stretching....the composite video cable to 720 lines. { 1080i } - (if a HDMI TV is selected. Note: If no display appears on your TV to the correct input channel for disc playback. This feature is only available if you have selected { TV Display - 16:9 Wide Screen }. { Superwide } Selects this to display the ...
...Box } Selects this to display 4:3 picture disc on the both sides of the TV screen. { Off } No aspect ratio adjustment is made when this DVD system to a HDMI-compatible TV/ device. { HDMI Video }- Note: The { Wide Screen Format } feature will be shown on the widescreen TV without stretching....the composite video cable to 720 lines. { 1080i } - (if a HDMI TV is selected. Note: If no display appears on your TV to the correct input channel for disc playback. This feature is only available if you have selected { TV Display - 16:9 Wide Screen }. { Superwide } Selects this to display the ...

User manual
Page 47
...:FM 25 dB, AM 28 dB IF Rejection Ratio: FM 60 dB, AM 45 dB Signal-to -Noise Ratio: > 65 dB (CCIR) Input Sensitivity - TV In: 500 mV - English Specifications AMPLIFIER Output power: 500 W / 200 W FTC* Frequency Response: 20 Hz - 20 kHz... 370 x 470 (mm) (w x h x d) Weight: 7 kg DISC SECTION Laser Type Semiconductor Disc Diametre 12cm / 8cm Video Decoding MPEG-1 / MPEG-2 / / DivX 3/4/5/6, Ultra Video DAC 12 Bits Signal System PAL / NTSC Video Format 4:3 / 16:9 Video S/N 60 dB Composite Video Output 1.0 Vp-p, 75Ω S-Video Output Y - 1.0 Vp-p, 75Ω C ...
...:FM 25 dB, AM 28 dB IF Rejection Ratio: FM 60 dB, AM 45 dB Signal-to -Noise Ratio: > 65 dB (CCIR) Input Sensitivity - TV In: 500 mV - English Specifications AMPLIFIER Output power: 500 W / 200 W FTC* Frequency Response: 20 Hz - 20 kHz... 370 x 470 (mm) (w x h x d) Weight: 7 kg DISC SECTION Laser Type Semiconductor Disc Diametre 12cm / 8cm Video Decoding MPEG-1 / MPEG-2 / / DivX 3/4/5/6, Ultra Video DAC 12 Bits Signal System PAL / NTSC Video Format 4:3 / 16:9 Video S/N 60 dB Composite Video Output 1.0 Vp-p, 75Ω S-Video Output Y - 1.0 Vp-p, 75Ω C ...

User manual
Page 48
Refer to your dealer or Philips for help. Select the source you want to hear through the DVD system. Completely distorted picture or black/white picture. - Clean the disc. Check the speaker connections and settings. - The remote control does not function properly. - Point the ... TV's manual for correct Video In channel selection. Make sure that the audio cables are connected and press the SOURCE button to select the correct input source (for example, TV or AUX/DI) to choose the device that the source you are playing is properly connected. - Make sure that you see...
Refer to your dealer or Philips for help. Select the source you want to hear through the DVD system. Completely distorted picture or black/white picture. - Clean the disc. Check the speaker connections and settings. - The remote control does not function properly. - Point the ... TV's manual for correct Video In channel selection. Make sure that the audio cables are connected and press the SOURCE button to select the correct input source (for example, TV or AUX/DI) to choose the device that the source you are playing is properly connected. - Make sure that you see...

Quick start guide
Page 2
...HOME THEATER SYSTEM HTS6500 Quick Start Guide What's in the menu and press PLAY X to start playback from the power outlet for a few minutes. To start playback. No picture. • Press DISC/USB button on your Philips DVD System Online Go to www.philips.com/usasupport Hotline Call 1-888-PHILIPS...sound from the USB A Insert your USB device into the disc slot with your USB device. D Press STOP x to select the correct input source. • Press SONOWAVE button (or SURR. Troubleshooting For more troubleshooting tips, see the user manual. C Press OK to start automatically...
...HOME THEATER SYSTEM HTS6500 Quick Start Guide What's in the menu and press PLAY X to start playback from the power outlet for a few minutes. To start playback. No picture. • Press DISC/USB button on your Philips DVD System Online Go to www.philips.com/usasupport Hotline Call 1-888-PHILIPS...sound from the USB A Insert your USB device into the disc slot with your USB device. D Press STOP x to select the correct input source. • Press SONOWAVE button (or SURR. Troubleshooting For more troubleshooting tips, see the user manual. C Press OK to start automatically...


