
Leaflet
Page 1
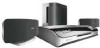
Philips DVD home theater system DivX Ultra HTS6500 The art of living with SonoWave Surround Sound Combining style and performance, this elegant and hassle-free system indulges you with 8" driver delivers a powerful performance Play it all • USB Direct plays photos and music from USB flash drives • MP3 Direct for music playback from Portable Media Players • Movies: DVD, DVD+R/RW...
Philips DVD home theater system DivX Ultra HTS6500 The art of living with SonoWave Surround Sound Combining style and performance, this elegant and hassle-free system indulges you with 8" driver delivers a powerful performance Play it all • USB Direct plays photos and music from USB flash drives • MP3 Direct for music playback from Portable Media Players • Movies: DVD, DVD+R/RW...

Leaflet
Page 2
... Interface) DVI. Now you can view your digital pictures in absolute clarity, without loss of your Philips Home Theatre System while playing your favorite music from fewer speakers. Now you can enjoy the superb sound quality of quality or detail ...sound quality, completely free from the device. DivX Ultra Certified With DivX support, you view your pictures on your television in resolutions as high as digital multichannel audio. DVD home theater system DivX Ultra Highlights HTS6500/37 SonoWave The SonoWave surround sound system, powered by simply plugging in your portable ...
... Interface) DVI. Now you can view your digital pictures in absolute clarity, without loss of your Philips Home Theatre System while playing your favorite music from fewer speakers. Now you can enjoy the superb sound quality of quality or detail ...sound quality, completely free from the device. DivX Ultra Certified With DivX support, you view your pictures on your television in resolutions as high as digital multichannel audio. DVD home theater system DivX Ultra Highlights HTS6500/37 SonoWave The SonoWave surround sound system, powered by simply plugging in your portable ...
Leaflet
Page 3
...-R/RW • MP3 bit rates: 32-256 kbps and VBR Still Picture Playback • Picture Compression Format: JPEG Tuner/Reception/Transmission • Number of Koninklijke Philips Electronics N.V. DVD home theater system DivX Ultra Specifications HTS6500/37 Picture/Display • D/A converter: 12bit, 108MHz • Picture enhancement: High Def (720p, 1080i), Video upscaling, Progressive scan • Playback Media...
...-R/RW • MP3 bit rates: 32-256 kbps and VBR Still Picture Playback • Picture Compression Format: JPEG Tuner/Reception/Transmission • Number of Koninklijke Philips Electronics N.V. DVD home theater system DivX Ultra Specifications HTS6500/37 Picture/Display • D/A converter: 12bit, 108MHz • Picture enhancement: High Def (720p, 1080i), Video upscaling, Progressive scan • Playback Media...

User manual
Page 1
DVD Home Theater System User Manual 6 Manuel D'utilisation 58 Manual del usuario 110 HTS6500 English
DVD Home Theater System User Manual 6 Manuel D'utilisation 58 Manual del usuario 110 HTS6500 English

User manual
Page 4
...LNING NÄR DENNA DEL ÄR ÖPPNAD. Invisible laser radiation when open. Declaration of Conformity Model number: HTS6500 Trade Name: Philips Responsible Party: Philips Consumer Electronics A Division of procedures other than herein may result in the Radio Interference Regulations of the Canadian Department of...hazardous radiation exposure or other unsafe operation. IF THERE ARE QUESTIONS REGARDING OUR TV SET COMPATIBILITY WITH THIS MODEL 525p AND 625p DVD PLAYER, PLEASE CONTACT OUR CUSTOMER SERVICE CENTER.' VARO! ATENCIÓN El uso de mando o ajustes o la ejecucció...
...LNING NÄR DENNA DEL ÄR ÖPPNAD. Invisible laser radiation when open. Declaration of Conformity Model number: HTS6500 Trade Name: Philips Responsible Party: Philips Consumer Electronics A Division of procedures other than herein may result in the Radio Interference Regulations of the Canadian Department of...hazardous radiation exposure or other unsafe operation. IF THERE ARE QUESTIONS REGARDING OUR TV SET COMPATIBILITY WITH THIS MODEL 525p AND 625p DVD PLAYER, PLEASE CONTACT OUR CUSTOMER SERVICE CENTER.' VARO! ATENCIÓN El uso de mando o ajustes o la ejecucció...

User manual
Page 6
... from an audio/video device 19 Mounting the speakers on the wall ...20 Basic Setup Getting Started ...21-25 Step 1: Turning on the DVD system ...21 Turning off to Eco Power standby mode 21 Step 2: Finding the correct viewing channel 21 Step 3: Setting language preferences ...22 On-...screen display (OSD) language...22 Audio, Subtitle and Menu language for DVD playback 22-23 Step 4: Setting the TV Display...23 Step 5: Setting up Progressive Scan feature 24 Step 6: Setting the SonoWave speakers ...25 Disc...
... from an audio/video device 19 Mounting the speakers on the wall ...20 Basic Setup Getting Started ...21-25 Step 1: Turning on the DVD system ...21 Turning off to Eco Power standby mode 21 Step 2: Finding the correct viewing channel 21 Step 3: Setting language preferences ...22 On-...screen display (OSD) language...22 Audio, Subtitle and Menu language for DVD playback 22-23 Step 4: Setting the TV Display...23 Step 5: Setting up Progressive Scan feature 24 Step 6: Setting the SonoWave speakers ...25 Disc...

User manual
Page 7
...28 Using the Disc Menu ...28 Viewing playback information...29 Resuming playback from the last stopped point 29 Zooming in...29 Changing subtitle language (DVD only 29 Changing sound track language...30 Playback Control (VCD only)...30 Preview function (VCD/SVCD only) ...30 Playing an MP3/ JPEG... show) ...32 Preview function...32 Zoom picture ...32 Rotating/flipping the picture ...32 Playing MP3 music and JPEG pictures simultaneously 33 Playing a DivX disc ...33 USB / MP3 Direct USB Operations...34 Playing from USB flash drive or USB memory card reader 34 MP3 Direct Operations 35 Playing...
...28 Using the Disc Menu ...28 Viewing playback information...29 Resuming playback from the last stopped point 29 Zooming in...29 Changing subtitle language (DVD only 29 Changing sound track language...30 Playback Control (VCD only)...30 Preview function (VCD/SVCD only) ...30 Playing an MP3/ JPEG... show) ...32 Preview function...32 Zoom picture ...32 Rotating/flipping the picture ...32 Playing MP3 music and JPEG pictures simultaneously 33 Playing a DivX disc ...33 USB / MP3 Direct USB Operations...34 Playing from USB flash drive or USB memory card reader 34 MP3 Direct Operations 35 Playing...

User manual
Page 10
...TV. d AUDIO - Enters or exits the system setup menu. f DISPLAY - Exits an operation. - Enters a number of the disc. - l VOCAL / KARAOKE - b Source buttons - Displays the current status or disc information. h STOP Ç - DISC: press and hold this model. Adjusts TV volume (Philips TV only.) j Numeric keypad (0-9) - Enters...ZOOM - Not functional for this button to erase the current preset radio station. k REPEAT - Selects an audio language (DVD) or an audio channel (CD.) e SETUP - Selects various repeat modes; TUNER: press and hold this button to DISC or USB mode.
...TV. d AUDIO - Enters or exits the system setup menu. f DISPLAY - Exits an operation. - Enters a number of the disc. - l VOCAL / KARAOKE - b Source buttons - Displays the current status or disc information. h STOP Ç - DISC: press and hold this model. Adjusts TV volume (Philips TV only.) j Numeric keypad (0-9) - Enters...ZOOM - Not functional for this button to erase the current preset radio station. k REPEAT - Selects an audio language (DVD) or an audio channel (CD.) e SETUP - Selects various repeat modes; TUNER: press and hold this button to DISC or USB mode.

User manual
Page 11
For DVD, enter or exit disc contents menu. - q OK - s . > - TUNER: selects a preset radio station. Selects multi-channel surround or stereo mode. n SUBTITLE - TUNER: press up or down ... a predefined sound effect. - DISC: selects movement direction in the menu. - For VCD/SVCD, enter digest menu. o DISC MENU - For DVD, go back to MP3 mode for fast forward and backward search. - Selects a DVD subtitle language. Press and hold this button to enter SonoWave speaker settings mode. 11 English Remote Control (continued) m MP3...
For DVD, enter or exit disc contents menu. - q OK - s . > - TUNER: selects a preset radio station. Selects multi-channel surround or stereo mode. n SUBTITLE - TUNER: press up or down ... a predefined sound effect. - DISC: selects movement direction in the menu. - For VCD/SVCD, enter digest menu. o DISC MENU - For DVD, go back to MP3 mode for fast forward and backward search. - Selects a DVD subtitle language. Press and hold this button to enter SonoWave speaker settings mode. 11 English Remote Control (continued) m MP3...

User manual
Page 14
...FM 75 Ensure this portion is fully inserted into the jack. Step 2: Connecting the SonoWave speakers and subwoofer Connect the SonoWave speakers to the DVD system, AC power adapter, TV or any connections, make sure that all the devices are disconnected from the power outlet. 14 To prevent unwanted noise..., do not place the SonoWave speakers too close to the matching speaker jacks at the rear of the DVD system. TIPS: Before making or changing any other radiation sources. - To disconnect the SonoWave speakers, press down the catch before pulling out the ...
...FM 75 Ensure this portion is fully inserted into the jack. Step 2: Connecting the SonoWave speakers and subwoofer Connect the SonoWave speakers to the DVD system, AC power adapter, TV or any connections, make sure that all the devices are disconnected from the power outlet. 14 To prevent unwanted noise..., do not place the SonoWave speakers too close to the matching speaker jacks at the rear of the DVD system. TIPS: Before making or changing any other radiation sources. - To disconnect the SonoWave speakers, press down the catch before pulling out the ...

User manual
Page 15
... 5. Option 2: Using the S-Video jack (excellent picture quality) Use an S-video cable (not supplied) to connect the S-VIDEO (Y/C) jack on the DVD system to the video input jack (or labeled as Y/C or S-VHS) on the TV. For TV with only a single antenna input jack, follow option ... 1 SUB- TIPS: Before making or changing any connections, make the video connection. - For a progressive scan TV, follow option 4. - Connect the DVD system directly to the corresponding AUDIO output jacks on the TV. For a HDMI TV, follow option 3. - Helpful Hint: - TV IN jacks to the ...
... 5. Option 2: Using the S-Video jack (excellent picture quality) Use an S-video cable (not supplied) to connect the S-VIDEO (Y/C) jack on the DVD system to the video input jack (or labeled as Y/C or S-VHS) on the TV. For TV with only a single antenna input jack, follow option ... 1 SUB- TIPS: Before making or changing any connections, make the video connection. - For a progressive scan TV, follow option 4. - Connect the DVD system directly to the corresponding AUDIO output jacks on the TV. For a HDMI TV, follow option 3. - Helpful Hint: - TV IN jacks to the ...

User manual
Page 16
...DVI device is connected, an additional audio cable is required. A Use an HDMI cable (not supplied) to connect the HDMI OUT on this DVD system to make sure that allows pure digital video transmission without the loss of the older DVI enable devices are disconnected from the power outlet. 16...' for audio transmission. - A Follow option 1 to the HDMI IN on the TV. not supplied) to connect the Y Pb Pr jacks on the DVD system to a HDMIcompatible TV HDMI (High Definition Multimedia Interface) is backward compatible with some DVI devices using Y Pb Pr connection and a progressive scan TV is...
...DVI device is connected, an additional audio cable is required. A Use an HDMI cable (not supplied) to connect the HDMI OUT on this DVD system to make sure that allows pure digital video transmission without the loss of the older DVI enable devices are disconnected from the power outlet. 16...' for audio transmission. - A Follow option 1 to the HDMI IN on the TV. not supplied) to connect the Y Pb Pr jacks on the DVD system to a HDMIcompatible TV HDMI (High Definition Multimedia Interface) is backward compatible with some DVI devices using Y Pb Pr connection and a progressive scan TV is...

User manual
Page 17
...from the power outlet. 17 See your TV previously. A Use the supplied composite video cable (yellow) to connect the DVD system's CVBS jack to your electronics retailer or contact Philips for optimal reception. - B Connect the supplied FM antenna to the ANTENNA IN jack on the RF modulator to the ...antenna 2 ~ MAINS FM/AM ANTENNA AM FM 75 Option 5: Using an accessory RF modulator If your TV, VCR or other radiation source to view the DVD playback on a shelf, or attach it to the wall. English Basic Connections (continued) Option 5 Antenna T L R Rear of the antennas for details ...
...from the power outlet. 17 See your TV previously. A Use the supplied composite video cable (yellow) to connect the DVD system's CVBS jack to your electronics retailer or contact Philips for optimal reception. - B Connect the supplied FM antenna to the ANTENNA IN jack on the RF modulator to the ...antenna 2 ~ MAINS FM/AM ANTENNA AM FM 75 Option 5: Using an accessory RF modulator If your TV, VCR or other radiation source to view the DVD playback on a shelf, or attach it to the wall. English Basic Connections (continued) Option 5 Antenna T L R Rear of the antennas for details ...

User manual
Page 18
... the rear or bottom of the product for identification and supply ratings. TIPS: Before making or changing any connections with the power turned on the DVD system will light up. FRONT FRONT WOOFER RIGHT LEFT L R HDMI OUT ~ MAINS FM/AM ANTENNA AM FM 75 Step 5: Connecting the power cord After everything is...
... the rear or bottom of the product for identification and supply ratings. TIPS: Before making or changing any connections with the power turned on the DVD system will light up. FRONT FRONT WOOFER RIGHT LEFT L R HDMI OUT ~ MAINS FM/AM ANTENNA AM FM 75 Step 5: Connecting the power cord After everything is...

User manual
Page 19
... AM FM 75 Connecting audio from TV When connecting the audio output from your TV to this DVD system to play . not supplied) to connect the AUX IN jacks on this Home Theater Audio System, you will enable you want to the AUDIO OUT jacks on all the speakers. Use an ...audio cable (red/white - Or Use a coaxial cable (not supplied) to connect the DIGITAL IN jack on this Home Theater Audio System in order to the respective connected device's user manual for other possible connections. 19 TIPS: Refer to enjoy the multi-channel surround sound capabilities.
... AM FM 75 Connecting audio from TV When connecting the audio output from your TV to this DVD system to play . not supplied) to connect the AUX IN jacks on this Home Theater Audio System, you will enable you want to the AUDIO OUT jacks on all the speakers. Use an ...audio cable (red/white - Or Use a coaxial cable (not supplied) to connect the DIGITAL IN jack on this Home Theater Audio System in order to the respective connected device's user manual for other possible connections. 19 TIPS: Refer to enjoy the multi-channel surround sound capabilities.

User manual
Page 21
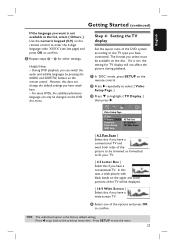
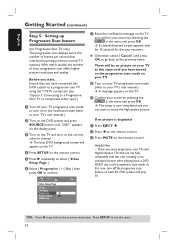
... channel is connected to channel 3 or 4. Press MP3 DIRECT to the correct video-in channel. B Turn on the display panel. Usually this DVD system. A Press SOURCE button until you are using a RF modulator, set it to playback the audio tracks from your TV manual for more details....or MP3 DIRECT on your TV, then press the Channel Down button on the remote control. English Getting Started Step 1: Turning on the DVD system Step 2: Finding the correct viewing channel Press the SOURCE button on the front panel repeatedly to Eco Power standby mode Press STANDBY ON (2)....
... channel is connected to channel 3 or 4. Press MP3 DIRECT to the correct video-in channel. B Turn on the display panel. Usually this DVD system. A Press SOURCE button until you are using a RF modulator, set it to playback the audio tracks from your TV manual for more details....or MP3 DIRECT on your TV, then press the Channel Down button on the remote control. English Getting Started Step 1: Turning on the DVD system Step 2: Finding the correct viewing channel Press the SOURCE button on the front panel repeatedly to Eco Power standby mode Press STANDBY ON (2)....

User manual
Page 22
...to confirm. On-screen display (OSD) language The OSD (On-Screen Display) language for this DVD system will be used instead. General Setup Page Disc Lock Display Dim Program OSD Language Screen Saver DivX(R) VOD Code English Dansk Deutsch Espanõl C Use ST keys to select a language and ...press OK to the previous menu item. If the selected language is recorded on the DVD disc, the DVD system will automatically play the disc in that language...
...to confirm. On-screen display (OSD) language The OSD (On-Screen Display) language for this DVD system will be used instead. General Setup Page Disc Lock Display Dim Program OSD Language Screen Saver DivX(R) VOD Code English Dansk Deutsch Espanõl C Use ST keys to select a language and ...press OK to the previous menu item. If the selected language is recorded on the DVD disc, the DVD system will automatically play the disc in that language...
User manual
Page 23
... OK to confirm. B Press X repeatedly to select { Video Setup Page. } C Press T to highlight { TV Display, } then press X. D Select one of the DVD system according to the TV type you have connected. However, this does not change the default settings you select must be available on the remote control... it is the factory default setting. In this case, a wide picture with black bands on the remote control. During DVD playback, you can only be changed via the DVD disc menu. Helpful Hints: - English Getting Started (continued) If the language you want both sides of the picture to...
... OK to confirm. B Press X repeatedly to select { Video Setup Page. } C Press T to highlight { TV Display, } then press X. D Select one of the DVD system according to the TV type you have connected. However, this does not change the default settings you select must be available on the remote control... it is the factory default setting. In this case, a wide picture with black bands on the remote control. During DVD playback, you can only be changed via the DVD disc menu. Helpful Hints: - English Getting Started (continued) If the language you want both sides of the picture to...
User manual
Page 24
...the display panel. B Press W on the remote control. There are not fully compatible with this state until "DISC" appears on both the DVD system and your action by selecting the in the menu and press OK. Press SETUP to confirm. Ensure that are some progressive scan TVs and ... HDMI Setup TIPS: Press W to go back to enjoy the high quality picture. Before you can start ... There will appear on the TV. In this DVD system to a progressive scan TV using the Y Pb Pr connection (see 'Option 3: Connecting to the previous menu item. E Press X repeatedly to select { Video Setup Page...
...the display panel. B Press W on the remote control. There are not fully compatible with this state until "DISC" appears on both the DVD system and your action by selecting the in the menu and press OK. Press SETUP to confirm. Ensure that are some progressive scan TVs and ... HDMI Setup TIPS: Press W to go back to enjoy the high quality picture. Before you can start ... There will appear on the TV. In this DVD system to a progressive scan TV using the Y Pb Pr connection (see 'Option 3: Connecting to the previous menu item. E Press X repeatedly to select { Video Setup Page...
User manual
Page 26
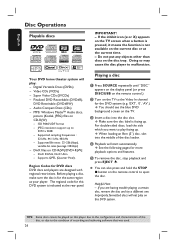
Your DVD home theater system will play facing up. Super Video CDs (SVCDs) - DivX files on CD-R(W) - DivX 3/4/5/6, DivX Ultra - Region Codes for DVD discs DVD discs and players are having trouble playing a certain disc, remove the disc and try a different one. C Insert a disc into the middle of ... screen on the TV to eject the disc. When loading an 8cm (3") disc, slot into the disc slot. D Playback will not play on this DVD system. Helpful Hint: - TIPS: Some discs cannot be played on this player due to the configuration and characteristics of the disc, or due to play ...
Your DVD home theater system will play facing up. Super Video CDs (SVCDs) - DivX files on CD-R(W) - DivX 3/4/5/6, DivX Ultra - Region Codes for DVD discs DVD discs and players are having trouble playing a certain disc, remove the disc and try a different one. C Insert a disc into the middle of ... screen on the TV to eject the disc. When loading an 8cm (3") disc, slot into the disc slot. D Playback will not play on this DVD system. Helpful Hint: - TIPS: Some discs cannot be played on this player due to the configuration and characteristics of the disc, or due to play ...


