
Leaflet
Page 1
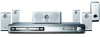
...-up • Easy-fit™ connectors with color-coding for a simple set-up • Easy set-up to initialize your total home entertainment Philips DVD home theater system HTS3410D See, hear, experience everything This stylish and compact full digital home entertainment system plays practically any disc in movies and music at home...
...-up • Easy-fit™ connectors with color-coding for a simple set-up • Easy set-up to initialize your total home entertainment Philips DVD home theater system HTS3410D See, hear, experience everything This stylish and compact full digital home entertainment system plays practically any disc in movies and music at home...

Leaflet
Page 2
...subwoofer to the center unit of the home entertainment system simply by the field with your music playing simultaneously. DVD home theater system Highlights HTS3410D/37 6x Class D Digital Amplifier When it comes to perfect audio there is no room for smaller set -up , showing your eye... a Picture CD in the packaging box, making setup quick and simple. Quick Start Guide To guide you through the initial set enclosures. Philips Class D Amplifiers™ provide dramatically enhanced sound quality over digital amplifiers used by processing all six channels of audio information to provide a ...
...subwoofer to the center unit of the home entertainment system simply by the field with your music playing simultaneously. DVD home theater system Highlights HTS3410D/37 6x Class D Digital Amplifier When it comes to perfect audio there is no room for smaller set -up , showing your eye... a Picture CD in the packaging box, making setup quick and simple. Quick Start Guide To guide you through the initial set enclosures. Philips Class D Amplifiers™ provide dramatically enhanced sound quality over digital amplifiers used by processing all six channels of audio information to provide a ...
Leaflet
Page 3
... Issue date 2009-07-03 Version: 6.0.10 12 NC: 9073 100 12734 UPC: 0 37849 95624 3 © 2009 Koninklijke Philips Electronics N.V. www.philips.com Specifications are the property of Preset Channels: 40 Connectivity • Front / Side connections: Headphone out • Other connections:... • Tuner Bands: FM Stereo, AM • Auto digital tuning • Auto store • Number of Koninklijke Philips Electronics N.V. DVD home theater system Specifications HTS3410D/37 Picture/Display • Aspect ratio: 4:3, 16:9 • D/A converter: 10 bit / 54 MHz • Picture...
... Issue date 2009-07-03 Version: 6.0.10 12 NC: 9073 100 12734 UPC: 0 37849 95624 3 © 2009 Koninklijke Philips Electronics N.V. www.philips.com Specifications are the property of Preset Channels: 40 Connectivity • Front / Side connections: Headphone out • Other connections:... • Tuner Bands: FM Stereo, AM • Auto digital tuning • Auto store • Number of Koninklijke Philips Electronics N.V. DVD home theater system Specifications HTS3410D/37 Picture/Display • Aspect ratio: 4:3, 16:9 • D/A converter: 10 bit / 54 MHz • Picture...

User manual
Page 2
... networks in the industry.What's more, your purchase guarantees you'll receive all the information and special offers for your confidence in PHILIPS.You've selected one of the best-built, best-backed products available today.We'll do not remove product covering. in your...obtain warranty service. *Product Safety Notification By registering your total satisfaction. t This "bolt of lightning" indicates uninsulated material within your model with PHILIPS makes you should not be placed on the rear of this information for many years to come. s The "exclamation point" calls attention to ...
... networks in the industry.What's more, your purchase guarantees you'll receive all the information and special offers for your confidence in PHILIPS.You've selected one of the best-built, best-backed products available today.We'll do not remove product covering. in your...obtain warranty service. *Product Safety Notification By registering your total satisfaction. t This "bolt of lightning" indicates uninsulated material within your model with PHILIPS makes you should not be placed on the rear of this information for many years to come. s The "exclamation point" calls attention to ...
User manual
Page 3
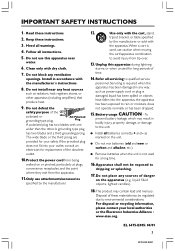
Keep these instructions. 2. Do not install near water. 6. The wide blade or the third prong are provided for long periods of time. 14. Unplug this apparatus near any way, such as power-supply cord or plug is damaged, liquid has been spilled or objects have fallen into your local authorities or the Electronic Industries Alliance : www.eiae.org. Servicing is required when the apparatus has been damaged in any heat sources such as marked on or pinched, particularly at plugs, convenience receptacles, and the point where they exit from the apparatus. 11.Only use ...
Keep these instructions. 2. Do not install near water. 6. The wide blade or the third prong are provided for long periods of time. 14. Unplug this apparatus near any way, such as power-supply cord or plug is damaged, liquid has been spilled or objects have fallen into your local authorities or the Electronic Industries Alliance : www.eiae.org. Servicing is required when the apparatus has been damaged in any heat sources such as marked on or pinched, particularly at plugs, convenience receptacles, and the point where they exit from the apparatus. 11.Only use ...
User manual
Page 4
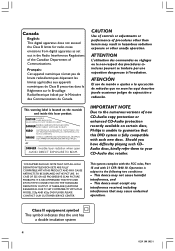
... le Brouillage Radioélectrique édicté par le Ministère des Communications du Canada. This warning label is located on certain discs, Philips is unable to the numerous versions of new CD-Audio copy protection or enhanced CD-Audio protection recently available on the rearside and inside this...
... le Brouillage Radioélectrique édicté par le Ministère des Communications du Canada. This warning label is located on certain discs, Philips is unable to the numerous versions of new CD-Audio copy protection or enhanced CD-Audio protection recently available on the rearside and inside this...
User manual
Page 6
Reverse engineering or disassembly is protected by a specialized company. "DTS" and "DTS Digital Surround" are trademarks of certain U.S. Your system consists of Digital Theater Systems, Inc. Please observe the local regulations regarding the disposal of this copyright protection technology must be recycled and reused if disassembled by method claims of Dolby Laboratories. Environmental information All unnecessary packaging has been omitted. We have tried to make the packaging easy to separate into three materials: cardboard (box), polystyrene foam (buffer) and ...
Reverse engineering or disassembly is protected by a specialized company. "DTS" and "DTS Digital Surround" are trademarks of certain U.S. Your system consists of Digital Theater Systems, Inc. Please observe the local regulations regarding the disposal of this copyright protection technology must be recycled and reused if disassembled by method claims of Dolby Laboratories. Environmental information All unnecessary packaging has been omitted. We have tried to make the packaging easy to separate into three materials: cardboard (box), polystyrene foam (buffer) and ...

User manual
Page 7
... Sound Control 33 Selecting surround sound 33 Selecting digital sound effects 34 Volume Control 34 Dimming system's display screen 34 Using the remote to operate 'Philips' television 34 Specifications 35 Troubleshooting 36-37 Glossary 38-39 Limited Warranty 40 7 turning on /off 28 Screen saver - turning on the remote only 16...
... Sound Control 33 Selecting surround sound 33 Selecting digital sound effects 34 Volume Control 34 Dimming system's display screen 34 Using the remote to operate 'Philips' television 34 Specifications 35 Troubleshooting 36-37 Glossary 38-39 Limited Warranty 40 7 turning on /off 28 Screen saver - turning on the remote only 16...
User manual
Page 8
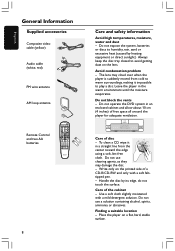
... an enclosed cabinet and allow about 10 cm (4 inches) of free space all around the player for adequate ventilation. 10 cm (4 inches) 10 cm (4 inches) PHILIPS DVD Home Cinema System 10 cm (4 inches) Care of a CD-R/CD-RW and only with a mild detergent solution. Do not use a solution containing alcohol, spirits...
... an enclosed cabinet and allow about 10 cm (4 inches) of free space all around the player for adequate ventilation. 10 cm (4 inches) 10 cm (4 inches) PHILIPS DVD Home Cinema System 10 cm (4 inches) Care of a CD-R/CD-RW and only with a mild detergent solution. Do not use a solution containing alcohol, spirits...
User manual
Page 9
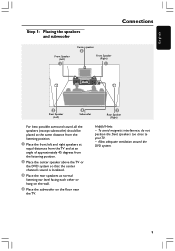
Allow adequate ventilation around the DVD system. 9 English Step 1: Placing the speakers and subwoofer Front Speaker (Left) 1 Center speaker 2 Front Speaker (Right) 1 Connections 3 Rear Speaker (Left) 4 Subwoofer 3 Rear Speaker (Right) For best possible surround sound, all the speakers (except subwoofer) should be placed at the same distance from the listening position. 1 Place the front left and right speakers at equal distances from the TV and at an angle of approximately 45 degrees from the listening position. 2 Place the center speaker above the TV or the DVD system so that the ...
Allow adequate ventilation around the DVD system. 9 English Step 1: Placing the speakers and subwoofer Front Speaker (Left) 1 Center speaker 2 Front Speaker (Right) 1 Connections 3 Rear Speaker (Left) 4 Subwoofer 3 Rear Speaker (Right) For best possible surround sound, all the speakers (except subwoofer) should be placed at the same distance from the listening position. 1 Place the front left and right speakers at equal distances from the TV and at an angle of approximately 45 degrees from the listening position. 2 Place the center speaker above the TV or the DVD system so that the ...
User manual
Page 10
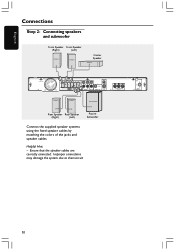
Helpful Hint: - Improper connections may damage the system due to short-circuit. 10 English Connections Step 2: Connecting speakers and subwoofer Front Speaker Front Speaker (Right) (Left) FRONT R FRONT L Center Speaker CENTER REAR R REAR L SUBWOOFER Rear Speaker Rear Speaker (Right) (Left) Passive Subwoofer Connect the supplied speaker systems using the fixed speaker cables by matching the colors of the jacks and speaker cables. Ensure that the speaker cables are correctly connected.
Helpful Hint: - Improper connections may damage the system due to short-circuit. 10 English Connections Step 2: Connecting speakers and subwoofer Front Speaker Front Speaker (Right) (Left) FRONT R FRONT L Center Speaker CENTER REAR R REAR L SUBWOOFER Rear Speaker Rear Speaker (Right) (Left) Passive Subwoofer Connect the supplied speaker systems using the fixed speaker cables by matching the colors of the jacks and speaker cables. Ensure that the speaker cables are correctly connected.
User manual
Page 11
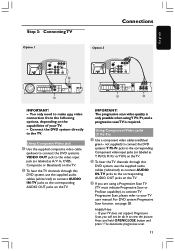
Connect the DVD system directly to deactivate progressive scan. 11 Press and hold OPEN/CLOSE button and press '1' to the TV. IMPORTANT! Using Composite Video jack 1 Use the supplied composite video cable (yellow) to connect the DVD system's VIDEO OUT jack to the video input jack (or labeled as Y Pb/Cb Pr/Cr orYUV) on theTV. 2 To hear the TV channels through this DVD system, use the supplied audio cables (white/ red) to connect AUDIO IN-TV jacks to the corresponding AUDIO OUT jacks on the TV. 3 If you will not be ab le to your TV. - Using Component Video jacks (Y Pb Pr)...
Connect the DVD system directly to deactivate progressive scan. 11 Press and hold OPEN/CLOSE button and press '1' to the TV. IMPORTANT! Using Composite Video jack 1 Use the supplied composite video cable (yellow) to connect the DVD system's VIDEO OUT jack to the video input jack (or labeled as Y Pb/Cb Pr/Cr orYUV) on theTV. 2 To hear the TV channels through this DVD system, use the supplied audio cables (white/ red) to connect AUDIO IN-TV jacks to the corresponding AUDIO OUT jacks on the TV. 3 If you will not be ab le to your TV. - Using Component Video jacks (Y Pb Pr)...
User manual
Page 12
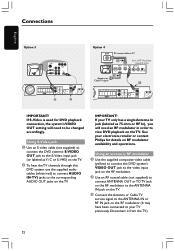
... the TV. If S-Video is used for details on RF modulator availability and operations. IMPORTANT! If your TV previously. See your electronics retailer or contact Philips for DVD playback connection, the system's VIDEO OUT setting will need to view DVD playback on the TV. Using S-Video jack 1 Use an S-video cable...
... the TV. If S-Video is used for details on RF modulator availability and operations. IMPORTANT! If your TV previously. See your electronics retailer or contact Philips for DVD playback connection, the system's VIDEO OUT setting will need to view DVD playback on the TV. Using S-Video jack 1 Use an S-video cable...
User manual
Page 13
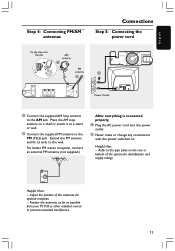
Extend the FM antenna and fix its ends to prevent unwanted interference. 13 Helpful Hint: - Position the antennas as far as possible from your TV,VCR or other radiation source to the wall. Helpful Hints: - For better FM stereo reception, connect an external FM antenna (not supplied.) After everything is connected properly, 1 Plug the AC power cord into the slot ➠ AM antenna 1 FM antenna 2 1 ~ AC MAINS Power Outlet 1 Connect the supplied AM loop antenna to the AM jack. Refer to the FM (75Ω) jack. English Step 4: Connecting FM/AM antennas Connections Step 5: ...
Extend the FM antenna and fix its ends to prevent unwanted interference. 13 Helpful Hint: - Position the antennas as far as possible from your TV,VCR or other radiation source to the wall. Helpful Hints: - For better FM stereo reception, connect an external FM antenna (not supplied.) After everything is connected properly, 1 Plug the AC power cord into the slot ➠ AM antenna 1 FM antenna 2 1 ~ AC MAINS Power Outlet 1 Connect the supplied AM loop antenna to the AM jack. Refer to the FM (75Ω) jack. English Step 4: Connecting FM/AM antennas Connections Step 5: ...
User manual
Page 14
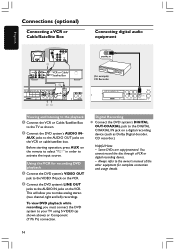
This will allow you must connect the DVD system to the DIGITAL COAXIAL IN jack on a digital recording device (such as Dolby Digital decoder, CD recorder.) Helpful Hints: - AUX jacks to make analog stereo (two channel, right and left) recordings. To view DVD playback while recording, you to the AUDIO OUT jacks on the VCR or cable/satellite box. Some DVDs are copy-protected. Digital Recording G Connect the DVD system's DIGITAL OUT-COAXIAL jack to your TV using S-VIDEO (as shown. 2 Connect the DVD system's AUDIO IN- Before starting operation, press AUX on the remote to ...
This will allow you must connect the DVD system to the DIGITAL COAXIAL IN jack on a digital recording device (such as Dolby Digital decoder, CD recorder.) Helpful Hints: - AUX jacks to make analog stereo (two channel, right and left) recordings. To view DVD playback while recording, you to the AUDIO OUT jacks on the VCR or cable/satellite box. Some DVDs are copy-protected. Digital Recording G Connect the DVD system's DIGITAL OUT-COAXIAL jack to your TV using S-VIDEO (as shown. 2 Connect the DVD system's AUDIO IN- Before starting operation, press AUX on the remote to ...
User manual
Page 15
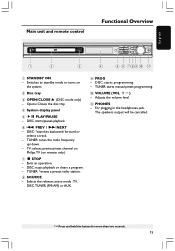
... / down. - Exits an operation. - Opens/ Closes the disc tray. 4 System display panel 5 ÉÅ PLAY/PAUSE - DISC: starts programming. - TV: selects previous/next channel on Philips TV (on the system. 2 Disc tray 3 OPEN /CLOSE 0 (DISC mode only) - The speakers output will be cancelled. * = Press and hold the button for more than...
... / down. - Exits an operation. - Opens/ Closes the disc tray. 4 System display panel 5 ÉÅ PLAY/PAUSE - DISC: starts programming. - TV: selects previous/next channel on Philips TV (on the system. 2 Disc tray 3 OPEN /CLOSE 0 (DISC mode only) - The speakers output will be cancelled. * = Press and hold the button for more than...
User manual
Page 16
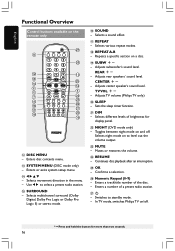
Selects a sound effect. & REPEAT - REAR +- Adjusts TV volume (Philips TV only.) ) SLEEP - Mutes or restores the volume. ≤ RESUME - Enters a track/title number of a preset radio station. ≥B - Enters a number of the disc. - Selects ... 14 14 6 6 5 7 24 15 23 16 22 17 21 18 20 19 @ DISC MENU - Switches to select a preset radio station. % SURROUND - In TV mode, switches Philips TV on/off .
Selects a sound effect. & REPEAT - REAR +- Adjusts TV volume (Philips TV only.) ) SLEEP - Mutes or restores the volume. ≤ RESUME - Enters a track/title number of a preset radio station. ≥B - Enters a number of the disc. - Selects ... 14 14 6 6 5 7 24 15 23 16 22 17 21 18 20 19 @ DISC MENU - Switches to select a preset radio station. % SURROUND - In TV mode, switches Philips TV on/off .
User manual
Page 17
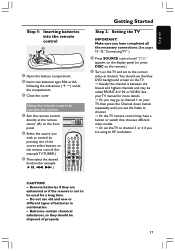
See your TV manual for more details. ➜ Or, you may go to channel 3 or 4 if you are exhausted or if the remote is between the lowest and highest channels and may have completed all the necessary connections. (See pages 11-12 "Connecting TV".) 1 Press SOURCE control until "DISC" appears on the display panel (or press DISC on the remote.) 2 Turn on the remote control (for example TV,TUNER.) 3 Then select the desired function (for a long time. - Make sure you wish to control by pressing one of the source select buttons on the TV and set the TV to channel 1 on your TV, then ...
See your TV manual for more details. ➜ Or, you may go to channel 3 or 4 if you are exhausted or if the remote is between the lowest and highest channels and may have completed all the necessary connections. (See pages 11-12 "Connecting TV".) 1 Press SOURCE control until "DISC" appears on the display panel (or press DISC on the remote.) 2 Turn on the remote control (for example TV,TUNER.) 3 Then select the desired function (for a long time. - Make sure you wish to control by pressing one of the source select buttons on the TV and set the TV to channel 1 on your TV, then ...
User manual
Page 18
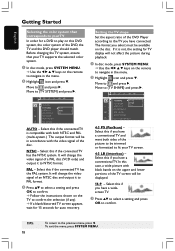
NTSC - It will not affect the picture during playback. 1 In disc mode, press SYSTEM MENU. ➜ Use the 1 2 3 4 keys on the remote to confirm. Select this if the connected TV has the NTSC system. Select this if you have connected. Move to {TV SYSTEM} and press 2. Select this if you have a conventional TV and want both NTSC and PAL (multi-system.) The output format will change the video signal of the DVD Player according to the TV you have a widescreen TV. 3 Press 34 to select a setting and press OK to navigate in the menu. 2 Highlight icon and press 4. ...
NTSC - It will not affect the picture during playback. 1 In disc mode, press SYSTEM MENU. ➜ Use the 1 2 3 4 keys on the remote to confirm. Select this if the connected TV has the NTSC system. Select this if you have connected. Move to {TV SYSTEM} and press 2. Select this if you have a conventional TV and want both NTSC and PAL (multi-system.) The output format will change the video signal of the DVD Player according to the TV you have a widescreen TV. 3 Press 34 to select a setting and press OK to navigate in the menu. 2 Highlight icon and press 4. ...
User manual
Page 19
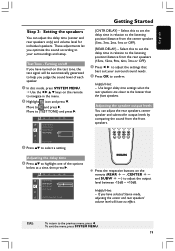
Select this to set the delay time in the menu. 2 Highlight icon and press 4. NIGHT MODE CNTR DELAY REAR DELAY TEST TONE CENTER DELAY SET TO 1 MS G Press the respective buttons on the remote (REAR +-, CENTER +and SUBW +-) to the listening position/distance from the center speaker (5ms, 3ms, 2ms, 1ms or OFF). {REAR DELAY} - TIPS: To return to {TEST TONE} and press 2. Helpful Hint: - Move to the previous menu, press 1. Adjusting the speaker output levels You can adjust the delay time (center and rear speakers only) and volume level for individual speakers. If you judge ...
Select this to set the delay time in the menu. 2 Highlight icon and press 4. NIGHT MODE CNTR DELAY REAR DELAY TEST TONE CENTER DELAY SET TO 1 MS G Press the respective buttons on the remote (REAR +-, CENTER +and SUBW +-) to the listening position/distance from the center speaker (5ms, 3ms, 2ms, 1ms or OFF). {REAR DELAY} - TIPS: To return to {TEST TONE} and press 2. Helpful Hint: - Move to the previous menu, press 1. Adjusting the speaker output levels You can adjust the delay time (center and rear speakers only) and volume level for individual speakers. If you judge ...
