

Owner's Manual
Page 2
... air openings blocked. Special care is not working properly, if it to the nearest authorized dealer or service center for its intended use as threading needle, changing needle, threading bobbin, or changing presser foot, etc. • Always unplug the sewing machine from the electrical outlet when removing covers, lubricating, or when making any...
... air openings blocked. Special care is not working properly, if it to the nearest authorized dealer or service center for its intended use as threading needle, changing needle, threading bobbin, or changing presser foot, etc. • Always unplug the sewing machine from the electrical outlet when removing covers, lubricating, or when making any...
Owner's Manual
Page 4
... presser foot pressure 9 Maintenance 32 Attaching the presser foot holder/presser foot/seam guide 10 Troubleshooting guide 33 Winding the bobbin 11 Inserting the bobbin 12 Inserting and changing needle 13 Threading the upper thread 14 Thread tension 15 Raising the bobbin thread 16 Reverse sewing 17 Changing sewing directions 17 Removing your work 17 Cutting the...
... presser foot pressure 9 Maintenance 32 Attaching the presser foot holder/presser foot/seam guide 10 Troubleshooting guide 33 Winding the bobbin 11 Inserting the bobbin 12 Inserting and changing needle 13 Threading the upper thread 14 Thread tension 15 Raising the bobbin thread 16 Reverse sewing 17 Changing sewing directions 17 Removing your work 17 Cutting the...
Owner's Manual
Page 5
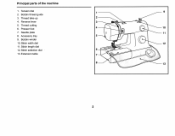
Stitch length dial 12. Extension table 7 8 13 2 Reverse lever 3 5. Stitch width dial 12 11. Presser foot 4 10 7. Bobbin winder 10. Thread take-up 2 4. Bobbin thread guide 3. Accessory tray 5 9. Stitch selection dial 6 13. Tension dial 1 9 2. Thread cutting 6. Principal parts of the machine 1. Needle plate 11 8.
Stitch length dial 12. Extension table 7 8 13 2 Reverse lever 3 5. Stitch width dial 12 11. Presser foot 4 10 7. Bobbin winder 10. Thread take-up 2 4. Bobbin thread guide 3. Accessory tray 5 9. Stitch selection dial 6 13. Tension dial 1 9 2. Thread cutting 6. Principal parts of the machine 1. Needle plate 11 8.
Owner's Manual
Page 6
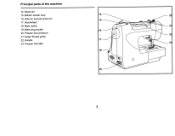
Principal parts of the machine 14. Handwheel 18. Main switch 2 19. Main plug socket 16 20. Hole for second spool pin 15 17. Upper thread guide 22. Spool pin 15. Handle 17 23. Bobbin winder stop 14 2( 16. Presser foot pressure 21. Presser foot lifter 2 18 19 3
Principal parts of the machine 14. Handwheel 18. Main switch 2 19. Main plug socket 16 20. Hole for second spool pin 15 17. Upper thread guide 22. Spool pin 15. Handle 17 23. Bobbin winder stop 14 2( 16. Presser foot pressure 21. Presser foot lifter 2 18 19 3
Owner's Manual
Page 14
Thread bobbin as illustrated and place on foot control (8). - Cut thread (9) Press bobbin to the left (10) and remove. Snap thread into thread guide (3). - Wind thread clockwise around bobbin winder tension discs (4). - Winding the bobbin - For smaller spools of thread place spool cap with small side next to right (6). - Push bobbin to spool (2). • - Place thread and spool cap onto spool pin (1). Hold...
Thread bobbin as illustrated and place on foot control (8). - Cut thread (9) Press bobbin to the left (10) and remove. Snap thread into thread guide (3). - Wind thread clockwise around bobbin winder tension discs (4). - Winding the bobbin - For smaller spools of thread place spool cap with small side next to right (6). - Push bobbin to spool (2). • - Place thread and spool cap onto spool pin (1). Hold...
Owner's Manual
Page 15
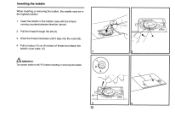
Draw the thread clockwise until it slips into the notch (B). 4. Pull out about 15cm (6 inches) of thread and attach the bobbin cover plate. (C) Attention: Turn power switch to off ("O'9 before inserting or removing the bobbin. 12 Pull the thread through the slit (A). 3. Inserting the bobbin When inserting or removing the bobbin, the needle must be in the bobbin case with the thread running counterclockwise direction (arrow). 2. Insert the bobbin in the highest position. 1.
Draw the thread clockwise until it slips into the notch (B). 4. Pull out about 15cm (6 inches) of thread and attach the bobbin cover plate. (C) Attention: Turn power switch to off ("O'9 before inserting or removing the bobbin. 12 Pull the thread through the slit (A). 3. Inserting the bobbin When inserting or removing the bobbin, the needle must be in the bobbin case with the thread running counterclockwise direction (arrow). 2. Insert the bobbin in the highest position. 1.
Owner's Manual
Page 19
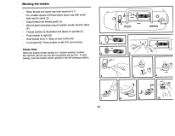
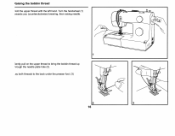
Turn the handwheel (1) owards you (counterclockwise) lowering, then raising needle. 1 3ently pull on the upper thread to bring the bobbin thread up hrough the needle plate hole (2). .ay both threads to the back under the presser foot. (3) 2 16 aising the bobbin thread old the upper thread with the left hand.
Turn the handwheel (1) owards you (counterclockwise) lowering, then raising needle. 1 3ently pull on the upper thread to bring the bobbin thread up hrough the needle plate hole (2). .ay both threads to the back under the presser foot. (3) 2 16 aising the bobbin thread old the upper thread with the left hand.
Owner's Manual
Page 35
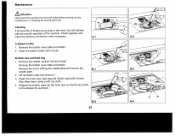
...any maintenance or changing the sewing light bulb. A-i A.Bobbin holder 1. Lift up bobbin case and remove it. 3. Clean the bobbin holder with a brush. Remove the bobbin cover plate and bobbin. 2. Remove the bobbin cover plate and bobbin. Replace the bobbin case into the hook race so that the tip ... dry cloth. 4. Check regularly and clean the stitching mechanism when necessary. Clean the hook race, feed dog and bobbin case with a brush. Cleaning If lint and bits of thread accumulate in the hook, this will interfere with the smooth operation of the machine.
...any maintenance or changing the sewing light bulb. A-i A.Bobbin holder 1. Lift up bobbin case and remove it. 3. Clean the bobbin holder with a brush. Remove the bobbin cover plate and bobbin. 2. Remove the bobbin cover plate and bobbin. Replace the bobbin case into the hook race so that the tip ... dry cloth. 4. Check regularly and clean the stitching mechanism when necessary. Clean the hook race, feed dog and bobbin case with a brush. Cleaning If lint and bits of thread accumulate in the hook, this will interfere with the smooth operation of the machine.

Owner's Manual
Page 36
... damaged. 2.The needle is not correctly inserted. 3.Wrong needle size for the fabric. 4.The wrong foot is attached. 1 .The machine is not correctly threaded. 2.The bobbin case is not correctly threaded, 3.Needle/ fabric) thread combination is wrong. 4.Thread tension wrong. 1 The needle is too thick for the fabric. 2.The stitch length is wrong adjusted. 3.The...
... damaged. 2.The needle is not correctly inserted. 3.Wrong needle size for the fabric. 4.The wrong foot is attached. 1 .The machine is not correctly threaded. 2.The bobbin case is not correctly threaded, 3.Needle/ fabric) thread combination is wrong. 4.Thread tension wrong. 1 The needle is too thick for the fabric. 2.The stitch length is wrong adjusted. 3.The...


