
Owner's Manual
Page 3
Stretch stitches 8-9 Operate your select sewing machine .........4 Standard accessories 5 Stitch overview 6 Stitch table - Contents Introduction Parts of the sewing chart 27 Needle thread tension 28 Topstitching 28 Straight stitch 29 Zigzag stitch 29 ...Utility stitches 26 Stretch stitches 26 Utility and stretch stitch combinations..26 Utility stitches and practical sewing Explanation of your Pfaff Select Lid 10 Connecting the foot control 10 Main switch 10 Accessory tray 11 Using the free arm 11 Bobbin winding 12-15 Changing the bobbin 16-17 Threading 18-19 Needle...
Stretch stitches 8-9 Operate your select sewing machine .........4 Standard accessories 5 Stitch overview 6 Stitch table - Contents Introduction Parts of the sewing chart 27 Needle thread tension 28 Topstitching 28 Straight stitch 29 Zigzag stitch 29 ...Utility stitches 26 Stretch stitches 26 Utility and stretch stitch combinations..26 Utility stitches and practical sewing Explanation of your Pfaff Select Lid 10 Connecting the foot control 10 Main switch 10 Accessory tray 11 Using the free arm 11 Bobbin winding 12-15 Changing the bobbin 16-17 Threading 18-19 Needle...
Owner's Manual
Page 4
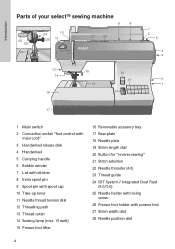
Introduction Parts of your select™ sewing machine 9 8 22 23 26 24 25 10 11 12 27 28 13 14 16 15 18 20 21 19 7 6 5 4 3 2 1 17 1 Main switch 2 Connection ... path 13 Thread cutter 14 Sewing lamp (max. 15 watt) 15 Presser foot lifter 16 Removable accessory tray 17 Base plate 18 Needle plate 19 Stitch length dial 20 Button for "reverse sewing" 21 Stitch selection 22 Needle threader (4.0) 23 Thread guide 24 IDT System / Integrated Dual Feed (4.0/3.0) 25 Needle holder with...
Introduction Parts of your select™ sewing machine 9 8 22 23 26 24 25 10 11 12 27 28 13 14 16 15 18 20 21 19 7 6 5 4 3 2 1 17 1 Main switch 2 Connection ... path 13 Thread cutter 14 Sewing lamp (max. 15 watt) 15 Presser foot lifter 16 Removable accessory tray 17 Base plate 18 Needle plate 19 Stitch length dial 20 Button for "reverse sewing" 21 Stitch selection 22 Needle threader (4.0) 23 Thread guide 24 IDT System / Integrated Dual Feed (4.0/3.0) 25 Needle holder with...

Owner's Manual
Page 5
... more information about accessories, please contact your PFAFF® dealer. Introduction 0 1 1 3 4 5 7 6 0 Standard Presser Foot With IDT (pictured) select 4.0 and 3.0 Without IDT select 2.0 1 Fancy Stitch Foot With IDT select 4.0 1 Clearview Foot (Fancy-stitch foot without IDT) 3 Blindhem/Overlock Foot With IDT (pictured) select 4.0 and 3.0 Without IDT select 2.0 4 Zipper Foot With IDT (pictured) select 4.0 and 3.0 Without IDT select 2.0 9 8 11 10 12...
... more information about accessories, please contact your PFAFF® dealer. Introduction 0 1 1 3 4 5 7 6 0 Standard Presser Foot With IDT (pictured) select 4.0 and 3.0 Without IDT select 2.0 1 Fancy Stitch Foot With IDT select 4.0 1 Clearview Foot (Fancy-stitch foot without IDT) 3 Blindhem/Overlock Foot With IDT (pictured) select 4.0 and 3.0 Without IDT select 2.0 4 Zipper Foot With IDT (pictured) select 4.0 and 3.0 Without IDT select 2.0 9 8 11 10 12...

Owner's Manual
Page 9
... and panels. IF LK LK 0/1 0/1 A decorative, elastic stitch. for patchwork and quilting. A top-stitching seam for traditional embroidery. LMK LMK 0/1 A decorative, elastic stitch. for bath accessories. For whip-stitching hems, e.g. LG - 0/1 A decorative stitch, e.g. ID - 0/1 A decorative elastic stitch, e.g. on pajamas and sweatsuits. for sportswear. The material must be turned by 180 degrees...
... and panels. IF LK LK 0/1 0/1 A decorative, elastic stitch. for patchwork and quilting. A top-stitching seam for traditional embroidery. LMK LMK 0/1 A decorative, elastic stitch. for bath accessories. For whip-stitching hems, e.g. LG - 0/1 A decorative stitch, e.g. ID - 0/1 A decorative elastic stitch, e.g. on pajamas and sweatsuits. for sportswear. The material must be turned by 180 degrees...
Owner's Manual
Page 11
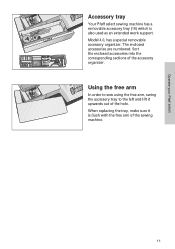
Using the free arm In order to sew using the free arm, swing the accessory tray to the left and lift it is also used as an extended work support. Model 4.0, has a special removable accessory organizer. The enclosed accessories are numbered. When replacing the tray, make sure it upwards out of the hole. Sort the enclosed accessories into the corresponding sections of the accessory organizer. Operate your Pfaff select Accessory tray Your Pfaff select sewing machine has a removable accessory tray (16) which is Áush with the free arm of the sewing machine. 11
Using the free arm In order to sew using the free arm, swing the accessory tray to the left and lift it is also used as an extended work support. Model 4.0, has a special removable accessory organizer. The enclosed accessories are numbered. When replacing the tray, make sure it upwards out of the hole. Sort the enclosed accessories into the corresponding sections of the accessory organizer. Operate your Pfaff select Accessory tray Your Pfaff select sewing machine has a removable accessory tray (16) which is Áush with the free arm of the sewing machine. 11

Owner's Manual
Page 28
... fabric edge, simply guide the fabric along the fabric edge for utility stitches is described on the needle plate or use the edge guide (standard accessory No.8). Needle thread tension To get perfect sewing results, the needle and bobbin thread tensions must be interlaced between the two fabric pieces. If the...
... fabric edge, simply guide the fabric along the fabric edge for utility stitches is described on the needle plate or use the edge guide (standard accessory No.8). Needle thread tension To get perfect sewing results, the needle and bobbin thread tensions must be interlaced between the two fabric pieces. If the...

Owner's Manual
Page 38
... in place. Note: Use good quality sewing machine oil only! 38 Maintenance and trouble-shooting Removal: • Raise the sewing foot and remove the removable accessory tray. • Push the point of its mounting. Now push the screwdriver into the opening between needle plate and sewing machine. • Twist it lightly...
... in place. Note: Use good quality sewing machine oil only! 38 Maintenance and trouble-shooting Removal: • Raise the sewing foot and remove the removable accessory tray. • Push the point of its mounting. Now push the screwdriver into the opening between needle plate and sewing machine. • Twist it lightly...

Owner's Manual
Page 39
... sewing bulb Switch off the main switch (1) • Disconnect the main plug and the foot control plug from the machine. • Take off the removable accessory tray (16).
... sewing bulb Switch off the main switch (1) • Disconnect the main plug and the foot control plug from the machine. • Take off the removable accessory tray (16).

Owner's Manual
Page 43
Please note that on disposal, this product must be to electrical/electronic products. Such modiÀcations, however, will always be safely recycled in doubt please contact your retailer for guidance If in accordance with relevant National legislation relating to the beneÀt of the user and the product. Intellectual property PFAFF, SELECT and IDT (image) are trademarks of accessories without prior notice, or make modiÀcations to the performance or design. We reserve the right to change the machine equipment and the assortment of KSIN Luxembourg II, S.ar.l.
Please note that on disposal, this product must be to electrical/electronic products. Such modiÀcations, however, will always be safely recycled in doubt please contact your retailer for guidance If in accordance with relevant National legislation relating to the beneÀt of the user and the product. Intellectual property PFAFF, SELECT and IDT (image) are trademarks of accessories without prior notice, or make modiÀcations to the performance or design. We reserve the right to change the machine equipment and the assortment of KSIN Luxembourg II, S.ar.l.


