Owner's Manual
Page 2
...: • A sewing machine should never be supervised to ensure that they have been given supervision or instruction concerning use as threading needle, changing needle, threading bobbin, or changing presser foot, etc. • Always unplug the sewing machine from the electric outlet immediately after using this household sewing machine. Always unplug this...
...: • A sewing machine should never be supervised to ensure that they have been given supervision or instruction concerning use as threading needle, changing needle, threading bobbin, or changing presser foot, etc. • Always unplug the sewing machine from the electric outlet immediately after using this household sewing machine. Always unplug this...
Owner's Manual
Page 3
...Select System .......24 Utility stitches 24 Stretch stitches 24 Utility and stretch stitch combinations..24 Utility stitches and practical sewing Explanation of your sewing machine Lid 9 Connecting the foot control 9 Main switch 9 Accessory tray 10 Using the free arm 10 Bobbin winding 11-14 Changing the bobbin... dial 22 Reverse sewing 23 Stitch length adjustment dial 23 Adjust stitch length 23 Buttonhole 23 Stretch stitches 23 Stitch selection - Contents Introduction Parts of the sewing chart 25 Needle thread tension 26 Topstitching 26 Straight stitch 27 Zigzag stitch...
...Select System .......24 Utility stitches 24 Stretch stitches 24 Utility and stretch stitch combinations..24 Utility stitches and practical sewing Explanation of your sewing machine Lid 9 Connecting the foot control 9 Main switch 9 Accessory tray 10 Using the free arm 10 Bobbin winding 11-14 Changing the bobbin... dial 22 Reverse sewing 23 Stitch length adjustment dial 23 Adjust stitch length 23 Buttonhole 23 Stretch stitches 23 Stitch selection - Contents Introduction Parts of the sewing chart 25 Needle thread tension 26 Topstitching 26 Straight stitch 27 Zigzag stitch...
Owner's Manual
Page 4
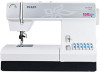
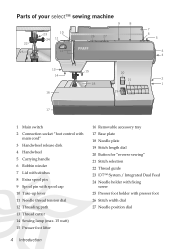
Parts of your select™ sewing machine 9 8 22 25 23 24 10 11 12 26 27 13 14 16 15 18 20 21 19 7 6 5 4 3 2 1 17 1 Main switch 2 Connection socket "foot control with main cord" 3 Handwheel release disk 4 Handwheel 5 Carrying handle 6 Bobbin winder 7 Lid with stitches 8 Extra spool pin 9 Spool ... lifter 4 Introduction 16 Removable accessory tray 17 Base plate 18 Needle plate 19 Stitch length dial 20 Button for "reverse sewing" 21 Stitch selection 22 Thread guide 23 IDT™ System / Integrated Dual Feed 24 Needle holder with Àxing screw 25 Presser foot holder with presser ...
Parts of your select™ sewing machine 9 8 22 25 23 24 10 11 12 26 27 13 14 16 15 18 20 21 19 7 6 5 4 3 2 1 17 1 Main switch 2 Connection socket "foot control with main cord" 3 Handwheel release disk 4 Handwheel 5 Carrying handle 6 Bobbin winder 7 Lid with stitches 8 Extra spool pin 9 Spool ... lifter 4 Introduction 16 Removable accessory tray 17 Base plate 18 Needle plate 19 Stitch length dial 20 Button for "reverse sewing" 21 Stitch selection 22 Thread guide 23 IDT™ System / Integrated Dual Feed 24 Needle holder with Àxing screw 25 Presser foot holder with presser ...
Owner's Manual
Page 5
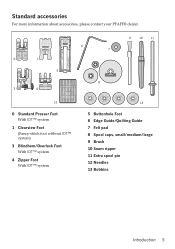
Standard accessories For more information about accessories, please contact your PFAFF® dealer. 0 1 5 3 4 9 10 11 6 7 8 12 0 Standard Presser Foot With IDT™ system 1 Clearview Foot (Fancy-stitch foot without IDT™ system) 3 Blindhem/Overlock Foot With IDT™ system 4 Zipper Foot With IDT™ system 13 5 Buttonhole Foot 6 Edge Guide/Quilting Guide 7 Felt pad 8 Spool caps, small/medium/large 9 Brush 10 Seam ripper 11 Extra spool pin 12 Needles 13 Bobbins Introduction 5
Standard accessories For more information about accessories, please contact your PFAFF® dealer. 0 1 5 3 4 9 10 11 6 7 8 12 0 Standard Presser Foot With IDT™ system 1 Clearview Foot (Fancy-stitch foot without IDT™ system) 3 Blindhem/Overlock Foot With IDT™ system 4 Zipper Foot With IDT™ system 13 5 Buttonhole Foot 6 Edge Guide/Quilting Guide 7 Felt pad 8 Spool caps, small/medium/large 9 Brush 10 Seam ripper 11 Extra spool pin 12 Needles 13 Bobbins Introduction 5
Owner's Manual
Page 11
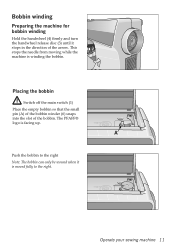
The PFAFF® logo is winding the bobbin. Bobbin winding Preparing the machine for bobbin winding Hold the handwheel (4) Àrmly and turn the handwheel release disc (3) until it is moved fully to the right Note: The bobbin can only be wound when it stops in the direction of the bobbin. Operate your sewing machine 11 This stops the needle from moving while the machine is facing up. Placing the bobbin Switch off the main switch (1) Place the empty bobbin so that the small pin (A) of the bobbin winder (6) snaps into the slot of the arrow. A Push the bobbin to the right.
The PFAFF® logo is winding the bobbin. Bobbin winding Preparing the machine for bobbin winding Hold the handwheel (4) Àrmly and turn the handwheel release disc (3) until it is moved fully to the right Note: The bobbin can only be wound when it stops in the direction of the bobbin. Operate your sewing machine 11 This stops the needle from moving while the machine is facing up. Placing the bobbin Switch off the main switch (1) Place the empty bobbin so that the small pin (A) of the bobbin winder (6) snaps into the slot of the arrow. A Push the bobbin to the right.
Owner's Manual
Page 12
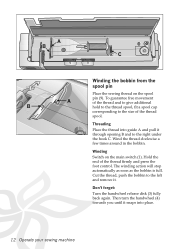
... thread spool, Àt a spool cap corresponding to the right under the hook C. Then turn the handwheel (4) towards you until it . Cut the thread, push the bobbin to the left and remove it snaps into guide A and pull it through opening B and to the size of the thread spool. Winding Switch on... press the foot control. Threading Place the thread into place. 12 Operate your sewing machine The winding action will stop automatically as soon as the bobbin is full. Don't forget: Turn the handwheel release disk (3) fully back again. A B C Winding the...
... thread spool, Àt a spool cap corresponding to the right under the hook C. Then turn the handwheel (4) towards you until it . Cut the thread, push the bobbin to the left and remove it snaps into guide A and pull it through opening B and to the size of the thread spool. Winding Switch on... press the foot control. Threading Place the thread into place. 12 Operate your sewing machine The winding action will stop automatically as soon as the bobbin is full. Don't forget: Turn the handwheel release disk (3) fully back again. A B C Winding the...

Owner's Manual
Page 13
... of thread Àrmly and press the the foot control. B A Operate your sewing machine 13 The winding action will stop automatically as soon as the bobbin is already threaded, you until it through opening B to the right under hook C. Don't forget: Turn the handwheel release disk (3) back again. Then turn the... you can easily wind thread from the second spool pin Push the second spool pin (8) into place. Wind the thread clockwise a few times around the bobbin. Cut the thread, push the bobbin to the left and remove it. TIP: If the machine is full. C Winding the...
... of thread Àrmly and press the the foot control. B A Operate your sewing machine 13 The winding action will stop automatically as soon as the bobbin is already threaded, you until it through opening B to the right under hook C. Don't forget: Turn the handwheel release disk (3) back again. Then turn the... you can easily wind thread from the second spool pin Push the second spool pin (8) into place. Wind the thread clockwise a few times around the bobbin. Cut the thread, push the bobbin to the left and remove it. TIP: If the machine is full. C Winding the...

Owner's Manual
Page 14
... lever must be positioned at its very top. Then wind the thread several times around the bobbin. Winding Switch on the main switch (1) and press the foot control. Cut the thread, push the bobbin to the left and remove it snaps into the take -up lever from moving while winding ...to right (10). Now, pull the thread into place. Pass the thread to stop automatically as soon as the bobbin is full. Then turn the handwheel (4) towards you can still wind the bobbin. C 14 Operate your sewing machine Winding through the right threading slot (12). First make sure to the right...
... lever must be positioned at its very top. Then wind the thread several times around the bobbin. Winding Switch on the main switch (1) and press the foot control. Cut the thread, push the bobbin to the left and remove it snaps into the take -up lever from moving while winding ...to right (10). Now, pull the thread into place. Pass the thread to stop automatically as soon as the bobbin is full. Then turn the handwheel (4) towards you can still wind the bobbin. C 14 Operate your sewing machine Winding through the right threading slot (12). First make sure to the right...
Owner's Manual
Page 15
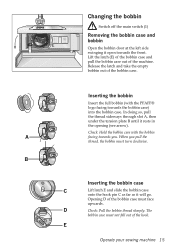
Inserting the bobbin Insert the full bobbin (with the bobbin A facing towards the bobbin case) into the bobbin case. D Check: Pull the bobbin thread sharply. The bobbin case must not fall out of the bobbin case. Check: Hold the bobbin case with the PFAFF® logo facing towards you pull the thread, the bobbin must face upwards. In doing so, pull the...
Inserting the bobbin Insert the full bobbin (with the bobbin A facing towards the bobbin case) into the bobbin case. D Check: Pull the bobbin thread sharply. The bobbin case must not fall out of the bobbin case. Check: Hold the bobbin case with the PFAFF® logo facing towards you pull the thread, the bobbin must face upwards. In doing so, pull the...

Owner's Manual
Page 18
Hold the needle thread and turn the handwheel towards you until the needle is in the highest position and the bobbin thread has formed a loop. Pull the needle thread to bring up the bobbin thread Switch off the main switch (1) Raise the presser foot. Close the bobbin case/hook cover and pull the thread under the presser foot to the front over the thread cutter (13). 18 Operate your sewing machine Thread cutter Pull the threads from the back to the left. Bringing up the bobbin thread.
Hold the needle thread and turn the handwheel towards you until the needle is in the highest position and the bobbin thread has formed a loop. Pull the needle thread to bring up the bobbin thread Switch off the main switch (1) Raise the presser foot. Close the bobbin case/hook cover and pull the thread under the presser foot to the front over the thread cutter (13). 18 Operate your sewing machine Thread cutter Pull the threads from the back to the left. Bringing up the bobbin thread.
Owner's Manual
Page 21
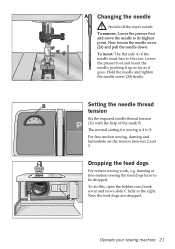
... Áat side A of the mark B. The normal setting for sewing is 4 to be dropped. Operate your sewing machine 21 To do this, open the bobbin case/hook cover and move the needle to its highest point. Lower the presser foot and insert the needle, pushing it up as far as...
... Áat side A of the mark B. The normal setting for sewing is 4 to be dropped. Operate your sewing machine 21 To do this, open the bobbin case/hook cover and move the needle to its highest point. Lower the presser foot and insert the needle, pushing it up as far as...
Owner's Manual
Page 26
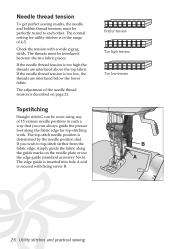
... threads are interlaced below the lower fabric. The normal setting for top-stitching work. Needle thread tension To get perfect sewing results, the needle and bobbin thread tensions must be sewn using any of 15 various needle positions in the range of the needle thread tension is determined by the needle...
... threads are interlaced below the lower fabric. The normal setting for top-stitching work. Needle thread tension To get perfect sewing results, the needle and bobbin thread tensions must be sewn using any of 15 various needle positions in the range of the needle thread tension is determined by the needle...
Owner's Manual
Page 36
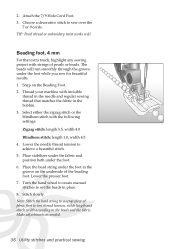
TIP: Pearl thread or embroidery twist works well. The beads will run smoothly through the groove under the foot in the bobbin. 3. Place the bead string under the foot while you sew for beautiful results. 1. Beading foot, 4 mm For that matches the fabric in the groove... on the Beading Foot. 2. Turn the hand wheel to create manual stitches to sew over the 7 or 9 cords. Select either the zigzag stitch or the blindhem stitch with strings of pearls or beads. Lower the presser foot. 7. Thread your machine with invisible thread in...
TIP: Pearl thread or embroidery twist works well. The beads will run smoothly through the groove under the foot in the bobbin. 3. Place the bead string under the foot while you sew for beautiful results. 1. Beading foot, 4 mm For that matches the fabric in the groove... on the Beading Foot. 2. Turn the hand wheel to create manual stitches to sew over the 7 or 9 cords. Select either the zigzag stitch or the blindhem stitch with strings of pearls or beads. Lower the presser foot. 7. Thread your machine with invisible thread in...
Owner's Manual
Page 38
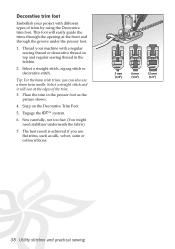
... on the Decorative Trim Foot. 5. Sew carefully, not too fast. (You might need stabilizer underneath the fabric) 7. Place the trim in the bobbin. 2. The best result is achieved if you can also use Áat the front and through the opening at trims, such as the picture ...shows. 4. Engage the IDT™ system. 6. Select a straight stitch, zigzag stitch or decorative stitch. Select a straight stitch and it will easily guide the trims through the groove under the presser foot. 1. Decorative trim foot Embellish your...
... on the Decorative Trim Foot. 5. Sew carefully, not too fast. (You might need stabilizer underneath the fabric) 7. Place the trim in the bobbin. 2. The best result is achieved if you can also use Áat the front and through the opening at trims, such as the picture ...shows. 4. Engage the IDT™ system. 6. Select a straight stitch, zigzag stitch or decorative stitch. Select a straight stitch and it will easily guide the trims through the groove under the presser foot. 1. Decorative trim foot Embellish your...
Owner's Manual
Page 41
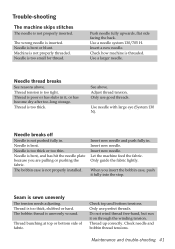
...through the winding tension. When you are pulling or pushing the fabric. Use a needle system 130/705 H. Needle is bent. Check needle and bobbin thread tensions. See above . Maintenance and trouble-shooting 41 Thread tension is threaded. Insert new needle and push fully in . Use a larger ... back. Check how machine is too tight. Needle is too thick. Thread is too small for thread. Only use good threads. The bobbin thread is not properly inserted. Trouble-shooting The machine skips stitches The needle is unevenly wound. Only use perfect threads. The wrong needle...
...through the winding tension. When you are pulling or pushing the fabric. Use a needle system 130/705 H. Needle is bent. Check needle and bobbin thread tensions. See above . Maintenance and trouble-shooting 41 Thread tension is threaded. Insert new needle and push fully in . Use a larger ... back. Check how machine is too tight. Needle is too thick. Thread is too small for thread. Only use good threads. The bobbin thread is not properly inserted. Trouble-shooting The machine skips stitches The needle is unevenly wound. Only use perfect threads. The wrong needle...


