

Owner's Manual
Page 2
... Sewing • Always use the proper needle plate. To reduce the risk of electric shock: • A sewing machine should always be followed, Read all moving parts. Replace bulb with same type rated 5 Watt. from the Keep ventilation accumulation of burns, fire, electric shock, or injury to persons: • Do not allow...
... Sewing • Always use the proper needle plate. To reduce the risk of electric shock: • A sewing machine should always be followed, Read all moving parts. Replace bulb with same type rated 5 Watt. from the Keep ventilation accumulation of burns, fire, electric shock, or injury to persons: • Do not allow...

Owner's Manual
Page 7
... suited for stretchy, easily 36 Open overedge stitch For joining operation. and serging light-knit and open -knit fabrics and jersey. For basting cut-out parts together. Durable work. serging very stretchy and easily fraying fabrics in 32 Closed overedge stitch For joining and serging in one 37 Light-knit fabric...
... suited for stretchy, easily 36 Open overedge stitch For joining operation. and serging light-knit and open -knit fabrics and jersey. For basting cut-out parts together. Durable work. serging very stretchy and easily fraying fabrics in 32 Closed overedge stitch For joining and serging in one 37 Light-knit fabric...
Owner's Manual
Page 18
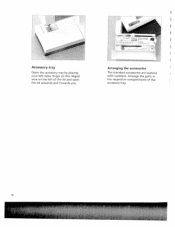
Accessory tray Open the accessory tray by placing your left index finger on the ridged area on the left of the accessory tray. 18 Arranging the accessories The standard accessories are marked with numbers. Arrange the parts in the respective compartments of the lid and open the lid upwards and towards you. L -
Accessory tray Open the accessory tray by placing your left index finger on the ridged area on the left of the accessory tray. 18 Arranging the accessories The standard accessories are marked with numbers. Arrange the parts in the respective compartments of the lid and open the lid upwards and towards you. L -

Owner's Manual
Page 27
Snap on the presser foot • Place the presser foot under the presser foot shank, so that the presser foot is lowered, the pins of the presser foot upwards and at the same time the rear part downwards until it disengages from the presser foot holder. 11% .i Changing the presser foot Press the front part of the foot snap in the presser foot shank. Check that when the presser foot lifter is properly attached by raising the presser foot lifter.
Snap on the presser foot • Place the presser foot under the presser foot shank, so that the presser foot is lowered, the pins of the presser foot upwards and at the same time the rear part downwards until it disengages from the presser foot holder. 11% .i Changing the presser foot Press the front part of the foot snap in the presser foot shank. Check that when the presser foot lifter is properly attached by raising the presser foot lifter.
Owner's Manual
Page 66
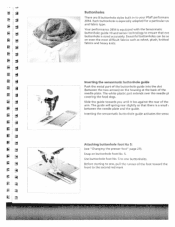
The white plastic part extends over the needle p1 covering the feed dogs. Your performance 2054 is equipped with the Sensormatic buttonhole guide 10 and sensor technology to ensure that there is a small between the two arrows) on the housing at ... heavy knits. Beautiful buttonholes can be se on buttonhole foot No. 5. Use buttonhole foot No. 5 to your Pfaff performanc 2054. Before starting to the second red mark - : Inserting the sensormatic buttonhole guide Push the metal part of the needle plate. Each buttonhole is sized accurately. The guide will spring rear slightly so that...
The white plastic part extends over the needle p1 covering the feed dogs. Your performance 2054 is equipped with the Sensormatic buttonhole guide 10 and sensor technology to ensure that there is a small between the two arrows) on the housing at ... heavy knits. Beautiful buttonholes can be se on buttonhole foot No. 5. Use buttonhole foot No. 5 to your Pfaff performanc 2054. Before starting to the second red mark - : Inserting the sensormatic buttonhole guide Push the metal part of the needle plate. Each buttonhole is sized accurately. The guide will spring rear slightly so that...
Owner's Manual
Page 79
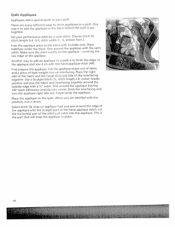
...0.4 - 0.5, stitch width 3 - 6, presser foot 2. First prepare the applique. This is to a quilt. Fuse the applique piece to the biock with the straight part of the hand applique stitch. Place the right side of the fabric and the rough (iron-on) side of the applique. Place the applique on... QuHt Apphques Appliques add a special touch to the block before the quilt is put together. One way is to add the applique to your performance 2054 for a satin stitch. covering the raw edge of the interfacing together. Select stitch 18, snap on applique foot and sew around the applique ...
...0.4 - 0.5, stitch width 3 - 6, presser foot 2. First prepare the applique. This is to a quilt. Fuse the applique piece to the biock with the straight part of the hand applique stitch. Place the right side of the fabric and the rough (iron-on) side of the applique. Place the applique on... QuHt Apphques Appliques add a special touch to the block before the quilt is put together. One way is to add the applique to your performance 2054 for a satin stitch. covering the raw edge of the interfacing together. Select stitch 18, snap on applique foot and sew around the applique ...


