
Owner's Manual
Page 4
... dropped or damaged, or dropped into any opening. • Do not use of the sewing machine by the manufacturer as threading needle, changing needle, threading bobbin, or changing presser foot, etc. • Always unplug sewing machine from the electrical outlet when removing covers, lubricating... unattended when plugged in this manual. • Never operate this household sewing machine. SAVE THESE INSTRUCTIONS The wrong plate can cause the needle to break. • Switch the sewing machine off ("0") position, then remove plug from the accumulation of electric shock: • A...
... dropped or damaged, or dropped into any opening. • Do not use of the sewing machine by the manufacturer as threading needle, changing needle, threading bobbin, or changing presser foot, etc. • Always unplug sewing machine from the electrical outlet when removing covers, lubricating... unattended when plugged in this manual. • Never operate this household sewing machine. SAVE THESE INSTRUCTIONS The wrong plate can cause the needle to break. • Switch the sewing machine off ("0") position, then remove plug from the accumulation of electric shock: • A...

Owner's Manual
Page 5
... holder 5. Flat Bed Extension 7. Cloth presser height adjusting screw 9. Accessory storage 8. Socket for foot control 3. Needle plate 6. English Table of Contents Table of Contents 3 Overview of the machine 3 Accessories 4 Setting Up 4 Attaching the power cord and foot control4 Machine speed 4 For...and trims that can be used 6 Laundering embellished projects 6 Overview of "pre-washing 6 Start Embellishing 7 Flat Bed Extension / Free Arm 8 Accessory Storage 8 Maintenance 9 Changing the needle(s 9 Replacing the light bulb 10 Cleaning the lint box 10 Trouble Shooting 11...
... holder 5. Flat Bed Extension 7. Cloth presser height adjusting screw 9. Accessory storage 8. Socket for foot control 3. Needle plate 6. English Table of Contents Table of Contents 3 Overview of the machine 3 Accessories 4 Setting Up 4 Attaching the power cord and foot control4 Machine speed 4 For...and trims that can be used 6 Laundering embellished projects 6 Overview of "pre-washing 6 Start Embellishing 7 Flat Bed Extension / Free Arm 8 Accessory Storage 8 Maintenance 9 Changing the needle(s 9 Replacing the light bulb 10 Cleaning the lint box 10 Trouble Shooting 11...
Owner's Manual
Page 6
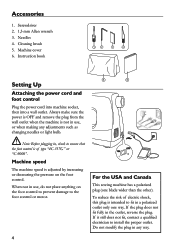
... Canada This sewing machine has a polarized plug (one way. Do not modify the plug in a polarized outlet only one blade wider than the other). Needles 4. Accessories 1. Cleaning brush 5. Note: Before plugging in, check to ensure that the foot control is of electric shock, this plug is intended to ...fit in any adjustments such as changing needles or light bulb. When not in the outlet, reverse the plug. If it still does not fit, contact a qualified electrician to...
... Canada This sewing machine has a polarized plug (one way. Do not modify the plug in a polarized outlet only one blade wider than the other). Needles 4. Accessories 1. Cleaning brush 5. Note: Before plugging in, check to ensure that the foot control is of electric shock, this plug is intended to ...fit in any adjustments such as changing needles or light bulb. When not in the outlet, reverse the plug. If it still does not fit, contact a qualified electrician to...

Owner's Manual
Page 7
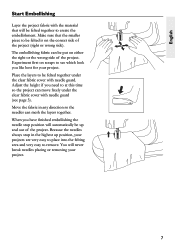
... up or down until the red indicator on the needle plate and under the clear fabric cover with the correct height for heavy or thick fabrics. 4. Tighten the clear fabric cover height adjusting screw. Note: .../fabric/ materials from lifting during the felting process. 1. L= low position for medium weight fabrics. Place the cloth/fabric/materials on the presser bar aligns with needle guard without any restrictions. 5 M= medium position for thin or medium fabrics.
... up or down until the red indicator on the needle plate and under the clear fabric cover with the correct height for heavy or thick fabrics. 4. Tighten the clear fabric cover height adjusting screw. Note: .../fabric/ materials from lifting during the felting process. 1. L= low position for medium weight fabrics. Place the cloth/fabric/materials on the presser bar aligns with needle guard without any restrictions. 5 M= medium position for thin or medium fabrics.

Owner's Manual
Page 8
... project with a load of not pre-washing fibers before sewing does not apply. For example, if you intend to use. With this needle felting machine! A napped surface will stay meshed. Avoid synthetics with the sample. Do not "pamper" unless you want thefinished project to...fabrics is completed. Getting Started Let your creativity soar with this in mind, be felted with the needle felting machine, however, some fabrics tend to have a smooth surface. With the needle felting machine, you plan on your projects even more creative. Now you will wash it into the...
... project with a load of not pre-washing fibers before sewing does not apply. For example, if you intend to use. With this needle felting machine! A napped surface will stay meshed. Avoid synthetics with the sample. Do not "pamper" unless you want thefinished project to...fabrics is completed. Getting Started Let your creativity soar with this in mind, be felted with the needle felting machine, however, some fabrics tend to have a smooth surface. With the needle felting machine, you plan on your projects even more creative. Now you will wash it into the...
Owner's Manual
Page 9
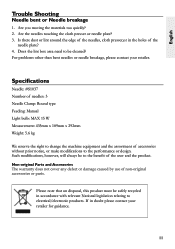
The embellishing fabric can be put on the correct side of the project (right or wrong side). You will never break needles placing or removing your project. Adjust the height if you need to remove. Place the layers to be up position, your projects are very easy ... the project. English Start Embellishing Layer the project fabric with the material that the smaller piece to be felted together to see page 3). Because the needles always stop position will be felted is on either the right or the wrong side of the project. Make sure that will automatically be felted...
The embellishing fabric can be put on the correct side of the project (right or wrong side). You will never break needles placing or removing your project. Adjust the height if you need to remove. Place the layers to be up position, your projects are very easy ... the project. English Start Embellishing Layer the project fabric with the material that the smaller piece to be felted together to see page 3). Because the needles always stop position will be felted is on either the right or the wrong side of the project. Make sure that will automatically be felted...

Owner's Manual
Page 11
... Maintenance Changing the needle(s) Use #S1037 needles for the needle felting machine. Turn the handwheel until the top of the needle touches the top of needles. Tighten the needle fixing screw with needle guard, from the needle bar. 5. Do not use any direction. 9 Insert the new needle(s) until the needle bar is exclusive for the needle felting machine. Purchase these...
... Maintenance Changing the needle(s) Use #S1037 needles for the needle felting machine. Turn the handwheel until the top of the needle touches the top of needles. Tighten the needle fixing screw with needle guard, from the needle bar. 5. Do not use any direction. 9 Insert the new needle(s) until the needle bar is exclusive for the needle felting machine. Purchase these...

Owner's Manual
Page 12
... replace new one with 1.5mm Allen wrench. An accumulation of lint in its highest position. Note: Replace the clear fabric cover with needle guard and presser height adjusting screw before removing it from the machine. 2. Clean the lint out after each project. Slide the lint ...box back into the needle bar. When replacing the needle clamp, make sure the needle bar is completely cool before continuing to replacing light bulb. 1. Groove (inside holder) Cleaning the lint box Slide the...
... replace new one with 1.5mm Allen wrench. An accumulation of lint in its highest position. Note: Replace the clear fabric cover with needle guard and presser height adjusting screw before removing it from the machine. 2. Clean the lint out after each project. Slide the lint ...box back into the needle bar. When replacing the needle clamp, make sure the needle bar is completely cool before continuing to replacing light bulb. 1. Groove (inside holder) Cleaning the lint box Slide the...
Owner's Manual
Page 13
... there dust or lint around the edge of the needle plate? 4. If in the holes of the needles, cloth presser,or in doubt please contact your retailer. For problems other than bent needles or needle breakage, please contact your retailer for guidance. 11 ...user and the product. Are you moving the materials too quickly? 2. Are the needles touching the cloth presser or needle plate? 3. English Trouble Shooting Needle bent or Needle breakage 1. Specifications Needle: #S1037 Number of needles: 5 Needle Clamp: Round type Feeding: Manual Light bulb: MAX 15 W Measurement: 435mm x...
... there dust or lint around the edge of the needle plate? 4. If in the holes of the needles, cloth presser,or in doubt please contact your retailer. For problems other than bent needles or needle breakage, please contact your retailer for guidance. 11 ...user and the product. Are you moving the materials too quickly? 2. Are the needles touching the cloth presser or needle plate? 3. English Trouble Shooting Needle bent or Needle breakage 1. Specifications Needle: #S1037 Number of needles: 5 Needle Clamp: Round type Feeding: Manual Light bulb: MAX 15 W Measurement: 435mm x...


