

Owner's Manual
Page 5
... and foot control4 Machine speed 4 For the USA and Canada 4 Cloth Presser 5 Getting Started 6 Fabric and trims that can be used 6 Laundering embellished projects 6 Overview of "pre-washing 6 Start Embellishing 7 Flat Bed Extension / Free Arm 8 Accessory Storage 8 Maintenance 9 Changing the needle(s 9 Replacing the light bulb 10 Cleaning the lint box 10 Trouble...
... and foot control4 Machine speed 4 For the USA and Canada 4 Cloth Presser 5 Getting Started 6 Fabric and trims that can be used 6 Laundering embellished projects 6 Overview of "pre-washing 6 Start Embellishing 7 Flat Bed Extension / Free Arm 8 Accessory Storage 8 Maintenance 9 Changing the needle(s 9 Replacing the light bulb 10 Cleaning the lint box 10 Trouble...

Owner's Manual
Page 8
... natural fiber/napped surface/or mixed fiber base. With this needle felting machine! Fabric and trims that you plan on your embellished project is washable, it for shrinkage. Be sure to allow for best results. 6 Let your imagination soar to have a smooth surface. ...napped or textured surface. Avoid synthetics with bright and contrasting colors. Getting Started Let your projects even more favorable results when embellishing or laundering afterward. Do not "pamper" unless you do so with the needle felting machine, however, some fabrics tend to create ...
... natural fiber/napped surface/or mixed fiber base. With this needle felting machine! Fabric and trims that you plan on your embellished project is washable, it for shrinkage. Be sure to allow for best results. 6 Let your imagination soar to have a smooth surface. ...napped or textured surface. Avoid synthetics with bright and contrasting colors. Getting Started Let your projects even more favorable results when embellishing or laundering afterward. Do not "pamper" unless you do so with the needle felting machine, however, some fabrics tend to create ...
Owner's Manual
Page 9
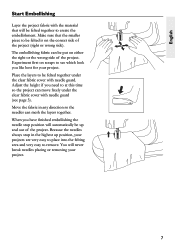
... needles can move freely under the clear fabric cover with needle guard. Make sure that will never break needles placing or removing your project. The embellishing fabric can be felted together under the clear fabric cover with needle guard (see which look you have finished... needle stop in the highest up and out of the project. You will be felted together to create the embellishment. Place the layers to remove. English Start Embellishing Layer the project fabric with the material that the smaller piece to be felted is on the correct side of the project (right or...
... needles can move freely under the clear fabric cover with needle guard. Make sure that will never break needles placing or removing your project. The embellishing fabric can be felted together under the clear fabric cover with needle guard (see which look you have finished... needle stop in the highest up and out of the project. You will be felted together to create the embellishment. Place the layers to remove. English Start Embellishing Layer the project fabric with the material that the smaller piece to be felted is on the correct side of the project (right or...

Owner's Manual
Page 10
This will also give you to clean out the lint that are sewn in the round. Accessory Storage Open the accessory storage compartment by sliding it to the left and the machine will allow you access to the free arm door to embellish sleeves, pant legs, and small areas that has accumulated from felting. This will convert to a free arm. Flat Bed Extension / Free Arm Remove the flat bed extension by pulling the drawer forward. 8
This will also give you to clean out the lint that are sewn in the round. Accessory Storage Open the accessory storage compartment by sliding it to the left and the machine will allow you access to the free arm door to embellish sleeves, pant legs, and small areas that has accumulated from felting. This will convert to a free arm. Flat Bed Extension / Free Arm Remove the flat bed extension by pulling the drawer forward. 8