
Owner's Manual
Page 2
.... • Do not use as threading needle, changing needle, threading bobbin, or changing presser foot, etc. • Always unplug the sewing machine from the electrical outlet when removing covers, lubricating, or when making any other user servicing adjustments mentioned in the instruction manual. • Never... dropped or damaged, or dropped into any air openings blocked. To unplug, grasp the plug, not the cord. This household sewing machine is designed to comply with IEC/EN 60335-2-28 and UL1594 IMPORTANT SAFETY INSTRUCTIONS When using an electrical appliance, basic safety precautions ...
.... • Do not use as threading needle, changing needle, threading bobbin, or changing presser foot, etc. • Always unplug the sewing machine from the electrical outlet when removing covers, lubricating, or when making any other user servicing adjustments mentioned in the instruction manual. • Never... dropped or damaged, or dropped into any air openings blocked. To unplug, grasp the plug, not the cord. This household sewing machine is designed to comply with IEC/EN 60335-2-28 and UL1594 IMPORTANT SAFETY INSTRUCTIONS When using an electrical appliance, basic safety precautions ...

Owner's Manual
Page 3
... your very own fashion ideas. If you have bought a quality product made by Pfaff which will be happy to assist you many enjoyable hours creating your machine can do and make sewing much easier for fun hobby Congratulations! Your new sewing machine features the very latest in design and technology. It is certainly time well spent...
... your very own fashion ideas. If you have bought a quality product made by Pfaff which will be happy to assist you many enjoyable hours creating your machine can do and make sewing much easier for fun hobby Congratulations! Your new sewing machine features the very latest in design and technology. It is certainly time well spent...
Owner's Manual
Page 5
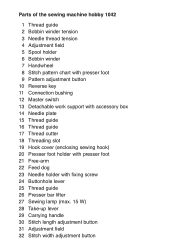
Parts of the sewing machine hobby 1042 1 Thread guide 2 Bobbin winder tension 3 Needle thread tension 4 Adjustment field 5 Spool holder 6 Bobbin winder 7 Handwheel ...box 14 Needle plate 15 Thread guide 16 Thread guide 17 Thread cutter 18 Threading slot 19 Hook cover (enclosing sewing hook) 20 Presser foot holder with presser foot 21 Free-arm 22 Feed dog 23 Needle holder with fixing ...screw 24 Buttonhole lever 25 Thread guide 26 Presser bar lifter 27 Sewing lamp (max. 15 W) 28 Take-up lever 29 Carrying handle 30 Stitch length adjustment button 31 Adjustment field ...
Parts of the sewing machine hobby 1042 1 Thread guide 2 Bobbin winder tension 3 Needle thread tension 4 Adjustment field 5 Spool holder 6 Bobbin winder 7 Handwheel ...box 14 Needle plate 15 Thread guide 16 Thread guide 17 Thread cutter 18 Threading slot 19 Hook cover (enclosing sewing hook) 20 Presser foot holder with presser foot 21 Free-arm 22 Feed dog 23 Needle holder with fixing ...screw 24 Buttonhole lever 25 Thread guide 26 Presser bar lifter 27 Sewing lamp (max. 15 W) 28 Take-up lever 29 Carrying handle 30 Stitch length adjustment button 31 Adjustment field ...

Owner's Manual
Page 7
Parts of the sewing machine hobby 1022 and 1032 1 Thread guide 2 Bobbin winder tension 3 Needle thread tension 4 Adjustment field 5 Spool holder 6 Bobbin winder 7 Handwheel 8 Stitch pattern chart with presser foot 9 Pattern adjustment button 10 ... Detachable work support with accessory box 14 Needle plate 15 Thread guide 16 Thread guide 17 Thread cutter 18 Threading slot 19 Hook cover (enclosing sewing hook) 20 Presser foot holder with presser foot 21 Free-arm 22 Feed dog 23 Needle holder with fixing screw 25 Thread guide 26 Presser...
Parts of the sewing machine hobby 1022 and 1032 1 Thread guide 2 Bobbin winder tension 3 Needle thread tension 4 Adjustment field 5 Spool holder 6 Bobbin winder 7 Handwheel 8 Stitch pattern chart with presser foot 9 Pattern adjustment button 10 ... Detachable work support with accessory box 14 Needle plate 15 Thread guide 16 Thread guide 17 Thread cutter 18 Threading slot 19 Hook cover (enclosing sewing hook) 20 Presser foot holder with presser foot 21 Free-arm 22 Feed dog 23 Needle holder with fixing screw 25 Thread guide 26 Presser...

Owner's Manual
Page 9
... O Oiling the machine One step buttonhole Open overlock stitch Overlock stitches P Patchwork quilt Practical sewing Presser bar lifter Q Quilt and patchwork foot R Repairing tears Reverse sewing Richelieu Roll hemming RufÁer 62 35-37 32 32 51 25 17 58 43 24 50 46...with the blind stitch foot 28 Serging with the zigzag stitch 27 Setting utility stitches 22 Sewing feet (normal accessories) 54 Sewing feet (special accessories) 55 Sewing lamp 63 Sewing on patches 42 Sewing problems and their solutions 64 Shell edging 48 Smocking 39 Special accessories chart 55 Spool ...
... O Oiling the machine One step buttonhole Open overlock stitch Overlock stitches P Patchwork quilt Practical sewing Presser bar lifter Q Quilt and patchwork foot R Repairing tears Reverse sewing Richelieu Roll hemming RufÁer 62 35-37 32 32 51 25 17 58 43 24 50 46...with the blind stitch foot 28 Serging with the zigzag stitch 27 Setting utility stitches 22 Sewing feet (normal accessories) 54 Sewing feet (special accessories) 55 Sewing lamp 63 Sewing on patches 42 Sewing problems and their solutions 64 Shell edging 48 Smocking 39 Special accessories chart 55 Spool ...

Owner's Manual
Page 14
... of the basic equipment, protects your sewing machine from behind. Before putting on the carrying case, lift up when the master switch (12) is turned on. Carrying case The carrying case, which is now ready to sew. The sewing speed is pointing toward you. 220 ... Master switch The sewing lamp lights up the carrying handle. Operating the machine Carrying handle Lift up the carrying handle of the sewing machine from dust and damage during transport. Make sure the sewing machine symbol on the sewing machine and the electrical socket. For this sewing machine has to the connection...
... of the basic equipment, protects your sewing machine from behind. Before putting on the carrying case, lift up when the master switch (12) is turned on. Carrying case The carrying case, which is now ready to sew. The sewing speed is pointing toward you. 220 ... Master switch The sewing lamp lights up the carrying handle. Operating the machine Carrying handle Lift up the carrying handle of the sewing machine from dust and damage during transport. Make sure the sewing machine symbol on the sewing machine and the electrical socket. For this sewing machine has to the connection...
Owner's Manual
Page 15
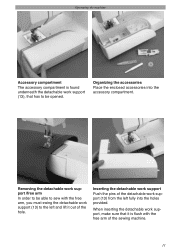
... Place the enclosed accessories into the holes provided. Removing the detachable work support /free arm In order to be able to sew with the free arm of the sewing machine. 11 Operating the machine Accessory compartment The accessory compartment is Áush with the free arm, you must swing the detachable work support (13...
... Place the enclosed accessories into the holes provided. Removing the detachable work support /free arm In order to be able to sew with the free arm of the sewing machine. 11 Operating the machine Accessory compartment The accessory compartment is Áush with the free arm, you must swing the detachable work support (13...
Owner's Manual
Page 18
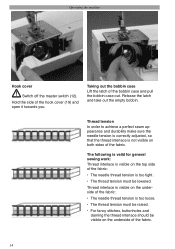
... too tight . • The thread tension must be raised. • For fancy stitches, buttonholes and darning the thread interlace should be lowered. Operating the machine Hook cover Switch off the master switch (12). The following is valid for general sewing work: Thread interlace is visible on the top side of the fabric.
... too tight . • The thread tension must be raised. • For fancy stitches, buttonholes and darning the thread interlace should be lowered. Operating the machine Hook cover Switch off the master switch (12). The following is valid for general sewing work: Thread interlace is visible on the top side of the fabric.
Owner's Manual
Page 19
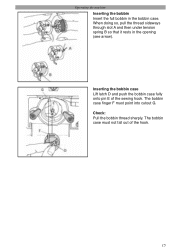
The bobbin case Ànger F must not fall out of the sewing hook. Check: Pull the bobbin thread sharply. When doing so, pull the thread sideways through slot A and then under tension spring B so that it rests in the bobbin case. Inserting the bobbin case Lift latch D and push the bobbin case fully onto pin E of the hook. 15 The bobbin case must point into cutout G. Operating the machine Inserting the bobbin Insert the full bobbin in the opening (see arrow).
The bobbin case Ànger F must not fall out of the sewing hook. Check: Pull the bobbin thread sharply. When doing so, pull the thread sideways through slot A and then under tension spring B so that it rests in the bobbin case. Inserting the bobbin case Lift latch D and push the bobbin case fully onto pin E of the hook. 15 The bobbin case must point into cutout G. Operating the machine Inserting the bobbin Insert the full bobbin in the opening (see arrow).
Owner's Manual
Page 24
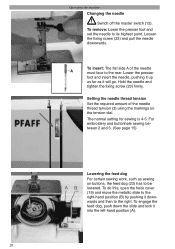
... 2 and 3. (See page 15) AB Lowering the feed dog For certain sewing work, such as it up as far as sewing on the tension dial. Operating the machine Changing the needle Switch off the master switch (12). Lower the presser foot and insert the needle, pushing it will go. Loosen the Àxing... Áat side A of the needle thread tension (3) using the markings on buttons, the feed dog (22) has to the right. The normal setting for sewing is 4-5.
... 2 and 3. (See page 15) AB Lowering the feed dog For certain sewing work, such as it up as far as sewing on the tension dial. Operating the machine Changing the needle Switch off the master switch (12). Lower the presser foot and insert the needle, pushing it will go. Loosen the Àxing... Áat side A of the needle thread tension (3) using the markings on buttons, the feed dog (22) has to the right. The normal setting for sewing is 4-5.
Owner's Manual
Page 25
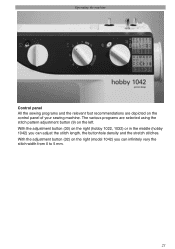
With the adjustment button (32) on the right (hobby 1022, 1032) or in the middle (hobby 1042) you can adjust the stitch length, the buttonhole density and the stretch stitches. With the adjustment button (30) on the right (model 1042) you can inÀnitely vary the stitch width from 0 to 5 mm. 21 Operating the machine Control panel All the sewing programs and the relevant foot recommendations are selected using the stitch pattern adjustment button (9) on the control panel of your sewing machine. The various programs are depicted on the left.
With the adjustment button (32) on the right (hobby 1022, 1032) or in the middle (hobby 1042) you can adjust the stitch length, the buttonhole density and the stretch stitches. With the adjustment button (30) on the right (model 1042) you can inÀnitely vary the stitch width from 0 to 5 mm. 21 Operating the machine Control panel All the sewing programs and the relevant foot recommendations are selected using the stitch pattern adjustment button (9) on the control panel of your sewing machine. The various programs are depicted on the left.

Owner's Manual
Page 26
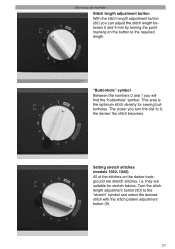
... set the desired stitch by turning the dial until the required letter appears in the adjustment Àeld (4). Operating the machine Setting utility stitches All stitch patterns that you can sew with your machine are illustrated in the stitch pattern chart (8). Note: For embroidering use the clear view foot. 22 Turn the stitch...
... set the desired stitch by turning the dial until the required letter appears in the adjustment Àeld (4). Operating the machine Setting utility stitches All stitch patterns that you can sew with your machine are illustrated in the stitch pattern chart (8). Note: For embroidering use the clear view foot. 22 Turn the stitch...
Owner's Manual
Page 27
...nd the "buttonhole" symbol. they are stretch stitches, i.e. This area is the optimum stitch density for stretch fabrics. Setting stretch stitches (models 1032, 1042) All of the stitches on the button to the "stretch" symbol and select the desired stitch with the stitch pattern adjustment button ...you turn the dial to 0, the denser the stitch becomes. Turn the stitch length adjustment button (30) to the required length. Operating the machine Stitch length adjustment button With the stitch length adjustment button (30) you can adjust the stitch length between 0 and 4 mm by turning ...
...nd the "buttonhole" symbol. they are stretch stitches, i.e. This area is the optimum stitch density for stretch fabrics. Setting stretch stitches (models 1032, 1042) All of the stitches on the button to the "stretch" symbol and select the desired stitch with the stitch pattern adjustment button ...you turn the dial to 0, the denser the stitch becomes. Turn the stitch length adjustment button (30) to the required length. Operating the machine Stitch length adjustment button With the stitch length adjustment button (30) you can adjust the stitch length between 0 and 4 mm by turning ...

Owner's Manual
Page 28
Reverse sewing The machine sews in Ànitely adjust the width from 0 to 5 mm. Operating the machine Stitch width adjustment button (model 1042) With the stitch width adjustment button (32) you can in reverse only as long as the reverse sewing key (10) is pressed. 24 The required width appears in the adjustment Àeld (31).
Reverse sewing The machine sews in Ànitely adjust the width from 0 to 5 mm. Operating the machine Stitch width adjustment button (model 1042) With the stitch width adjustment button (32) you can in reverse only as long as the reverse sewing key (10) is pressed. 24 The required width appears in the adjustment Àeld (31).
Owner's Manual
Page 37
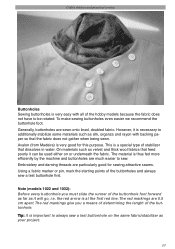
... that dissolves in water. Note (models 1022 and 1032): Before every buttonhole you a means of determining the length of the buttonholes and always sew a test buttonhole Àrst. The red markings give you must slide the runner of the hobby models because the fabric does not have to additionally ...more efÀciently by the machine and buttonholes are particularly good for this purpose. The red markings are sewn onto lined, doubled fabric. This is at the first red line. Avalon (from Madeira) is important to sew. Tip: It is very good for sewing attractive seams. Using a fabric ...
... that dissolves in water. Note (models 1022 and 1032): Before every buttonhole you a means of determining the length of the buttonholes and always sew a test buttonhole Àrst. The red markings give you must slide the runner of the hobby models because the fabric does not have to additionally ...more efÀciently by the machine and buttonholes are particularly good for this purpose. The red markings are sewn onto lined, doubled fabric. This is at the first red line. Avalon (from Madeira) is important to sew. Tip: It is very good for sewing attractive seams. Using a fabric ...

Owner's Manual
Page 39
Set the machine: Stitch A Stitch length at "buttonhole" symbol • Place the button on the fabric and mark the upper and lower point to 2.5 cm (1ß) can be ... (9). Insert the button and push the button holder together as far as it will go. • Attach the buttonhole foot R. 35 Utility stitches and practical sewing 1 step buttonhole (model 1042) For the 1 step buttonhole, the size of the buttonhole foot.
Set the machine: Stitch A Stitch length at "buttonhole" symbol • Place the button on the fabric and mark the upper and lower point to 2.5 cm (1ß) can be ... (9). Insert the button and push the button holder together as far as it will go. • Attach the buttonhole foot R. 35 Utility stitches and practical sewing 1 step buttonhole (model 1042) For the 1 step buttonhole, the size of the buttonhole foot.
Owner's Manual
Page 40
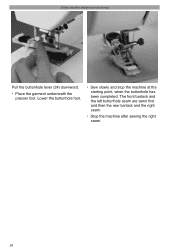
Lower the buttonhole foot. • Sew slowly and stop the machine at the starting point, when the buttonhole has been completed. The front bartack and the left buttonhole seam are sewn Àrst and then the rear bartack and the right seam. • Stop the machine after sewing the right seam. 36 Utility stitches and practical sewing Pull the buttonhole lever (24) downward. • Place the garment underneath the presser foot.
Lower the buttonhole foot. • Sew slowly and stop the machine at the starting point, when the buttonhole has been completed. The front bartack and the left buttonhole seam are sewn Àrst and then the rear bartack and the right seam. • Stop the machine after sewing the right seam. 36 Utility stitches and practical sewing Pull the buttonhole lever (24) downward. • Place the garment underneath the presser foot.
Owner's Manual
Page 54
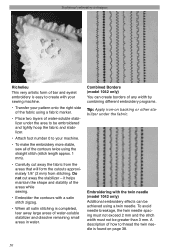
.... Combined Borders (model 1042 only) You can be greater than 3 mm. it helps maintain the shape and stability of the areas while sewing. • Embroider the contours with your sewing machine. • Transfer your pattern onto the right side of the fabric using a fabric marker. • Place two layers of water-soluble stabilizer...
.... Combined Borders (model 1042 only) You can be greater than 3 mm. it helps maintain the shape and stability of the areas while sewing. • Embroider the contours with your sewing machine. • Transfer your pattern onto the right side of the fabric using a fabric marker. • Place two layers of water-soluble stabilizer...
Owner's Manual
Page 55
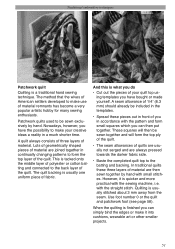
... creative ideas a reality in continually changing patterns to the back layer of material remnants has become a very popular artistic hobby for many sewing enthusiasts. In traditional quilts these pieces out in front of fabric. And this is usually one uniform piece of you ...other smaller projects. 51 Lots of geometrically shaped pieces of material are joined together in a much shorter time. with the sewing machine, i.e. Quilting is a traditional hand sewing technique. Use foot number 0 or the quilt and patchwork foot (see page 58). These squares will then be included in...
... creative ideas a reality in continually changing patterns to the back layer of material remnants has become a very popular artistic hobby for many sewing enthusiasts. In traditional quilts these pieces out in front of fabric. And this is usually one uniform piece of you ...other smaller projects. 51 Lots of geometrically shaped pieces of material are joined together in a much shorter time. with the sewing machine, i.e. Quilting is a traditional hand sewing technique. Use foot number 0 or the quilt and patchwork foot (see page 58). These squares will then be included in...
Owner's Manual
Page 71
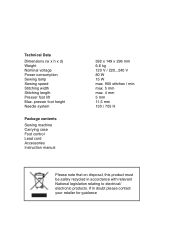
presser foot height Needle system Package contents Sewing machine Carrying case Foot control Lead cord Accessories Instruction manual 392 x 149 x 296 mm 6,6 kg 120 V / 220...240 V 80 W 15 W max. 900 stitches / min. max. 5 mm ... that on disposal, this product must be safely recycled in doubt please contact your retailer for guidance Technical Data Dimensions (w x h x d) Weight Nominal voltage Power consumption Sewing lamp Sewing speed Stitching width Stitching length Presser foot lift Max. If in accordance with relevant National legislation relating to electrical/ electronic products.
presser foot height Needle system Package contents Sewing machine Carrying case Foot control Lead cord Accessories Instruction manual 392 x 149 x 296 mm 6,6 kg 120 V / 220...240 V 80 W 15 W max. 900 stitches / min. max. 5 mm ... that on disposal, this product must be safely recycled in doubt please contact your retailer for guidance Technical Data Dimensions (w x h x d) Weight Nominal voltage Power consumption Sewing lamp Sewing speed Stitching width Stitching length Presser foot lift Max. If in accordance with relevant National legislation relating to electrical/ electronic products.


