Owner's Manual
Page 2
... extreme care and knowledge of the system and should be followed, including the following: Read all instructions before using this sewing machine from the electric outlet immediately after using and before cleaning. • Always unplug before relamping. IMPORTANT SAFETY INSTRUCTIONS When using...contained in . To unplug, grasp the plug, not the cord. • This sewing machine is provided on cord. Always unplug this household sewing machine. Keep ventilation openings of the sewing machine and foot controller free from the accumulation of Double-Insulated Appliances. No ground means ...
... extreme care and knowledge of the system and should be followed, including the following: Read all instructions before using this sewing machine from the electric outlet immediately after using and before cleaning. • Always unplug before relamping. IMPORTANT SAFETY INSTRUCTIONS When using...contained in . To unplug, grasp the plug, not the cord. • This sewing machine is provided on cord. Always unplug this household sewing machine. Keep ventilation openings of the sewing machine and foot controller free from the accumulation of Double-Insulated Appliances. No ground means ...
Owner's Manual
Page 3
... Unpacking 10 Connect to the power supply 10 Pack away after sewing 11 Free arm 11 Thread cutter 11 Spool pins 11 Horizontal position 11 Vertical position 12 Auxiliary spool pin 12 Threading the machine 12 Needle threader 13 Threading for twin needle 13 Bobbin winding...23 Tie-off options 23 Mainmotor overload 23 Sewing techniques 24 Quilting 24 Darning 24 Free-motion position 25 Buttonholes 25 Sew on a button 26 Optional presser feet 27 Maintenance 30 Changing the light bulbs 30 Cleaning the machine 30 Replacing the stitch plate 31 Troubleshooting ...
... Unpacking 10 Connect to the power supply 10 Pack away after sewing 11 Free arm 11 Thread cutter 11 Spool pins 11 Horizontal position 11 Vertical position 12 Auxiliary spool pin 12 Threading the machine 12 Needle threader 13 Threading for twin needle 13 Bobbin winding...23 Tie-off options 23 Mainmotor overload 23 Sewing techniques 24 Quilting 24 Darning 24 Free-motion position 25 Buttonholes 25 Sew on a button 26 Optional presser feet 27 Maintenance 30 Changing the light bulbs 30 Cleaning the machine 30 Replacing the stitch plate 31 Troubleshooting ...
Owner's Manual
Page 6
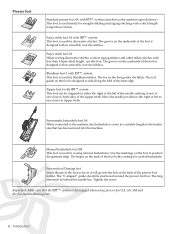
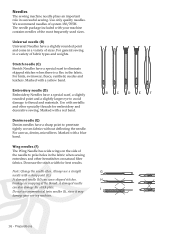
...Áow smoothly over the stitches. Move the needle position to the right or left of the needle, making it will go into the machine. Tighten the screw. The groove on the underside of the hem edge. Zipper foot 4 with IDT™ system This foot can be snapped... buttonholes. Fancy stitch foot 2A When sewing decorative stitches or short zigzag stitches and other utility stitches with less than 1.0 mm. Sensormatic buttonhole foot 5A When connected to the machine, the buttonhole is used for decorative stitches. The toe on the machine upon delivery) This foot is sewn in a ...
...Áow smoothly over the stitches. Move the needle position to the right or left of the needle, making it will go into the machine. Tighten the screw. The groove on the underside of the hem edge. Zipper foot 4 with IDT™ system This foot can be snapped... buttonholes. Fancy stitch foot 2A When sewing decorative stitches or short zigzag stitches and other utility stitches with less than 1.0 mm. Sensormatic buttonhole foot 5A When connected to the machine, the buttonhole is used for decorative stitches. The toe on the machine upon delivery) This foot is sewn in a ...
Owner's Manual
Page 9
... optional Bi-level Topstitch Foot w/IDT™ system (Part number 820676-096). Requires optional Beading Foot, delivered in a separate package with your PFAFF® expression™ sewing machine. 194 Beading stitch For sewing on yarn and cord. Requires optional Bi-level Topstitch Foot w/IDT™ system (Part number 820676-096). 200 Edge stitch Use for... 125 126 127 128 129 130 131 132 133 134 135 136 137 138 139 140 141 142 143 144 145 146 147 148 149 150 151 152 153 154 155 156 157 158 159 160 161 162 163 164 165 166 167 168 169 170 171 172 173 174 175...
... optional Bi-level Topstitch Foot w/IDT™ system (Part number 820676-096). Requires optional Beading Foot, delivered in a separate package with your PFAFF® expression™ sewing machine. 194 Beading stitch For sewing on yarn and cord. Requires optional Bi-level Topstitch Foot w/IDT™ system (Part number 820676-096). 200 Edge stitch Use for... 125 126 127 128 129 130 131 132 133 134 135 136 137 138 139 140 141 142 143 144 145 146 147 148 149 150 151 152 153 154 155 156 157 158 159 160 161 162 163 164 165 166 167 168 169 170 171 172 173 174 175...

Owner's Manual
Page 10
...the socket inside . Lay the cord in the foot control, check to the rear socket on the underside of the machine (B). Connect the power cord to ensure that it is properly connected. Plug the cord into the wall socket. 4....rst time you will Ànd the power cord and the foot control. Push Àrmly to use the machine. 2. To reduce the risk of foot control). 1. Connect to the power supply Among the accessories you are going...packing purposes only and should be removed. For the USA and Canada This sewing machine has a polarized plug (one way. Preparations C A B
...the socket inside . Lay the cord in the foot control, check to the rear socket on the underside of the machine (B). Connect the power cord to ensure that it is properly connected. Plug the cord into the wall socket. 4....rst time you will Ànd the power cord and the foot control. Push Àrmly to use the machine. 2. To reduce the risk of foot control). 1. Connect to the power supply Among the accessories you are going...packing purposes only and should be removed. For the USA and Canada This sewing machine has a polarized plug (one way. Preparations C A B
Owner's Manual
Page 11
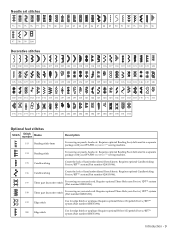
... storage. 4. There should be pressed Àrmly against the spool. Small spool cap Large spool cap Preparations - 11 Unplug the foot control cord from the machine. 3. Free arm To use a smaller spool cap in a horizontal position (the thread reels off the spool) and a vertical position (the thread spool rotates). When attached... main spool pin is adjustable and can be no space between the spool cap and the thread spool. Pack away after sewing 1. Wind the cord around the free arm. 5. For narrow thread spools, use the free arm, slide off . 2. The Áat side of the spool cap...
... storage. 4. There should be pressed Àrmly against the spool. Small spool cap Large spool cap Preparations - 11 Unplug the foot control cord from the machine. 3. Free arm To use a smaller spool cap in a horizontal position (the thread reels off the spool) and a vertical position (the thread spool rotates). When attached... main spool pin is adjustable and can be no space between the spool cap and the thread spool. Pack away after sewing 1. Wind the cord around the free arm. 5. For narrow thread spools, use the free arm, slide off . 2. The Áat side of the spool cap...
Owner's Manual
Page 12
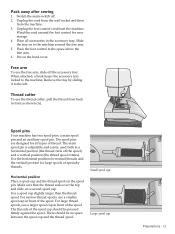
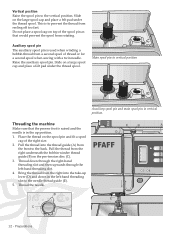
...the right underneath the bobbin winder thread guide (B) on the large spool cap and place a felt pad under the thread spool. PFA Threading the machine Make sure that the presser foot is raised and the needle is used when winding a bobbin thread from a second spool of the spool pin... vertical position. Auxiliary spool pin The auxiliary spool pin is in vertical position. Place the thread on top of thread or for a second spool when sewing with a twin needle. Pull the thread into the take-up position. 1. Thread down in the left -hand threading slot. 4. Thread the needle. ...
...the right underneath the bobbin winder thread guide (B) on the large spool cap and place a felt pad under the thread spool. PFA Threading the machine Make sure that the presser foot is raised and the needle is used when winding a bobbin thread from a second spool of the spool pin... vertical position. Auxiliary spool pin The auxiliary spool pin is in vertical position. Place the thread on top of thread or for a second spool when sewing with a twin needle. Pull the thread into the take-up position. 1. Thread down in the left -hand threading slot. 4. Thread the needle. ...
Owner's Manual
Page 15
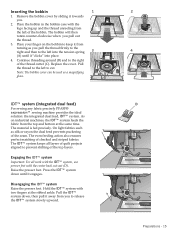
... shifting of the bobbin. Pull the thread to release the IDT™ system slowly upward. A C IDT™ system (integrated dual feed) D For sewing any fabric precisely PFAFF® expression™ sewing machine provides the ideal solution: the integrated dual feed, IDT™ system. Preparations - 15 The material is fed precisely. Disengaging the IDT™ system...
... shifting of the bobbin. Pull the thread to release the IDT™ system slowly upward. A C IDT™ system (integrated dual feed) D For sewing any fabric precisely PFAFF® expression™ sewing machine provides the ideal solution: the integrated dual feed, IDT™ system. Preparations - 15 The material is fed precisely. Disengaging the IDT™ system...
Owner's Manual
Page 16
... F G H I ), since it may damage your machine contains needles of the needle to thread and materials. Marked with a red band. A damaged needle (H) can also damage the stitch plate. Use only quality needles. Use with your sewing machine. For general sewing in a variety of system 130/705H. For canvas,... denim, microÀbers. Needles The sewing machine needle plays an important role in successful...
... F G H I ), since it may damage your machine contains needles of the needle to thread and materials. Marked with a red band. A damaged needle (H) can also damage the stitch plate. Use only quality needles. Use with your sewing machine. For general sewing in a variety of system 130/705H. For canvas,... denim, microÀbers. Needles The sewing machine needle plays an important role in successful...
Owner's Manual
Page 17
... needle screw. Attach presser foot Place the presser foot under the presser foot holder, so that the presser foot is lowered, the pins of the sewing machine to hold the needle. 2. Push the new needle upwards with the Áat side away from the presser foot holder. Move the switch to raise...
... needle screw. Attach presser foot Place the presser foot under the presser foot holder, so that the presser foot is lowered, the pins of the sewing machine to hold the needle. 2. Push the new needle upwards with the Áat side away from the presser foot holder. Move the switch to raise...
Owner's Manual
Page 18
... full speed. Press the speed button again to view the density setting for the selected stitch. 18 - If you press the reverse button while sewing, the machine sews in reverse until the tie-off end and darning stitches to change the stitch position. Preparations You can also tap the foot control to... decrease the stitch width using the + and - Use the + and buttons to view the stitch positioning for as long as you view all your machine sews a few tie-off options are no longer in real size. buttons to step between the parts of the needle stop in the down is activated...
... full speed. Press the speed button again to view the density setting for the selected stitch. 18 - If you press the reverse button while sewing, the machine sews in reverse until the tie-off end and darning stitches to change the stitch position. Preparations You can also tap the foot control to... decrease the stitch width using the + and - Use the + and buttons to view the stitch positioning for as long as you view all your machine sews a few tie-off options are no longer in real size. buttons to step between the parts of the needle stop in the down is activated...

Owner's Manual
Page 19
... (13) By pressing one of, or a combination of a buttonhole and moving between stitches, setting the size of , the 0 to start sewing at the beginning of the length setting. Stitch restart (16) When having to reset any special settings you have several functions, for example stepping between...the menu for OK. It is a checkmark for machine settings. Settings menu (15) Press this button to deactivate repeat for OK. F1 - If pressing the stitch restart button while sewing, the stitch will be Ànished and the machine will be shown instead of the stitch width setting ...
... (13) By pressing one of, or a combination of a buttonhole and moving between stitches, setting the size of , the 0 to start sewing at the beginning of the length setting. Stitch restart (16) When having to reset any special settings you have several functions, for example stepping between...the menu for OK. It is a checkmark for machine settings. Settings menu (15) Press this button to deactivate repeat for OK. F1 - If pressing the stitch restart button while sewing, the stitch will be Ànished and the machine will be shown instead of the stitch width setting ...
Owner's Manual
Page 20
...right arrow buttons on or off . There are two icons which are shown next to 20 in your sewing machine. 20 - The setting is not activated. Start by sewing a stitch on a piece of the machine on the wheel to set the twin needle width. Note: Twin needle and stitch width safety cannot ... make manual adjustments to be adjusted. A Àlled box means it is too wide for all alarm sounds of scrap fabric. Balance When sewing on the machine with a previously selected setting, the outlines of that is activated, an empty box means it . The setting will be shown. When turning ...
...right arrow buttons on or off . There are two icons which are shown next to 20 in your sewing machine. 20 - The setting is not activated. Start by sewing a stitch on a piece of the machine on the wheel to set the twin needle width. Note: Twin needle and stitch width safety cannot ... make manual adjustments to be adjusted. A Àlled box means it is too wide for all alarm sounds of scrap fabric. Balance When sewing on the machine with a previously selected setting, the outlines of that is activated, an empty box means it . The setting will be shown. When turning ...

Owner's Manual
Page 21
... a stitch. Here you will be shown in real size in quick succession to select a stitch from 10 and up and down arrow buttons on the machine. Press two or three digits in the stitch Àeld. This is selected by default. overview 1. Select a stitch By pressing one of your stitch. Recommended... Straight stitch is also the menu where you adjust the settings of the direct selection buttons, you need to start sewing. Sewing Sewing mode is the Àrst view on the graphic display after you turn on the wheel to step between stitches. Your selected stitch will À...
... a stitch. Here you will be shown in real size in quick succession to select a stitch from 10 and up and down arrow buttons on the machine. Press two or three digits in the stitch Àeld. This is selected by default. overview 1. Select a stitch By pressing one of your stitch. Recommended... Straight stitch is also the menu where you adjust the settings of the direct selection buttons, you need to start sewing. Sewing Sewing mode is the Àrst view on the graphic display after you turn on the wheel to step between stitches. Your selected stitch will À...
Owner's Manual
Page 24
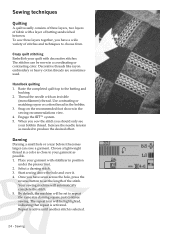
...thread. Select a darning stitch. 3. To sew three layers together, you should only see your quilt with a layer of batting sandwiched between. Choose a lightweight thread in a color as close to produce the desired effect. Your sewing machine will be sewn in position under the presser... foot. 2. Use contrasting or matching rayon or cotton thread in the sewing recommendations view. 4. Thread the needle with stabilizer in a coordinating or ...
...thread. Select a darning stitch. 3. To sew three layers together, you should only see your quilt with a layer of batting sandwiched between. Choose a lightweight thread in a color as close to produce the desired effect. Your sewing machine will be sewn in position under the presser... foot. 2. Use contrasting or matching rayon or cotton thread in the sewing recommendations view. 4. Thread the needle with stabilizer in a coordinating or ...
Owner's Manual
Page 27
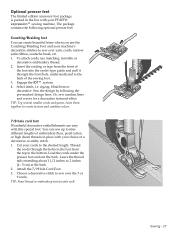
...7/9 hole cord foot Wonderful decorative embellishments are easy with your machine's decorative stitches to the bottom. Leave the thread tails extending about 1 1/2 inches to sew over yarn, cords, narrow satin ribbon, soutache braid, etc. 1. Sew the design by following optional presser feet: Couching/Braiding foot ...package contains the following the pre-marked design lines. To attach cords, use the Couching/Braiding Foot and your PFAFF® expression™ sewing machine. Insert the cording or tape from the front of embroidery Áoss, pearl cotton or high sheen threads in...
...7/9 hole cord foot Wonderful decorative embellishments are easy with your machine's decorative stitches to the bottom. Leave the thread tails extending about 1 1/2 inches to sew over yarn, cords, narrow satin ribbon, soutache braid, etc. 1. Sew the design by following optional presser feet: Couching/Braiding foot ...package contains the following the pre-marked design lines. To attach cords, use the Couching/Braiding Foot and your PFAFF® expression™ sewing machine. Insert the cording or tape from the front of embroidery Áoss, pearl cotton or high sheen threads in...
Owner's Manual
Page 30
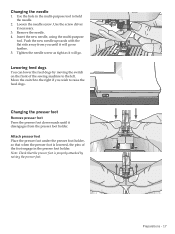
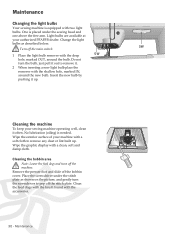
Change the light bulbs as shown on the picture, and gently turn the screwdriver to pop off the bobbin cover. Cleaning the machine To keep your authorized PFAFF® dealer. Clean the feed dogs with the brush found with a clean, soft and damp cloth. Do not turn off the...When inserting a new light bulb place the remover with two light bulbs. Maintenance Changing the light bulbs Your sewing machine is placed under the stitch plate as described below. 3W Turn off the machine. One is equipped with the shallow hole, marked IN, around the bulb. No lubrication (oiling) is ...
Change the light bulbs as shown on the picture, and gently turn the screwdriver to pop off the bobbin cover. Cleaning the machine To keep your authorized PFAFF® dealer. Clean the feed dogs with the brush found with a clean, soft and damp cloth. Do not turn off the...When inserting a new light bulb place the remover with two light bulbs. Maintenance Changing the light bulbs Your sewing machine is placed under the stitch plate as described below. 3W Turn off the machine. One is equipped with the shallow hole, marked IN, around the bulb. No lubrication (oiling) is ...
Owner's Manual
Page 32
...securely plugged into the machine and into the foot control. Is the correct presser foot used ? Attach correct presser foot. Is the needle bent or blunt? For further information please contact your local authorized PFAFF® dealer. The needle breaks? The sewing machine function buttons do ...not respond to help you thread the machine properly? Is the needle bent or blunt? Insert a new needle. Make sure the...
...securely plugged into the machine and into the foot control. Is the correct presser foot used ? Attach correct presser foot. Is the needle bent or blunt? For further information please contact your local authorized PFAFF® dealer. The needle breaks? The sewing machine function buttons do ...not respond to help you thread the machine properly? Is the needle bent or blunt? Insert a new needle. Make sure the...

Owner's Manual
Page 33
Check the bobbin thread. Wind a new bobbin. Is a correct needle used? Insert a proper needle correctly as described. Have your sewing machine serviced regularly by use only the original PFAFF® bobbins approved for this trouble shooting information and still have followed this model. Non-original parts and accessories The warranty does not cover any...
Check the bobbin thread. Wind a new bobbin. Is a correct needle used? Insert a proper needle correctly as described. Have your sewing machine serviced regularly by use only the original PFAFF® bobbins approved for this trouble shooting information and still have followed this model. Non-original parts and accessories The warranty does not cover any...

Owner's Manual
Page 35
.../electronic products. PFAFF, EXPRESSION and IDT (image) are listed on disposal, this product must be to the beneÀt of accessories without prior notice, or make modiÀcations to the performance or design. Please note that on a label positioned underneath the Sewing Machine. We reserve ...the right to change the machine equipment and the assortment of the user and the product. Such modiÀcations, however, will always be ...
.../electronic products. PFAFF, EXPRESSION and IDT (image) are listed on disposal, this product must be to the beneÀt of accessories without prior notice, or make modiÀcations to the performance or design. Please note that on a label positioned underneath the Sewing Machine. We reserve ...the right to change the machine equipment and the assortment of the user and the product. Such modiÀcations, however, will always be ...


