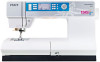
Owner's Manual
Page 2
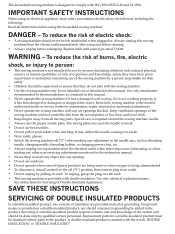
... administrated. • To disconnect, turn all controls to the off ("0") when making any adjustment in the needle area, such as threading needle, changing needle, threading bobbin, or changing presser foot, etc. • Always unplug sewing machine from the electrical outlet when removing covers, lubricating, or when making any other user servicing...
... administrated. • To disconnect, turn all controls to the off ("0") when making any adjustment in the needle area, such as threading needle, changing needle, threading bobbin, or changing presser foot, etc. • Always unplug sewing machine from the electrical outlet when removing covers, lubricating, or when making any other user servicing...
Owner's Manual
Page 3
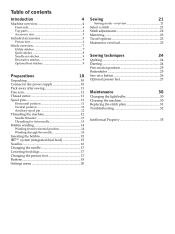
... position 12 Auxiliary spool pin 12 Threading the machine 12 Needle threader 13 Threading for twin needle 13 Bobbin winding 14 Winding from horizontal position 14 Winding through the needle 14 Inserting the bobbin 15 IDT™ system (integrated dual feed 15 Needles 16 Changing the needle 17 Lowering feed dogs 17...
... position 12 Auxiliary spool pin 12 Threading the machine 12 Needle threader 13 Threading for twin needle 13 Bobbin winding 14 Winding from horizontal position 14 Winding through the needle 14 Inserting the bobbin 15 IDT™ system (integrated dual feed 15 Needles 16 Changing the needle 17 Lowering feed dogs 17...
Owner's Manual
Page 4
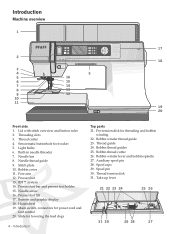
...guides 25. Auxiliary spool pin 28. Needle bar 8. Stitch plate 10. Presser foot lift 17. Main switch, connectors for threading and bobbin winding 22. Bobbin thread cutter 26. Spool pin 30. Presser foot bar and presser foot holder 15. Introduction Top parts 21. Needle thread guide 9. ... 10 20 1 30 40 2 50 17 18 19 20 Front side 1. Free arm 12. Bobbin winder thread guide 23. Presser foot 13. Needle screw 16. Threading slots 3. Bobbin winder lever and bobbin spindle 27. Lid with stitch overview and button ruler 2. Thread guide 24. Spool caps 29. ...
...guides 25. Auxiliary spool pin 28. Needle bar 8. Stitch plate 10. Presser foot lift 17. Main switch, connectors for threading and bobbin winding 22. Bobbin thread cutter 26. Spool pin 30. Presser foot bar and presser foot holder 15. Introduction Top parts 21. Needle thread guide 9. ... 10 20 1 30 40 2 50 17 18 19 20 Front side 1. Free arm 12. Bobbin winder thread guide 23. Presser foot 13. Needle screw 16. Threading slots 3. Bobbin winder lever and bobbin spindle 27. Lid with stitch overview and button ruler 2. Thread guide 24. Spool caps 29. ...
Owner's Manual
Page 5
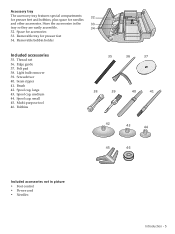
...38 39 40 41 42 43 44 45 46 Included accessories not in the 33 tray so they are easily accessible. 34 32. Removable bobbin holder Included accessories 35. Thread net 36. Screwdriver 40. Multi-purpose tool 46. Brush 42. Spool cap, medium 44. Accessory tray ...The accessory tray features special compartments for presser feet and bobbins, plus space for presser feet 34. Removable tray for needles 32 and other accessories. Store the accessories in picture • Foot control •...
...38 39 40 41 42 43 44 45 46 Included accessories not in the 33 tray so they are easily accessible. 34 32. Removable bobbin holder Included accessories 35. Thread net 36. Screwdriver 40. Multi-purpose tool 46. Brush 42. Spool cap, medium 44. Accessory tray ...The accessory tray features special compartments for presser feet and bobbins, plus space for presser feet 34. Removable tray for needles 32 and other accessories. Store the accessories in picture • Foot control •...
Owner's Manual
Page 7
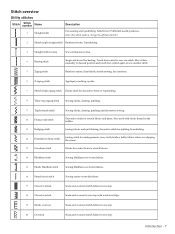
.... 17 Closed overlock Seam and overcast stretch fabrics in one step. 18 Closed overlock Seam and overcast in one step with elastic thread in the bobbin. 11 Bridging stitch Joining fabrics and quilt batting, decorative stitch for quilting, hemstitching. 12 Foundation elastic stitch Joining stitch for undergarments, terry cloth, leather, bulky...
.... 17 Closed overlock Seam and overcast stretch fabrics in one step. 18 Closed overlock Seam and overcast in one step with elastic thread in the bobbin. 11 Bridging stitch Joining fabrics and quilt batting, decorative stitch for quilting, hemstitching. 12 Foundation elastic stitch Joining stitch for undergarments, terry cloth, leather, bulky...
Owner's Manual
Page 12
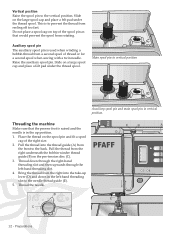
... in vertical position Auxiliary spool pin and main spool pin in the left -hand threading slot. 4. Preparations This is used when winding a bobbin thread from the right underneath the bobbin winder thread guide (B) on a large spool cap and place a felt pad under the thread spool. Pull the thread from a second spool of...
... in vertical position Auxiliary spool pin and main spool pin in the left -hand threading slot. 4. Preparations This is used when winding a bobbin thread from the right underneath the bobbin winder thread guide (B) on a large spool cap and place a felt pad under the thread spool. Pull the thread from a second spool of...

Owner's Manual
Page 13
Place the thread from the right underneath the bobbin winder thread guide (B) on the spool pin and Àt a spool cap of the tension disk (D). 4. You cannot use the built-in needle threader. Place the ...
Place the thread from the right underneath the bobbin winder thread guide (B) on the spool pin and Àt a spool cap of the tension disk (D). 4. You cannot use the built-in needle threader. Place the ...
Owner's Manual
Page 14
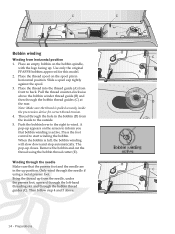
... presser foot, upward through the left-hand threading slot and through the bobbin thread guides (C). Use only the original PFAFF® bobbins approved for correct thread tension. 4. Pull the thread counter-clockwise above . Press the foot control to wind. Remove the bobbin and cut the thread using a metal presser foot. Note: Make sure the...
... presser foot, upward through the left-hand threading slot and through the bobbin thread guides (C). Use only the original PFAFF® bobbins approved for correct thread tension. 4. Pull the thread counter-clockwise above . Press the foot control to wind. Remove the bobbin and cut the thread using a metal presser foot. Note: Make sure the...
Owner's Manual
Page 15
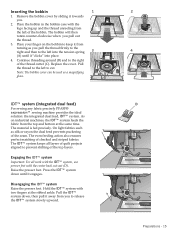
...;ngers at the same time. Remove the bobbin cover by sliding it away from turning as you to release the IDT™ system slowly upward. A C IDT™ system (integrated dual feed) D For sewing any fabric precisely PFAFF® expression™ sewing machine provides the ideal solution...: the integrated dual feed, IDT™ system. Raise the presser foot. As on the bobbin to keep it from you pull the thread Àrmly to the ...
...;ngers at the same time. Remove the bobbin cover by sliding it away from turning as you to release the IDT™ system slowly upward. A C IDT™ system (integrated dual feed) D For sewing any fabric precisely PFAFF® expression™ sewing machine provides the ideal solution...: the integrated dual feed, IDT™ system. Raise the presser foot. As on the bobbin to keep it from you pull the thread Àrmly to the ...
Owner's Manual
Page 22
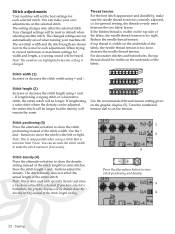
... stitch positioning and density 3 4 22 - Note: This is narrower than 9 mm. The setting changes only affect the selected stitch. The set the tension. If the bobbin thread is visible on the graphic display (5). Increase the needle thread tension. You can make your machine off. Stitch adjustments Your machine will set the...
... stitch positioning and density 3 4 22 - Note: This is narrower than 9 mm. The setting changes only affect the selected stitch. The set the tension. If the bobbin thread is visible on the graphic display (5). Increase the needle thread tension. You can make your machine off. Stitch adjustments Your machine will set the...
Owner's Manual
Page 24
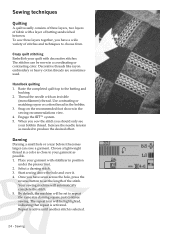
... repeat the same size darning square, just continue sewing. Thread the needle with an invisible (monoÀlament) thread. Place your bobbin thread. Start sewing above the hole and over it becomes larger can be set the length of batting sandwiched between. Use contrasting or...threads like rayon embroidery or heavy cotton threads are sometimes used. Engage the IDT™ system. 5. Snap on the recommended foot shown in the bobbin. 3. Sewing techniques Quilting A quilt usually consists of three layers, two layers of fabric with a layer of the stitch. Your sewing machine will...
... repeat the same size darning square, just continue sewing. Thread the needle with an invisible (monoÀlament) thread. Place your bobbin thread. Start sewing above the hole and over it becomes larger can be set the length of batting sandwiched between. Use contrasting or...threads like rayon embroidery or heavy cotton threads are sometimes used. Engage the IDT™ system. 5. Snap on the recommended foot shown in the bobbin. 3. Sewing techniques Quilting A quilt usually consists of three layers, two layers of fabric with a layer of the stitch. Your sewing machine will...
Owner's Manual
Page 28
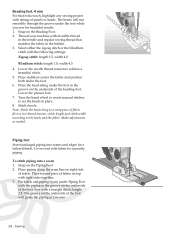
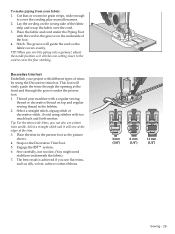
... into a seam: 1. Snap on right side of pearls or beads. Sew with strings of fabric. Beading foot, 4 mm For that matches the fabric in the bobbin. 3. Select either the zigzag stitch or the blindhem stitch with the following settings: Zigzag stitch: length 3.5, width 4.0 Blindhem stitch: length 1.0, width 4.5 4. The groove on the...
... into a seam: 1. Snap on right side of pearls or beads. Sew with strings of fabric. Beading foot, 4 mm For that matches the fabric in the bobbin. 3. Select either the zigzag stitch or the blindhem stitch with the following settings: Zigzag stitch: length 3.5, width 4.0 Blindhem stitch: length 1.0, width 4.5 4. The groove on the...
Owner's Manual
Page 29
... the fabric) 7. Snap on the underside of trims by using stitches with different types of the foot. 4. Thread your machine with the cord in the bobbin. 2. Decorative trim foot Embellish your fabric: 1. Avoid using the Decorative trim foot. Lay the cording on top and regular sewing thread in the groove on...
... the fabric) 7. Snap on the underside of trims by using stitches with different types of the foot. 4. Thread your machine with the cord in the bobbin. 2. Decorative trim foot Embellish your fabric: 1. Avoid using the Decorative trim foot. Lay the cording on top and regular sewing thread in the groove on...
Owner's Manual
Page 30
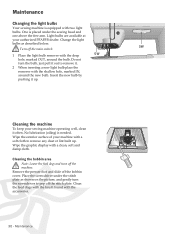
... . Wipe the graphic display with the shallow hole, marked IN, around the bulb. Insert the new bulb by pushing it often. Cleaning the bobbin area Note: Lower the feed dogs and turn the screwdriver to pop off the main switch. 1 Place the light bulb remover with a soft ... the light bulbs as shown on the picture, and gently turn off the bobbin cover. Place the screwdriver under the sewing head and one above the free arm. Wipe the exterior surface of your authorized PFAFF® dealer. Maintenance Maintenance Changing the light bulbs Your sewing machine is equipped...
... . Wipe the graphic display with the shallow hole, marked IN, around the bulb. Insert the new bulb by pushing it often. Cleaning the bobbin area Note: Lower the feed dogs and turn the screwdriver to pop off the main switch. 1 Place the light bulb remover with a soft ... the light bulbs as shown on the picture, and gently turn off the bobbin cover. Place the screwdriver under the sewing head and one above the free arm. Wipe the exterior surface of your authorized PFAFF® dealer. Maintenance Maintenance Changing the light bulbs Your sewing machine is equipped...

Owner's Manual
Page 31
... dogs lowered, place the stitch plate with the brush. Clean B with the knob Àtting into place. Slide on the bobbin cover. Maintenance - 31 Remove the bobbin case holder (A), covering the front part of lint in place. Press the stitch plate down until it clicks into the notch at... the back (C). Note: Do not blow air into your machine. Put the bobbin case and the bobbin case holder back in the bobbin case area. Cleaning under the bobbin area Clean the area under the bobbin case after sewing several projects or any time you notice an accumulation of the...
... dogs lowered, place the stitch plate with the brush. Clean B with the knob Àtting into place. Slide on the bobbin cover. Maintenance - 31 Remove the bobbin case holder (A), covering the front part of lint in place. Press the stitch plate down until it clicks into the notch at... the back (C). Note: Do not blow air into your machine. Put the bobbin case and the bobbin case holder back in the bobbin case area. Cleaning under the bobbin area Clean the area under the bobbin case after sewing several projects or any time you notice an accumulation of the...
Owner's Manual
Page 32
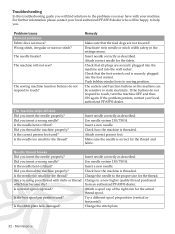
.... Is a correct spool cap used ? Use needle system 130/750 H. Change the needle to a new higher quality thread purchased from an authorized PFAFF® dealer. Change the stitch plate. 32 - Problem/cause General problems Fabric does not move? Deactivate twin needle or stitch width safety in the... or horizontal). Check that the foot control cord is threaded. Is the needle bent or blunt? Are you thread the machine properly? Push bobbin winder lever to help you. Is the stitch plate hole damaged? The needle breaks? Did you using poor thread with your machine. Insert needle...
.... Is a correct spool cap used ? Use needle system 130/750 H. Change the needle to a new higher quality thread purchased from an authorized PFAFF® dealer. Change the stitch plate. 32 - Problem/cause General problems Fabric does not move? Deactivate twin needle or stitch width safety in the... or horizontal). Check that the foot control cord is threaded. Is the needle bent or blunt? Are you thread the machine properly? Push bobbin winder lever to help you. Is the stitch plate hole damaged? The needle breaks? Did you using poor thread with your machine. Insert needle...

Owner's Manual
Page 33
... using too thick or slubbed thread? Maintenance - 33 Bobbin thread breaks Did you have followed this model. Check needle thread tension and the threading. Check how the machine is a great help to your local authorized PFAFF® dealer! Have your sewing machine serviced regularly by... use only the original PFAFF® bobbins approved for this trouble shooting information and still have problems, take your sewing machine to ...
... using too thick or slubbed thread? Maintenance - 33 Bobbin thread breaks Did you have followed this model. Check needle thread tension and the threading. Check how the machine is a great help to your local authorized PFAFF® dealer! Have your sewing machine serviced regularly by... use only the original PFAFF® bobbins approved for this trouble shooting information and still have problems, take your sewing machine to ...


