
Owner's Manual
Page 2
... machine only for their safety. • Children should always be added to the off ("0") when making any opening. • Do not use as threading needle, changing needle, threading bobbin, or changing presser foot, etc. • Always unplug sewing machine from the electrical outlet when removing covers, lubricating, or when making any other...
... machine only for their safety. • Children should always be added to the off ("0") when making any opening. • Do not use as threading needle, changing needle, threading bobbin, or changing presser foot, etc. • Always unplug sewing machine from the electrical outlet when removing covers, lubricating, or when making any other...
Owner's Manual
Page 4
...module.... 2:14 How to all 4:8 Stitch settings 4:9 Stitch width 4:9 Stitch positioning 4:9 Stitch length 4:9 Stitch density 4:10 Thread tension 4:10 Buttonhole slit length 4:10 Button stitch repetition 4:11 Sequence start position 4:11 Sewing techniques 4:12 Three-step zigzag ...USB ports 2:12 Connect machine to computer 2:12 4D™ Embroidery Software 2:13 Installing your machine 2:14 Buttons and icons 2:15 3 PFAFF® HD screen 3:1 Task bar 3:2 Use the task bar 3:3 Common icons 3:3 Selection menu 3:4 Embroidery edit 3:5 Embroidery text editor...
...module.... 2:14 How to all 4:8 Stitch settings 4:9 Stitch width 4:9 Stitch positioning 4:9 Stitch length 4:9 Stitch density 4:10 Thread tension 4:10 Buttonhole slit length 4:10 Button stitch repetition 4:11 Sequence start position 4:11 Sewing techniques 4:12 Three-step zigzag ...USB ports 2:12 Connect machine to computer 2:12 4D™ Embroidery Software 2:13 Installing your machine 2:14 Buttons and icons 2:15 3 PFAFF® HD screen 3:1 Task bar 3:2 Use the task bar 3:3 Common icons 3:3 Selection menu 3:4 Embroidery edit 3:5 Embroidery text editor...
Owner's Manual
Page 5
... Common Stitch Creator pop-ups 6:6 7 Embroidery preparations 7:1 Embroidery unit overview 7:2 Built-in designs 7:2 Embroidery hoop overview 7:2 creative vision™ Embroidery collection 7:3 Connect the embroidery unit 7:3 Remove the embroidery unit 7:3 To hoop the fabric 7:4 Slide on the ... 8:7 Rotate 8:7 Scale 8:7 Pan 8:7 Option bar 8:8 Save design 8:8 More options 8:9 Select hoop 8:10 Thread color edit 8:10 Shaping 8:11 Embroidery stitch editor 8:16 Resize 8:18 Embroidery text editor 8:20 Embroidery edit pop-ups 8:22 5 Sequencing 5:1...
... Common Stitch Creator pop-ups 6:6 7 Embroidery preparations 7:1 Embroidery unit overview 7:2 Built-in designs 7:2 Embroidery hoop overview 7:2 creative vision™ Embroidery collection 7:3 Connect the embroidery unit 7:3 Remove the embroidery unit 7:3 To hoop the fabric 7:4 Slide on the ... 8:7 Rotate 8:7 Scale 8:7 Pan 8:7 Option bar 8:8 Save design 8:8 More options 8:9 Select hoop 8:10 Thread color edit 8:10 Shaping 8:11 Embroidery stitch editor 8:16 Resize 8:18 Embroidery text editor 8:20 Embroidery edit pop-ups 8:22 5 Sequencing 5:1...
Owner's Manual
Page 6
... also on your fabric/ready-to-wear garment contains a lot of excess dye. This discoloring may be very difficult or impossible to stitch 9:4 Thread tension 9:4 Basting 9:5 Color block sort 9:5 Pan 9:5 Option bar 9:6 More options 9:6 Speed control 9:7 Hoop position 9:7 Precise positioning 9:8 Common embroidery stitch-out pop-ups 9:11 10 Files...
... also on your fabric/ready-to-wear garment contains a lot of excess dye. This discoloring may be very difficult or impossible to stitch 9:4 Thread tension 9:4 Basting 9:5 Color block sort 9:5 Pan 9:5 Option bar 9:6 More options 9:6 Speed control 9:7 Hoop position 9:7 Precise positioning 9:8 Common embroidery stitch-out pop-ups 9:11 10 Files...
Owner's Manual
Page 8
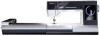
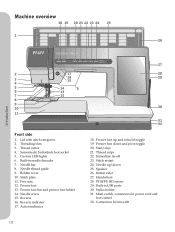
... and extra lift toggle 19. Button ruler 27. Custom LED-lights 6. Stitch restart 24. Needle thread guide 9. Stitch plate 11. Presser foot 13. Speaker 26. Main switch, connectors for knee-lift 1:8 Needle screw 15. Thread snips 22. PFAFF® HD screen 29. Stylus holder 31. Lid with stitch categories 2. Bobbin cover 10. Reverse...
... and extra lift toggle 19. Button ruler 27. Custom LED-lights 6. Stitch restart 24. Needle thread guide 9. Stitch plate 11. Presser foot 13. Speaker 26. Main switch, connectors for knee-lift 1:8 Needle screw 15. Thread snips 22. PFAFF® HD screen 29. Stylus holder 31. Lid with stitch categories 2. Bobbin cover 10. Reverse...
Owner's Manual
Page 9
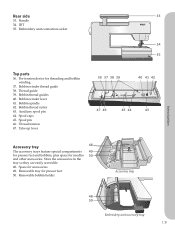
... Pre-tension device for presser feet 50. Auxiliary spool pin 44. Store the accessories in the tray so they are easily accessible. 48. Thread tension 47. Spool pin 46. Take-up lever 36 37 38 39 40 41 42 47 46 45 44 43 Accessory tray 48 The ...compartments 49 for presser feet and bobbins, plus space for accessories 49. Thread guide 39. Bobbin winder lever 41. Bobbin thread cutter 43. Embroidery unit connection socket 34 35 Top parts 36. Bobbin winder thread guide 38. Bobbin thread guides 40. Space for needles 50 and other accessories. Removable bobbin holder...
... Pre-tension device for presser feet 50. Auxiliary spool pin 44. Store the accessories in the tray so they are easily accessible. 48. Thread tension 47. Spool pin 46. Take-up lever 36 37 38 39 40 41 42 47 46 45 44 43 Accessory tray 48 The ...compartments 49 for presser feet and bobbins, plus space for accessories 49. Thread guide 39. Bobbin winder lever 41. Bobbin thread cutter 43. Embroidery unit connection socket 34 35 Top parts 36. Bobbin winder thread guide 38. Bobbin thread guides 40. Space for needles 50 and other accessories. Removable bobbin holder...

Owner's Manual
Page 10
...; Master Hoop (240x150) 74. Thread net 59. Hoop clips 71. creative™ Deluxe Hoop (360x200) 72 74 Included accessories not in picture • Foot control • Power cord 73 • USB cord (P/N:412 62 59-04) • Needles • 4D™ Embroidery Machine Communication CD • creative vision™ Embroidery collection 1:10 Edge guide...
...; Master Hoop (240x150) 74. Thread net 59. Hoop clips 71. creative™ Deluxe Hoop (360x200) 72 74 Included accessories not in picture • Foot control • Power cord 73 • USB cord (P/N:412 62 59-04) • Needles • 4D™ Embroidery Machine Communication CD • creative vision™ Embroidery collection 1:10 Edge guide...
Owner's Manual
Page 12
Topstitching. 1.1.3 Straight stitch reverse Sew continuous reverse with elastic thread in one stitch. Touch foot control to sew another stitch. 1.1.5 Zigzag stitch Reinforce seams, clean finish, stretch sewing, lace insertion. 1.1.6 Zigzag stitch, right or ...
Topstitching. 1.1.3 Straight stitch reverse Sew continuous reverse with elastic thread in one stitch. Touch foot control to sew another stitch. 1.1.5 Zigzag stitch Reinforce seams, clean finish, stretch sewing, lace insertion. 1.1.6 Zigzag stitch, right or ...

Owner's Manual
Page 23
Free arm To use the thread cutter, pull the thread from back to front as shown. Remove the tray by sliding it slightly towards you. 2:3 Preparations Custom LED lights Your machine has LED lights which ...distribute the light evenly over the sewing area and eliminates shadows. Stylus holder To keep the stylus in the Settings menu, see chapter 3. Thread cutter To use the free arm, slide off the accessory tray. When attached, a hook keeps the accessory tray locked to the left. You can adjust...
Free arm To use the thread cutter, pull the thread from back to front as shown. Remove the tray by sliding it slightly towards you. 2:3 Preparations Custom LED lights Your machine has LED lights which ...distribute the light evenly over the sewing area and eliminates shadows. Stylus holder To keep the stylus in the Settings menu, see chapter 3. Thread cutter To use the free arm, slide off the accessory tray. When attached, a hook keeps the accessory tray locked to the left. You can adjust...

Owner's Manual
Page 24
... auxiliary spool pin. Slide on a second spool cap. The main spool pin is adjustable and can be no space between the spool cap and the thread spool. Make sure that would prevent the spool from rotating. This is used both in front of the spool pin as that the... an auxiliary spool pin. There should be pressed firmly against the spool. Slide on the large spool cap and place a felt pad under the thread spool. The flat side of the spool. Auxiliary spool pin The auxiliary spool pin is to the vertical position. Use the horizontal position for...
... auxiliary spool pin. Slide on a second spool cap. The main spool pin is adjustable and can be no space between the spool cap and the thread spool. Make sure that would prevent the spool from rotating. This is used both in front of the spool pin as that the... an auxiliary spool pin. There should be pressed firmly against the spool. Slide on the large spool cap and place a felt pad under the thread spool. The flat side of the spool. Auxiliary spool pin The auxiliary spool pin is to the vertical position. Use the horizontal position for...
Owner's Manual
Page 25
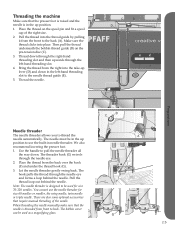
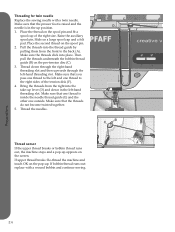
...to be in the left -hand threading slot. 4. Pull the thread into the thread guide by pulling it from the right into place. Bring the thread from the front to back. Place the thread on the pre-tension disc (C). 3. Then pull the thread underneath the bobbin thread guide (B) on the spool pin... then upwards through the needle eye. 2. We also recommend lowering the presser foot. 1. Use the handle to thread the needle automatically. The hook pulls the thread through the needle eye and forms a loop behind the needle. Note: The needle threader is in needle threader....
...to be in the left -hand threading slot. 4. Pull the thread into the thread guide by pulling it from the right into place. Bring the thread from the front to back. Place the thread on the pre-tension disc (C). 3. Then pull the thread underneath the bobbin thread guide (B) on the spool pin... then upwards through the needle eye. 2. We also recommend lowering the presser foot. 1. Use the handle to thread the needle automatically. The hook pulls the thread through the needle eye and forms a loop behind the needle. Note: The needle threader is in needle threader....
Owner's Manual
Page 26
... Then pull the threads underneath the bobbin thread guide (B) on the screen. Thread down in the up . C B A D F E B C Thread sensor A If the upper thread breaks or bobbin thread runs out, the machine stops and a pop-up appears on the pre-tension disc (C). 3. Pull the threads into the thread guide by pulling ... and the needle is inside the needle thread guide (E) and the other one thread to the back (A). Thread the needles. Raise the auxiliary spool pin. Make sure that you pass one thread to the left -hand threading slot. If bobbin thread runs out: replace with a twin needle...
... Then pull the threads underneath the bobbin thread guide (B) on the screen. Thread down in the up . C B A D F E B C Thread sensor A If the upper thread breaks or bobbin thread runs out, the machine stops and a pop-up appears on the pre-tension disc (C). 3. Pull the threads into the thread guide by pulling ... and the needle is inside the needle thread guide (E) and the other one thread to the back (A). Thread the needles. Raise the auxiliary spool pin. Make sure that you pass one thread to the left -hand threading slot. If bobbin thread runs out: replace with a twin needle...
Owner's Manual
Page 27
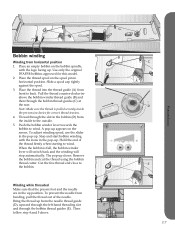
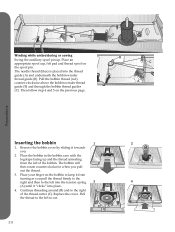
... bending, pull the thread out of the thread firmly when starting to back. Place the thread into the thread guide (A) from the needle thread guide (D), upward through the left-hand threading slot and through the bobbin thread guides (E). Remove the bobbin and cut the thread using the bobbin thread cutter. Then follow ... with the logo facing up. When the bobbin is pulled securely inside to the outside. 5. Use only the original PFAFF® bobbins approved for correct thread tension. 4. Bring the thread up . A pop-up . Place an empty bobbin on the screen.
... bending, pull the thread out of the thread firmly when starting to back. Place the thread into the thread guide (A) from the needle thread guide (D), upward through the left-hand threading slot and through the bobbin thread guides (E). Remove the bobbin and cut the thread using the bobbin thread cutter. Then follow ... with the logo facing up. When the bobbin is pulled securely inside to the outside. 5. Use only the original PFAFF® bobbins approved for correct thread tension. 4. Bring the thread up . A pop-up . Place an empty bobbin on the screen.
Owner's Manual
Page 28
...Inserting the bobbin 1 2 1. The bobbin will then rotate counter-clockwise when you . 2. Pull the bobbin thread (red) counter-clockwise above the bobbin winder thread guide (B) and through the bobbin thread guides (C). Place the bobbin in the bobbin case with the logotype facing up . Place your finger... on the bobbin to the left to the right B of the bobbin. Continue threading around (B) and to cut. Replace the cover. The needle thread (blue) is placed into place. 4. Pull the thread to the left into the tension spring 3 4 (A) until it towards you pull...
...Inserting the bobbin 1 2 1. The bobbin will then rotate counter-clockwise when you . 2. Pull the bobbin thread (red) counter-clockwise above the bobbin winder thread guide (B) and through the bobbin thread guides (C). Place the bobbin in the bobbin case with the logotype facing up . Place your finger... on the bobbin to the left to the right B of the bobbin. Continue threading around (B) and to cut. Replace the cover. The needle thread (blue) is placed into place. 4. Pull the thread to the left into the tension spring 3 4 (A) until it towards you pull...

Owner's Manual
Page 30
...damaged needle (G) can also damage the stitch plate. A damaged needle can cause skipped stitches, G breakage or snapping of the needle to thread and materials. Use with your sewing machine. Universal needle (A) Universal needles have a special scarf to eliminate skipped stitches when there is a ...flex in the fabric when sewing entredeux and other specailty threads for embroidery and decorative sewing Denim needle (D) Denim needles have a special scarf, a slightly rounded point and a slightly larger eye ...
...damaged needle (G) can also damage the stitch plate. A damaged needle can cause skipped stitches, G breakage or snapping of the needle to thread and materials. Use with your sewing machine. Universal needle (A) Universal needles have a special scarf to eliminate skipped stitches when there is a ...flex in the fabric when sewing entredeux and other specailty threads for embroidery and decorative sewing Denim needle (D) Denim needles have a special scarf, a slightly rounded point and a slightly larger eye ...
Owner's Manual
Page 35
... stitch. When the design is pressed. The reverse indicator is lit when the reverse button is finished both needle and bobbin thread immediately. Action indicator (C) The action indicator is lit to indicate that an action is automatically activated when cut automatically. Press the button...function can be turned off button once more to raise the presser foot to start or stop (F) Press this button while sewing, the threads will raise to the up position. Presser foot down and pivot toggle (E) Lower the presser foot completely. Press the button once to ...
... stitch. When the design is pressed. The reverse indicator is lit when the reverse button is finished both needle and bobbin thread immediately. Action indicator (C) The action indicator is lit to indicate that an action is automatically activated when cut automatically. Press the button...function can be turned off button once more to raise the presser foot to start or stop (F) Press this button while sewing, the threads will raise to the up position. Presser foot down and pivot toggle (E) Lower the presser foot completely. Press the button once to ...

Owner's Manual
Page 43
...;eld and build your stitch or insert a stitch for further adjustments. 3:7 Stitch Creator Stitch Creator allows you have created. Pfaff HD screen Sequencing With sequencing you can program tie-offs, stops and thread snips into your sequence. Connection stitches can be inserted to create your stitch right on screen. Add, delete, move...
...;eld and build your stitch or insert a stitch for further adjustments. 3:7 Stitch Creator Stitch Creator allows you have created. Pfaff HD screen Sequencing With sequencing you can program tie-offs, stops and thread snips into your sequence. Connection stitches can be inserted to create your stitch right on screen. Add, delete, move...

Owner's Manual
Page 45
.... The information about the embroidery will also cut the thread after switching the machine off. Automatic thread snips When selected, the automatic thread snips is activated. ABC 3:9 Pfaff HD screen Note: Your machine will be performed. The threads are programmed for example when stopping with this symbol are... lift When selected, the automatic presser foot lift is activated. When Cut jump stitches is selected it can easily remove the thread end when cut automatically and the presser foot raises at color changes or when an embroidery is finished. The presser ...
.... The information about the embroidery will also cut the thread after switching the machine off. Automatic thread snips When selected, the automatic thread snips is activated. ABC 3:9 Pfaff HD screen Note: Your machine will be performed. The threads are programmed for example when stopping with this symbol are... lift When selected, the automatic presser foot lift is activated. When Cut jump stitches is selected it can easily remove the thread end when cut automatically and the presser foot raises at color changes or when an embroidery is finished. The presser ...
Owner's Manual
Page 46
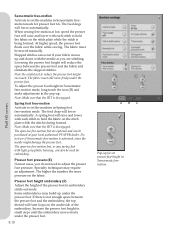
.... Some embroideries may require an adjustment. Lowering the presser foot height will reduce the space between the presser foot and the embroidery, the top thread will form loops on the stitch plate while the stitch is being formed. A spring foot will raise and lower with each stitch to hold.... Do not use if Sensormatic free-motion is not enough space between the presser foot and the fabric and eliminate the skipped stitches. Pfaff HD screen Sensormatic free-motion Activate to set the machine in Sensormatic freemotion mode for set the machine in the pop-up for presser ...
.... Some embroideries may require an adjustment. Lowering the presser foot height will reduce the space between the presser foot and the embroidery, the top thread will form loops on the stitch plate while the stitch is being formed. A spring foot will raise and lower with each stitch to hold.... Do not use if Sensormatic free-motion is not enough space between the presser foot and the fabric and eliminate the skipped stitches. Pfaff HD screen Sensormatic free-motion Activate to set the machine in Sensormatic freemotion mode for set the machine in the pop-up for presser ...
Owner's Manual
Page 52
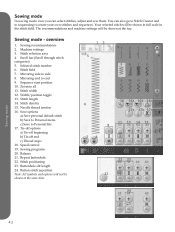
... field. You can select stitches, adjust and sew them. Stitch selection area 4. Selected stitch number 6. Width/position toggle 13. Needle thread tension 16. Sewing programs 20. Sewing mode - overview 1. Stitch field 7. Sequence start position 10. Sewing recommendations 2. Zoom to side... 8. Mirroring side to all 11. Tie-off options a) Tie-off beginning b) Tie-off end c) Thread snips 18. Stitch length 14. Buttonhole slit length 24. Sewing mode In sewing mode view you can also go to Stitch Creator and...
... field. You can select stitches, adjust and sew them. Stitch selection area 4. Selected stitch number 6. Width/position toggle 13. Needle thread tension 16. Sewing programs 20. Sewing mode - overview 1. Stitch field 7. Sequence start position 10. Sewing recommendations 2. Zoom to side... 8. Mirroring side to all 11. Tie-off options a) Tie-off beginning b) Tie-off end c) Thread snips 18. Stitch length 14. Buttonhole slit length 24. Sewing mode In sewing mode view you can also go to Stitch Creator and...


