Owner's Manual
Page 4
...4:4 Tie-off options 4:5 Speed control 4:6 Sewing programs 4:6 Balance 4:8 Mirroring 4:8 Zoom to update your machine 2:14 Buttons and icons 2:15 3 PFAFF® HD screen 3:1 Task bar 3:2 Use the task bar 3:3 Common icons 3:3 Selection menu 3:4 Embroidery edit 3:5 Embroidery text editor 3:6 Embroidery ...Changing the presser foot 2:11 USB ports 2:12 Connect machine to computer 2:12 4D™ Embroidery Software 2:13 Installing your software 2:13 Install hardware drivers and connect the embroidery machine 2:13 How to launch the programs 2:14 Embroidery...
...4:4 Tie-off options 4:5 Speed control 4:6 Sewing programs 4:6 Balance 4:8 Mirroring 4:8 Zoom to update your machine 2:14 Buttons and icons 2:15 3 PFAFF® HD screen 3:1 Task bar 3:2 Use the task bar 3:3 Common icons 3:3 Selection menu 3:4 Embroidery edit 3:5 Embroidery text editor 3:6 Embroidery ...Changing the presser foot 2:11 USB ports 2:12 Connect machine to computer 2:12 4D™ Embroidery Software 2:13 Installing your software 2:13 Install hardware drivers and connect the embroidery machine 2:13 How to launch the programs 2:14 Embroidery...

Owner's Manual
Page 32
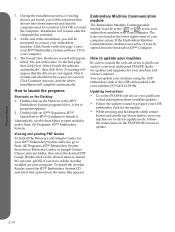
... connect either your machine. Use the stick to store designs and other files, or to and remove from or saving to your local authorized PFAFF® dealer for USB devices for the first time. Connect to move designs or other cable should be left in this port. do not... cover of the USB cable out straight. Note: Do not remove the USB embroidery stick when the hourglass is shown on your machine. When the software on the screen. Make sure that time can only be inserted one to your PC. USB embroidery stick Delivered with the machine can easily move...
... connect either your machine. Use the stick to store designs and other files, or to and remove from or saving to your local authorized PFAFF® dealer for USB devices for the first time. Connect to move designs or other cable should be left in this port. do not... cover of the USB cable out straight. Note: Do not remove the USB embroidery stick when the hourglass is shown on your machine. When the software on the screen. Make sure that time can only be inserted one to your PC. USB embroidery stick Delivered with the machine can easily move...

Owner's Manual
Page 33
... the Continue button. 7. Drivers are logged onto your PFAFF® creative vision™ embroidery machine from the Machine Manager in 4D™ Configure, as full worksheets of installing the Embroidery Machine Communication Software. Installing your software If you own other PFAFF® 4D™ Embroidery System software, you will appear and you may appear, asking...
... the Continue button. 7. Drivers are logged onto your PFAFF® creative vision™ embroidery machine from the Machine Manager in 4D™ Configure, as full worksheets of installing the Embroidery Machine Communication Software. Installing your software If you own other PFAFF® 4D™ Embroidery System software, you will appear and you may appear, asking...
Owner's Manual
Page 34
...Programs, 4D™ Embroidery System. Preparations 2:14 Click Finish on to prepare your USB embroidery stick for your computer. Select 'Install the software automatically', then click Next. A warning will complete automatically. How to update. To install the Acrobat Reader, insert the 4D™ Embroidery... the USB embroidery stick or the USB cable packed with your 4D™ Embroidery System software, go to consult the web site at www.pfaff.com and/or your local authorized PFAFF® dealer for updates and upgrades for concern. During the installation process, if existing ...
...Programs, 4D™ Embroidery System. Preparations 2:14 Click Finish on to prepare your USB embroidery stick for your computer. Select 'Install the software automatically', then click Next. A warning will complete automatically. How to update. To install the Acrobat Reader, insert the 4D™ Embroidery... the USB embroidery stick or the USB cable packed with your 4D™ Embroidery System software, go to consult the web site at www.pfaff.com and/or your local authorized PFAFF® dealer for updates and upgrades for concern. During the installation process, if existing ...

Owner's Manual
Page 45
... in down position. The presser foot will raise to pivot height for Cut jump stitches. ABC 3:9 Pfaff HD screen The information about the embroidery will be added to any design using the 4D™ Organizer Software, included with the needle in the Settings menu and select Defragment machine memory. When deselected, no...
... in down position. The presser foot will raise to pivot height for Cut jump stitches. ABC 3:9 Pfaff HD screen The information about the embroidery will be added to any design using the 4D™ Organizer Software, included with the needle in the Settings menu and select Defragment machine memory. When deselected, no...
Owner's Manual
Page 49
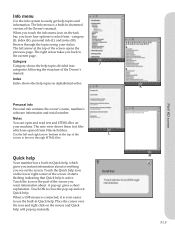
... connected, it is active. Category J Category shows the help , which are opened from - Personal info Personal info contains the owner's name, machine's software information and serial number. Place the cursor over the icon and right click on your stylus. The Info menu is a built-in Quick help will... you instant information about . Quick help Your machine has a built-in alphabetical order. Touch the Quick help topics and information. K M 3:13 Pfaff HD screen Index Index shows the help . Use the left arrow at the top of the screen you back to the current page. A pop-up...
... connected, it is active. Category J Category shows the help , which are opened from - Personal info Personal info contains the owner's name, machine's software information and serial number. Place the cursor over the icon and right click on your stylus. The Info menu is a built-in Quick help will... you instant information about . Quick help Your machine has a built-in alphabetical order. Touch the Quick help topics and information. K M 3:13 Pfaff HD screen Index Index shows the help . Use the left arrow at the top of the screen you back to the current page. A pop-up...
Owner's Manual
Page 105
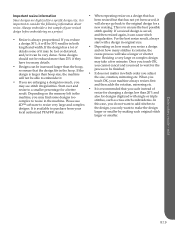
...the machine. If the design has a lot of • Depending on how much , you do not want to make the design local authorized PFAFF® dealer. design is to ensure the best possible design before embroidering on how many details. the size, rotation, mirroring etc. larger or... smaller. Always embroider a test sample of result. stitch quality. When you • If you are digitized for a resize. In 4D™ software to resize very large and complex this case, you touch OK, your resized new resizing. Resizing a very large or complex design have too many ...
...the machine. If the design has a lot of • Depending on how much , you do not want to make the design local authorized PFAFF® dealer. design is to ensure the best possible design before embroidering on how many details. the size, rotation, mirroring etc. larger or... smaller. Always embroider a test sample of result. stitch quality. When you • If you are digitized for a resize. In 4D™ software to resize very large and complex this case, you touch OK, your resized new resizing. Resizing a very large or complex design have too many ...

Owner's Manual
Page 108
... resize window. It is too complex, the resize process will ask you to confirm when you try again, or use the 4D™ software. In order for the attached hoop. Your machine will ask you touch OK to delete all designs? Design is too complex If the design is... long touch. Reduce the size and try to save again, your machine will appear when a function has been chosen that already exists, your local authorized PFAFF® dealer.
... resize window. It is too complex, the resize process will ask you to confirm when you try again, or use the 4D™ software. In order for the attached hoop. Your machine will ask you touch OK to delete all designs? Design is too complex If the design is... long touch. Reduce the size and try to save again, your machine will appear when a function has been chosen that already exists, your local authorized PFAFF® dealer.
Owner's Manual
Page 135
Index Index 3-dimensional view 8:9, 9:6 4D™ Embroidery Software 2:13 4D™ Organizer 2:13 4D™ QuickFont 2:13 A Accessories 1:10 Accessory tray 1:9 Action indicator 2:15 Add a letter into a text 8:20 Adjust... to the power supply 2:2 Copy a file or folder 10:6 Could not delete file or folder 10:7 Create a new folder 10:6 Create a sequence 5:3 creative vision™ Embroidery collection 7:3 Crosshair 9:3 Current position 9:7 Current stitch 9:4 Custom LED lights 2:3 Cut jump stitches 3:9 Cut position 9:7 Cut thread end 9:12 D Decorative stitches 1:...
Index Index 3-dimensional view 8:9, 9:6 4D™ Embroidery Software 2:13 4D™ Organizer 2:13 4D™ QuickFont 2:13 A Accessories 1:10 Accessory tray 1:9 Action indicator 2:15 Add a letter into a text 8:20 Adjust... to the power supply 2:2 Copy a file or folder 10:6 Could not delete file or folder 10:7 Create a new folder 10:6 Create a sequence 5:3 creative vision™ Embroidery collection 7:3 Crosshair 9:3 Current position 9:7 Current stitch 9:4 Custom LED lights 2:3 Cut jump stitches 3:9 Cut position 9:7 Cut thread end 9:12 D Decorative stitches 1:...

Owner's Manual
Page 136
... Info menu 3:13 Insert a new stitch point 6:3 Insert a stitch or letter 5:3 Inserting the bobbin 2:8 Install hardware drivers and connect the embroidery machine 2:13 Installing your software 2:13 Intellectual Property 11:10 Invalid file type for this folder 10:8 F File formats 10:2 File name 8:8 Files & Folders - clear screen 9:12 Embroidery Machine...
... Info menu 3:13 Insert a new stitch point 6:3 Insert a stitch or letter 5:3 Inserting the bobbin 2:8 Install hardware drivers and connect the embroidery machine 2:13 Installing your software 2:13 Intellectual Property 11:10 Invalid file type for this folder 10:8 F File formats 10:2 File name 8:8 Files & Folders - clear screen 9:12 Embroidery Machine...

Technique Book
Page 3
Type in the taskbar. 7 Touch personal info to check your name, software version, serial number etc. 8 Touch on cancel to bring 2 up a pop-up where you can enter your personal info. creative vision Techniques Book 3 Settings menu Touch the "Owner's name" icon to close the settings menu. 6 To check that your name is programmed touch the info menu in your name. 3 Touch the lower case icon to get lower case letters 4 Touch OK to confirm your name. 5 Touch OK to close your name. 1 Settings menu Owner's name 1 Sewing Sequence 1 Task bar.
Type in the taskbar. 7 Touch personal info to check your name, software version, serial number etc. 8 Touch on cancel to bring 2 up a pop-up where you can enter your personal info. creative vision Techniques Book 3 Settings menu Touch the "Owner's name" icon to close the settings menu. 6 To check that your name is programmed touch the info menu in your name. 3 Touch the lower case icon to get lower case letters 4 Touch OK to confirm your name. 5 Touch OK to close your name. 1 Settings menu Owner's name 1 Sewing Sequence 1 Task bar.


