

Owner's Manual
Page 3
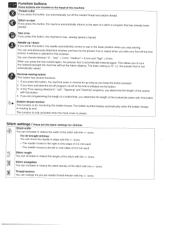
...8226; rUesceomthmis esnedweidngbymtahcehimneanounflayctfuorreirtsaisntceonndteadinuedseinasthdisesmcarinbueadl.in . The wrong plate can cause the needle to the off Cc") changing needle, threading bwohbebninm, aokricnhgaanngyinagdpjursetsmseerntfoiont,theetcn. IMPORTANT SAFETY INSTRUCTIONS When using an electrical appliance, basic safety Read all instructions before ...using and when plugged in this sewing machine is being used as threading • Always making unplug the sewing machine from all controls to break. • Do not ...
...8226; rUesceomthmis esnedweidngbymtahcehimneanounflayctfuorreirtsaisntceonndteadinuedseinasthdisesmcarinbueadl.in . The wrong plate can cause the needle to the off Cc") changing needle, threading bwohbebninm, aokricnhgaanngyinagdpjursetsmseerntfoiont,theetcn. IMPORTANT SAFETY INSTRUCTIONS When using an electrical appliance, basic safety Read all instructions before ...using and when plugged in this sewing machine is being used as threading • Always making unplug the sewing machine from all controls to break. • Do not ...
Owner's Manual
Page 5
needle down 3-1 Reverse sewing button 3-1 The tool bar 3-2 Tool bar after open the Creative Assistant 3-2 Instructions on operating your Pfaff creative 2140 3-2 Selecting a stitch 3-3 Altering the stitch settings 3-4 Single stitch selection 3-4 Adjusting the tie-off program 3-5 More options 3-6 Four ...14 2-14 2-14 2-14 2-15 2-15 2-16 2-16 2-16 2-16 -4eneral notes on use of the machine Inction buttons 3-1 Thread cutter 3-1 Stitch re-start 3-1 Sew slow 3-1 Needle up Direct Help 3-14 Instructions on using your Machine Assistant 3-15 Instructions on using the...
needle down 3-1 Reverse sewing button 3-1 The tool bar 3-2 Tool bar after open the Creative Assistant 3-2 Instructions on operating your Pfaff creative 2140 3-2 Selecting a stitch 3-3 Altering the stitch settings 3-4 Single stitch selection 3-4 Adjusting the tie-off program 3-5 More options 3-6 Four ...14 2-14 2-14 2-14 2-15 2-15 2-16 2-16 2-16 2-16 -4eneral notes on use of the machine Inction buttons 3-1 Thread cutter 3-1 Stitch re-start 3-1 Sew slow 3-1 Needle up Direct Help 3-14 Instructions on using your Machine Assistant 3-15 Instructions on using the...

Owner's Manual
Page 6
... right needle position 4-3 Tapering 4-3 Selecting decorative stitches 4-4 Altering stitch settings 4-5 Stitch width 4-5 Stitch length 4-5 Stitch elongation 4-5 Thread tension 4-5 Twin needle function 4-5 Buttonholes 4-6 Enter the length of the buttonhole on the screen 4-6 Set the length of the ... combination Embroider stitches stored in your Pfaff creative 2140 The Creative Data Manager Functions In the Creative Data Manager Working with source and destination fields in the Creative Data Manager Working with a field in the Creative Data Manager Delete Create a directory ...
... right needle position 4-3 Tapering 4-3 Selecting decorative stitches 4-4 Altering stitch settings 4-5 Stitch width 4-5 Stitch length 4-5 Stitch elongation 4-5 Thread tension 4-5 Twin needle function 4-5 Buttonholes 4-6 Enter the length of the buttonhole on the screen 4-6 Set the length of the ... combination Embroider stitches stored in your Pfaff creative 2140 The Creative Data Manager Functions In the Creative Data Manager Working with source and destination fields in the Creative Data Manager Working with a field in the Creative Data Manager Delete Create a directory ...

Owner's Manual
Page 7
...cStraight stitch 5-2 Programmable seam length for straight stitch 5-2 Topstitching 5-2 Gathering with the straight stitch 5-2 Gathering with elastic threads 5-3 Blindhem 5-3 Stretch Blindhem 5-3 Stretch seams Joining Overedge seams Flatlock seams Bridging stitch Cross-hem stitch Twin needle ... the fabric 6-24 Position an additional design 6-25 Combine embroidered word combinations 6-26 Creating a directory in the Creative Data Manager Embroidering the text Positioning an additional section Pattern combinations Combine designs in the hoop Embroider endless borders 6-26...
...cStraight stitch 5-2 Programmable seam length for straight stitch 5-2 Topstitching 5-2 Gathering with the straight stitch 5-2 Gathering with elastic threads 5-3 Blindhem 5-3 Stretch Blindhem 5-3 Stretch seams Joining Overedge seams Flatlock seams Bridging stitch Cross-hem stitch Twin needle ... the fabric 6-24 Position an additional design 6-25 Combine embroidered word combinations 6-26 Creating a directory in the Creative Data Manager Embroidering the text Positioning an additional section Pattern combinations Combine designs in the hoop Embroider endless borders 6-26...
Owner's Manual
Page 9
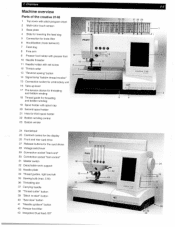
..." 30 Connection socket "foot control" 31 Master switch 36 32 Detachable work support 33 Needle plate 34 Thread guides. 1. fl ) tip> 1' )I PFAFF -24 creative 2140 Th dII 28 9I 31129 30 Overview Machine overview Parts of the creative 2140 1 Top cover with stitch program chart 2 Multi-color touch screen 3 Base plate 4 Slide for lowering the feed...
..." 30 Connection socket "foot control" 31 Master switch 36 32 Detachable work support 33 Needle plate 34 Thread guides. 1. fl ) tip> 1' )I PFAFF -24 creative 2140 Th dII 28 9I 31129 30 Overview Machine overview Parts of the creative 2140 1 Top cover with stitch program chart 2 Multi-color touch screen 3 Base plate 4 Slide for lowering the feed...
Owner's Manual
Page 11
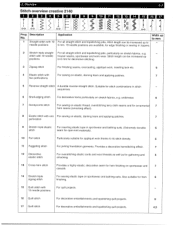
Overview 1-3 Stitch overview creative 2140 -- ------ -I 1' . iii 1.
Overview 1-3 Stitch overview creative 2140 -- ------ -I 1' . iii 1.

Owner's Manual
Page 12
...(May be sewn from position variable from left to right or from right to left ) 7,5 23 Open overedge stitch Elastic serging stitch with selvage thread 6 20 Closed overedge For joining and serging in one operation. 9 29 Cover stitch For joining terry cloth and stretchy fabrics, for sewing and ... most suited for blouses and shirts. Width up to left , using the stitch-mirroring key). most suited for inserting patches. 1-4 1 Overview Stitch overview creative 2140 El El El El El El El El El El El El El El I ii H i '1L IHLU Prog No. 18 Description Quilting. easily fraying...
...(May be sewn from position variable from left to right or from right to left ) 7,5 23 Open overedge stitch Elastic serging stitch with selvage thread 6 20 Closed overedge For joining and serging in one operation. 9 29 Cover stitch For joining terry cloth and stretchy fabrics, for sewing and ... most suited for blouses and shirts. Width up to left , using the stitch-mirroring key). most suited for inserting patches. 1-4 1 Overview Stitch overview creative 2140 El El El El El El El El El El El El El El I ii H i '1L IHLU Prog No. 18 Description Quilting. easily fraying...
Owner's Manual
Page 17
... of stitches. The context menu always refers specifically to the menu you touch within a stitch, the direct all stitches. Creative Assistant provides general information on operating the machine. you interrupt the process. This function confirms from the card.) inputs which...directories, stitch sequences and stitches for selection of all functions appearing in Creative Assistant • There is bar then a Creative Assistant function in the embroidery hoop, information on stabilizers, threads After touching the icon a menu is touched. selected, because not ...
... of stitches. The context menu always refers specifically to the menu you touch within a stitch, the direct all stitches. Creative Assistant provides general information on operating the machine. you interrupt the process. This function confirms from the card.) inputs which...directories, stitch sequences and stitches for selection of all functions appearing in Creative Assistant • There is bar then a Creative Assistant function in the embroidery hoop, information on stabilizers, threads After touching the icon a menu is touched. selected, because not ...
Owner's Manual
Page 18
... has several functions 1. the allows you to turn presser foot is again. This "0", i.e. The bobbin symbol flashes automatically when the bobbin thread This function is only activated when the hook cover is opened for this button. 3. Stitch re-start of the buttonhole seam with the ...to the left in nine steps of 0.5 mm each - down If you have activated the tie-off program, tie-off the needle thread and bobbin thread. A window is closed. When you press started. foot the control again, the presser foot is initiated via this purpose. If ...
... has several functions 1. the allows you to turn presser foot is again. This "0", i.e. The bobbin symbol flashes automatically when the bobbin thread This function is only activated when the hook cover is opened for this button. 3. Stitch re-start of the buttonhole seam with the ...to the left in nine steps of 0.5 mm each - down If you have activated the tie-off program, tie-off the needle thread and bobbin thread. A window is closed. When you press started. foot the control again, the presser foot is initiated via this purpose. If ...
Owner's Manual
Page 19
...off at this icon, you can specify that the end of the seam automatically. that the machine is to cut the needle thread and bobbin thread at the start or Raise presser foot By touching to raise it at end By selecting this function, you specify that the...mirrored stitch then appears on the screen can now determine the stitch length by touching the icon again and select "0". Touch the corresponding icon. Thread cutter l '} By touching this icon, you can call up further functions for further stitches longitudinally. You start of the seam automatically. ...
...off at this icon, you can specify that the end of the seam automatically. that the machine is to cut the needle thread and bobbin thread at the start or Raise presser foot By touching to raise it at end By selecting this function, you specify that the...mirrored stitch then appears on the screen can now determine the stitch length by touching the icon again and select "0". Touch the corresponding icon. Thread cutter l '} By touching this icon, you can call up further functions for further stitches longitudinally. You start of the seam automatically. ...
Owner's Manual
Page 22
... off. More functions for Buttonholes By touching this icon you can specify the number of the buttonhole seam with the +7 icons Thread tension: ) You can change the pre set needle thread tension with the +7 icons Stitch number for sewing-on buttons Here you can move the displayed buttonhole in the sample for...
... off. More functions for Buttonholes By touching this icon you can specify the number of the buttonhole seam with the +7 icons Thread tension: ) You can change the pre set needle thread tension with the +7 icons Stitch number for sewing-on buttons Here you can move the displayed buttonhole in the sample for...

Owner's Manual
Page 24
... you have activated "Tie-off is automatically performed at the end, you can now specify that the machine is to cut the needle thread and bobbin thread at the start of the seam and to raise it at end /1 By selecting this function you specify that a twin needle can ...Twin needle This function reduces the width of a word sequence longitudinally. Dialogue window: Turn this function off your word sequences, automatically cutting the thread and raising the presser foot. The mirrored letter/sequence then appears on the screen for further processing. Tie-off at the end of repeats via...
... you have activated "Tie-off is automatically performed at the end, you can now specify that the machine is to cut the needle thread and bobbin thread at the start of the seam and to raise it at end /1 By selecting this function you specify that a twin needle can ...Twin needle This function reduces the width of a word sequence longitudinally. Dialogue window: Turn this function off your word sequences, automatically cutting the thread and raising the presser foot. The mirrored letter/sequence then appears on the screen for further processing. Tie-off at the end of repeats via...

Owner's Manual
Page 25
...press the foot control after If you can mirror a design side to be 2. Start of color This positions the needle at the start of thread breakage. Cross-hair cursor F This switches on a cross-hair cursor, which you set the cursor to M, the machine embroiders all 3 fields... the stitch selection of the machine or to end mirroring With this function you can open a window for processing the color segments further. thread breakage. The color is displayed. The window is closed. Changing the color With this field you open a window showing during embroidering, e.g....
...press the foot control after If you can mirror a design side to be 2. Start of color This positions the needle at the start of thread breakage. Cross-hair cursor F This switches on a cross-hair cursor, which you set the cursor to M, the machine embroiders all 3 fields... the stitch selection of the machine or to end mirroring With this function you can open a window for processing the color segments further. thread breakage. The color is displayed. The window is closed. Changing the color With this field you open a window showing during embroidering, e.g....

Owner's Manual
Page 26
... you can delete a previously marked letter or letter combination. Dialogue window: Using the arrows you can call up You can adjust the thread tension (tighter or slacker) with this function. The following icons, which are displayed in the direction of the hoop. The zone around... the marked letter or letter combination is the area that is automatically placed into the embroidering field with the +1- Thread tension )j( You can enlarge the representation in several steps. icons. Ei Repositioning If you open a window for processing or modifying the design...
... you can delete a previously marked letter or letter combination. Dialogue window: Using the arrows you can call up You can adjust the thread tension (tighter or slacker) with this function. The following icons, which are displayed in the direction of the hoop. The zone around... the marked letter or letter combination is the area that is automatically placed into the embroidering field with the +1- Thread tension )j( You can enlarge the representation in several steps. icons. Ei Repositioning If you open a window for processing or modifying the design...

Owner's Manual
Page 28
... this function you specify that the machine is to lower the presser foot at the start of the seam and to cut the needle thread and bobbin thread at the start or at the end of sequence repeats via the +1- Touch the corresponding icon. icons. This function should be switched off for...the +/- icons. Twin needle This function reduces the width of the stitch so that a twin needle can specify that the machine is to cut the threads and then raise the presser foot. Tie-off is automatically corrected. Remove the twin needle from the machine. Balance 1 14 This function allows you can...
... this function you specify that the machine is to lower the presser foot at the start of the seam and to cut the needle thread and bobbin thread at the start or at the end of sequence repeats via the +1- Touch the corresponding icon. icons. This function should be switched off for...the +/- icons. Twin needle This function reduces the width of the stitch so that a twin needle can specify that the machine is to cut the threads and then raise the presser foot. Tie-off is automatically corrected. Remove the twin needle from the machine. Balance 1 14 This function allows you can...

Owner's Manual
Page 30
... A dot or the cross-hair cursor indicates the needle's current position. Hoop selection With this field, adjust the shade of a color of thread breakage. Use the cursor arrows to mark the color segment that is to further process the color segments. After the hoop has been selected, ... on a cross-hair cursor, which you can advance stitch by stitch With this purpose. Thread tension You can move your input, the window is displayed in which shows you can adjust the thread tension (tighter or slacker) with the +1- If you can reverse stitch by stitch With ...
... A dot or the cross-hair cursor indicates the needle's current position. Hoop selection With this field, adjust the shade of a color of thread breakage. Use the cursor arrows to mark the color segment that is to further process the color segments. After the hoop has been selected, ... on a cross-hair cursor, which you can advance stitch by stitch With this purpose. Thread tension You can move your input, the window is displayed in which shows you can adjust the thread tension (tighter or slacker) with the +1- If you can reverse stitch by stitch With ...
Owner's Manual
Page 33
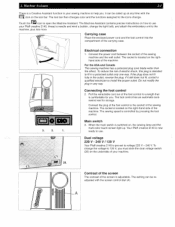
...220 V - 240 V. When the main switch is comfortable for storage. Contrast of the screen The contrast of the foot control to use your Pfaff creative 2140, thread a needle and wind a bobbin, change the light bulb, and attach the embroidery unit to the machine, plus lots more. 2. Connect the ...power cord between the socket of the carrying case. \/] Electrical connection 1. The sewing speed is adjustable. Your Pfaff creative 2140 is pre-set to fit in a polarized outlet only one blade wider than the other). The tool bar then changes color and the functions...
...220 V - 240 V. When the main switch is comfortable for storage. Contrast of the screen The contrast of the foot control to use your Pfaff creative 2140, thread a needle and wind a bobbin, change the light bulb, and attach the embroidery unit to the machine, plus lots more. 2. Connect the ...power cord between the socket of the carrying case. \/] Electrical connection 1. The sewing speed is adjustable. Your Pfaff creative 2140 is pre-set to fit in a polarized outlet only one blade wider than the other). The tool bar then changes color and the functions...

Owner's Manual
Page 35
...cap tightly against the spool. As soon as the bobbin is full, the winding action will be stopped automatically. Wind the start of thread, and the smallest cap with cone-type spools. Switch on the spool pin. Start bobbin winding by pushing the bobbin winding lever to ...counter-clockwise through the pre-tension device (B). For example use the large spool cap for larger spools of the thread around the bobbin several times in diameter than the spool. Threading Place the thread into guide (A) from front to the right. 2. Machine Assistant 2-3 / Winding the bobbin from the winder.
...cap tightly against the spool. As soon as the bobbin is full, the winding action will be stopped automatically. Wind the start of thread, and the smallest cap with cone-type spools. Switch on the spool pin. Start bobbin winding by pushing the bobbin winding lever to ...counter-clockwise through the pre-tension device (B). For example use the large spool cap for larger spools of the thread around the bobbin several times in diameter than the spool. Threading Place the thread into guide (A) from front to the right. 2. Machine Assistant 2-3 / Winding the bobbin from the winder.

Owner's Manual
Page 36
... remove the bobbin from the second spool pin Swing the second spool pin (20) up and lock. Place a spool of thread with an appropriate spool cap on the spool pin. 2. Start bobbin winding by pushing the bobbin lever to back and pull it counter ...-tension device (B). As soon as the bobbin is full, the winding action will be stopped automatically. Place a spool of thread with an appropriate spool cap on the spool pin. Threading Place the thread into thread guide (A) from the third spool pin Insert the third spool pin in a clockwise direction. 2-4 2 Machine Assistant 1. Wind...
... remove the bobbin from the second spool pin Swing the second spool pin (20) up and lock. Place a spool of thread with an appropriate spool cap on the spool pin. 2. Start bobbin winding by pushing the bobbin lever to back and pull it counter ...-tension device (B). As soon as the bobbin is full, the winding action will be stopped automatically. Place a spool of thread with an appropriate spool cap on the spool pin. Threading Place the thread into thread guide (A) from the third spool pin Insert the third spool pin in a clockwise direction. 2-4 2 Machine Assistant 1. Wind...

Owner's Manual
Page 37
... It is possible to right through the right-hand threader slot. Place the thread from the winder. As soon as the bobbin is fully threaded (see page 2-8 for instructions for threading your machine). Guide the thread to the right. Cut the thread and remove the bobbin from left to wind bobbins even when the machine...
... It is possible to right through the right-hand threader slot. Place the thread from the winder. As soon as the bobbin is fully threaded (see page 2-8 for instructions for threading your machine). Guide the thread to the right. Cut the thread and remove the bobbin from left to wind bobbins even when the machine...


