
Owner's Manual
Page 2
...the various sequences and different embroidery 5. cfOuonpmcebtriiaontnaestitoahnneds,mpeurmoltgbirr-aocmiodlseo,rrisntuogc,uhecthacs.sscerweeinng: This chapter buttonholes, familiarizes you can put in your wish to Your machine creative 2140 homepage: can likewise will never be always be outdated. Your chapter: Here you creating sewing with update pages. oGAwtMpoleilegnat&#...mn2ba1oht4boio0bwni.n,to the latest software detailed information, astsaktuyso.uTr hdiesaelnersuorrevsistiht aotuyrour www.pfaff.com II updated For more to 4. The language dealer has not ...
...the various sequences and different embroidery 5. cfOuonpmcebtriiaontnaestitoahnneds,mpeurmoltgbirr-aocmiodlseo,rrisntuogc,uhecthacs.sscerweeinng: This chapter buttonholes, familiarizes you can put in your wish to Your machine creative 2140 homepage: can likewise will never be always be outdated. Your chapter: Here you creating sewing with update pages. oGAwtMpoleilegnat&#...mn2ba1oht4boio0bwni.n,to the latest software detailed information, astsaktuyso.uTr hdiesaelnersuorrevsistiht aotuyrour www.pfaff.com II updated For more to 4. The language dealer has not ...
Owner's Manual
Page 5
...3-11 All stitches 3-11 Last stitch 3-11 Creative Data Manager 3-12 The Creative Assistant 3-13 Sewing Assistant 3-13 Embroidery Assistant 3-13 Machine Assistant 3-13 Instructions on using your Sewing and Embroidery Assistant 3-16 lame Of content 1 Overview jMachine...3-14 Instructions on using your Machine Assistant 3-15 Instructions on using the Creative Assistant Pop-up ! needle down 3-1 Reverse sewing button 3-1 The tool bar 3-2 Tool bar after open the Creative Assistant 3-2 Instructions on operating your Pfaff creative 2140 3-2 Selecting a stitch 3-3 ...
...3-11 All stitches 3-11 Last stitch 3-11 Creative Data Manager 3-12 The Creative Assistant 3-13 Sewing Assistant 3-13 Embroidery Assistant 3-13 Machine Assistant 3-13 Instructions on using your Sewing and Embroidery Assistant 3-16 lame Of content 1 Overview jMachine...3-14 Instructions on using your Machine Assistant 3-15 Instructions on using the Creative Assistant Pop-up ! needle down 3-1 Reverse sewing button 3-1 The tool bar 3-2 Tool bar after open the Creative Assistant 3-2 Instructions on operating your Pfaff creative 2140 3-2 Selecting a stitch 3-3 ...

Owner's Manual
Page 6
... without saving 4-27 Delete a sewing sequence 4-27 Select and open a saved sewing sequence 4-28 Embroidery combination Create an embroidery combination Selecting a design from the machine's memory or from a creative memory card Move the design within the hoop Embroidery Adjust an embroidery combination Save an embroidery combination Open a saved embroidery combination Embroider stitches stored in your Pfaff creative 2140 The Creative Data Manager Functions In...
... without saving 4-27 Delete a sewing sequence 4-27 Select and open a saved sewing sequence 4-28 Embroidery combination Create an embroidery combination Selecting a design from the machine's memory or from a creative memory card Move the design within the hoop Embroidery Adjust an embroidery combination Save an embroidery combination Open a saved embroidery combination Embroider stitches stored in your Pfaff creative 2140 The Creative Data Manager Functions In...

Owner's Manual
Page 7
...Centered zipper (concealed on both sides) Visible zipper Buttonholes Machine-made buttonholes Inserting the buttonhole guide Buttonhole tips Buttonhole with gimp thread Eyelet buttonhole with gimp thread Sewing on buttons Sewing on buttons with shanks Eyelets 5-4 5-4 5-4 5-5 ... Sewing-on patches Reinforced darning Shell edging Roll hemming 5-14 - 5-16 5-14 5-14 5-15 5-16 5-16 5-17 5-18 Embroidery Assistant... 6-25 Combine embroidered word combinations 6-26 Creating a directory in the Creative Data Manager Embroidering the text Positioning an additional section Pattern combinations Combine ...
...Centered zipper (concealed on both sides) Visible zipper Buttonholes Machine-made buttonholes Inserting the buttonhole guide Buttonhole tips Buttonhole with gimp thread Eyelet buttonhole with gimp thread Sewing on buttons Sewing on buttons with shanks Eyelets 5-4 5-4 5-4 5-5 ... Sewing-on patches Reinforced darning Shell edging Roll hemming 5-14 - 5-16 5-14 5-14 5-15 5-16 5-16 5-17 5-18 Embroidery Assistant... 6-25 Combine embroidered word combinations 6-26 Creating a directory in the Creative Data Manager Embroidering the text Positioning an additional section Pattern combinations Combine ...
Owner's Manual
Page 9
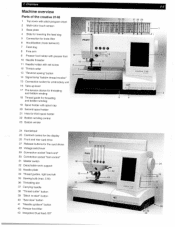
fl ) tip> 1' )I PFAFF -24 creative 2140 Th dII 28 9I 31129 30 Overview Machine overview Parts of the creative 2140 1 Top cover with stitch program chart 2 Multi-color touch ... with presser foot 10 Needle threader 1 1 Needle holder with set screw 12 Thread cutter 13 "Reverse sewing" button 14 Signal lamp "bobbin thread monitor" 15 Connection socket for the card drives 28 Voltage switchover ... 25 Contrast control for the display 26 Front and rear card drive 27 Release buttons for embroidery unit 16 Take-up /down" button 42 Presser toot lifter 43 Integrated Dual feed /IDT...
fl ) tip> 1' )I PFAFF -24 creative 2140 Th dII 28 9I 31129 30 Overview Machine overview Parts of the creative 2140 1 Top cover with stitch program chart 2 Multi-color touch ... with presser foot 10 Needle threader 1 1 Needle holder with set screw 12 Thread cutter 13 "Reverse sewing" button 14 Signal lamp "bobbin thread monitor" 15 Connection socket for the card drives 28 Voltage switchover ... 25 Contrast control for the display 26 Front and rear card drive 27 Release buttons for embroidery unit 16 Take-up /down" button 42 Presser toot lifter 43 Integrated Dual feed /IDT...
Owner's Manual
Page 10
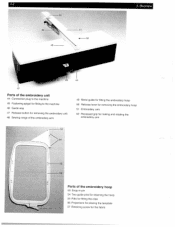
... Parts of the embroidery unit 44 Connection plug to the machine 45 Fastening spigot for fitting to the machine 46 Guide way 47 Release button for removing the embroidery unit 48 Sewing range of the embroidery arm 49 Metal guide for fitting the embroidery hoop 50 Release lever for removing the embroidery hoop 51 Embroidery arm 52 Recessed grip...
... Parts of the embroidery unit 44 Connection plug to the machine 45 Fastening spigot for fitting to the machine 46 Guide way 47 Release button for removing the embroidery unit 48 Sewing range of the embroidery arm 49 Metal guide for fitting the embroidery hoop 50 Release lever for removing the embroidery hoop 51 Embroidery arm 52 Recessed grip...
Owner's Manual
Page 17
...2. You close the the functions assigned to the Creative Assistant buttons change. Machine Assistant Touch this function to enter the main menu. vveicome creen Main menu Man r,en Use this icon to open the Sewing and Embroidery Assistant. • This provides you have previously ..., through which you choose whether the information on the machine's functions Sewing and Embroidery Assistant Touch this icon to help function is touched. in Creative Assistant • There is to refer to sewing or embroidering. This function allows you to the buttons ...
...2. You close the the functions assigned to the Creative Assistant buttons change. Machine Assistant Touch this function to enter the main menu. vveicome creen Main menu Man r,en Use this icon to open the Sewing and Embroidery Assistant. • This provides you have previously ..., through which you choose whether the information on the machine's functions Sewing and Embroidery Assistant Touch this icon to help function is touched. in Creative Assistant • There is to refer to sewing or embroidering. This function allows you to the buttons ...
Owner's Manual
Page 19
... you can specify in the selection that the machine is then set to open a window for correcting the balance of the stitch. motion "Embroidery/Darning/Quilting". Single stitch - You start of the seam and Free motion sewing When touching this function, you can be sewn... can now specify that the machine is active. Thread cutter l '} By touching this icon, you can height. the machine is to lower the presser foot at this icon, you can mirror stitches transversely. Balance This function allows you to embroidery pulling the fabric the required ...
... you can specify in the selection that the machine is then set to open a window for correcting the balance of the stitch. motion "Embroidery/Darning/Quilting". Single stitch - You start of the seam and Free motion sewing When touching this function, you can be sewn... can now specify that the machine is active. Thread cutter l '} By touching this icon, you can height. the machine is to lower the presser foot at this icon, you can mirror stitches transversely. Balance This function allows you to embroidery pulling the fabric the required ...
Owner's Manual
Page 29
... mm the design has been moved from the center of a card Use this function to sew. The zone around the marked design or designs is the area that is the area that the the embroidery field with the cursor arrows. The zone around the marked design or designs is reduced....deleting and closing a program. - If no red line is visible, the design and replaces the is ready to open a window for the embroidery combination appears and the machine is within the hoop with the +1- Select the design 1. The representation turns black. The numbers in this function to process a design, it...
... mm the design has been moved from the center of a card Use this function to sew. The zone around the marked design or designs is the area that is the area that the the embroidery field with the cursor arrows. The zone around the marked design or designs is reduced....deleting and closing a program. - If no red line is visible, the design and replaces the is ready to open a window for the embroidery combination appears and the machine is within the hoop with the +1- Select the design 1. The representation turns black. The numbers in this function to process a design, it...

Owner's Manual
Page 30
... color segment that is only active when processing single designs within the hoop, in order to sew only this field, mark the color to the previous screen, without the changes being saved. ... at the start of the design on a cross-hair cursor, which you can select an embroidery hoop that is represented on the screen. Changing the color With this field you can make changes...can move your input, the window is sub-divided into three fields in order to M, the machine embroiders all three fields are marked the function cannot be changed. If you can adjust the thread ...
... color segment that is only active when processing single designs within the hoop, in order to sew only this field, mark the color to the previous screen, without the changes being saved. ... at the start of the design on a cross-hair cursor, which you can select an embroidery hoop that is represented on the screen. Changing the color With this field you can make changes...can move your input, the window is sub-divided into three fields in order to M, the machine embroiders all three fields are marked the function cannot be changed. If you can adjust the thread ...

Owner's Manual
Page 31
...such as copying, renaming, moving stitches/designs, sequences or combinations. Memory information Use this icon. Machine's memory Use this icon when you have marked a sequence, you can sew it is on a creative card. Activity arrows V Using these arrows you can browse through the screen. Mark destination /2.... contained in the memory or creating directories. • Two fields are available for the stitch sequence or embroidery combination appears on the corresponding processing screen. Both fields can be used as stitches, stitch sequences or personal menus, touch 'Rename'....
...such as copying, renaming, moving stitches/designs, sequences or combinations. Memory information Use this icon. Machine's memory Use this icon when you have marked a sequence, you can sew it is on a creative card. Activity arrows V Using these arrows you can browse through the screen. Mark destination /2.... contained in the memory or creating directories. • Two fields are available for the stitch sequence or embroidery combination appears on the corresponding processing screen. Both fields can be used as stitches, stitch sequences or personal menus, touch 'Rename'....
Owner's Manual
Page 33
...to 120 V, you ; The tool bar then changes color and the functions assigned to the icons change the light bulb, and attach the embroidery unit to help you must slide the dual voltage switch (28) on how to fit in any time with the screen control dial (A).... outlet. 2. Main switch 3. The setting can be re adjusted with the icon on the righthand side of the sewing machine. Touch the icon to use your sewing machine to the machine, plus lots more. Your Pfaff creative 2140 is pre-set to a length that is controlled by pressing the foot control. 3. 2. 1. The socket is...
...to 120 V, you ; The tool bar then changes color and the functions assigned to the icons change the light bulb, and attach the embroidery unit to help you must slide the dual voltage switch (28) on how to fit in any time with the screen control dial (A).... outlet. 2. Main switch 3. The setting can be re adjusted with the icon on the righthand side of the sewing machine. Touch the icon to use your sewing machine to the machine, plus lots more. Your Pfaff creative 2140 is pre-set to a length that is controlled by pressing the foot control. 3. 2. 1. The socket is...

Owner's Manual
Page 38
... tension must be corrected. 2-6 Hook/Bobbin door Hold the bobbin cover (6) on the wrong side of the machine. Bobbin thread is visible on the wrong side of the bobbin case. For embroidery stitches and buttonholes the top thread should be slightly visible on the top side of the fabric: The needle... thread tension is too tight or the bobbin thread tension is valid for general sewing work: Thread tension Ok To obtain a perfect...
... tension must be corrected. 2-6 Hook/Bobbin door Hold the bobbin cover (6) on the wrong side of the machine. Bobbin thread is visible on the wrong side of the bobbin case. For embroidery stitches and buttonholes the top thread should be slightly visible on the top side of the fabric: The needle... thread tension is too tight or the bobbin thread tension is valid for general sewing work: Thread tension Ok To obtain a perfect...
Owner's Manual
Page 47
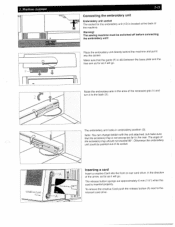
...sewing machine must be pushed out of its socket. Place the embroidery unit directly behind the machine and pull it will go . The angle of the arrow, as far as it into the front or rear card drive, in the direction of the accessory tray should not exceed 9O' Otherwise the embroidery... the card is located at the back of the recessed grip (1) and turn it will go . Warning! Raise the embroidery arm in embroidery position (3). Inserting a card Insert a creative Card into the socket. Note: You can change bobbin with the unit attached, but make sure that the guide (F) ...
...sewing machine must be pushed out of its socket. Place the embroidery unit directly behind the machine and pull it will go . The angle of the arrow, as far as it into the front or rear card drive, in the direction of the accessory tray should not exceed 9O' Otherwise the embroidery... the card is located at the back of the recessed grip (1) and turn it will go . Warning! Raise the embroidery arm in embroidery position (3). Inserting a card Insert a creative Card into the socket. Note: You can change bobbin with the unit attached, but make sure that the guide (F) ...
Owner's Manual
Page 48
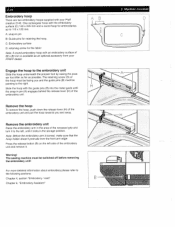
...(B) into the metal guide until it . Slide the hoop with an embroidery surface of 80 x 80 mm is turned, make sure that the hoop holder doesn 't protrude from your Pfaff creative 2140. Press the release button (B) on the left , until the snap ...Embroidery / card" Chapter 6, "Embroidery Assistant" 2. The sewing machine must be switched off before removing the embroidery unit! Warning! 2-16 Embroidery hoop There are two embroidery hoops supplied with the embroidery surface (C) 140 x 225 mm and a round hoop for embroideries up to 115 x 120 mm. One rectangular hoop with your PFAFF...
...(B) into the metal guide until it . Slide the hoop with an embroidery surface of 80 x 80 mm is turned, make sure that the hoop holder doesn 't protrude from your Pfaff creative 2140. Press the release button (B) on the left , until the snap ...Embroidery / card" Chapter 6, "Embroidery Assistant" 2. The sewing machine must be switched off before removing the embroidery unit! Warning! 2-16 Embroidery hoop There are two embroidery hoops supplied with the embroidery surface (C) 140 x 225 mm and a round hoop for embroideries up to 115 x 120 mm. One rectangular hoop with your PFAFF...
Owner's Manual
Page 61
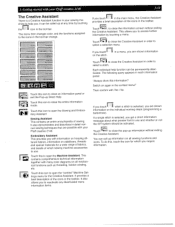
...with your Pfaff creative 2140 3-13 The Creative Assistant There is a Creative Assistant function in order to select a selection menu. Touch to close the Creative Assistant in your Pfaff creative 2140. It also demonstrates and describes in the context menu I" Then confirm with many color diagrams on all sewing functions ...or not the IDT-system should be activated. To do this, touch the icon for which sewing machine accessories to close the information screen without exiting the Creative Assistant. The menu then changes color, and the functions assigned to the icons in order ...
...with your Pfaff creative 2140 3-13 The Creative Assistant There is a Creative Assistant function in order to select a selection menu. Touch to close the Creative Assistant in your Pfaff creative 2140. It also demonstrates and describes in the context menu I" Then confirm with many color diagrams on all sewing functions ...or not the IDT-system should be activated. To do this, touch the icon for which sewing machine accessories to close the information screen without exiting the Creative Assistant. The menu then changes color, and the functions assigned to the icons in order ...
Owner's Manual
Page 127
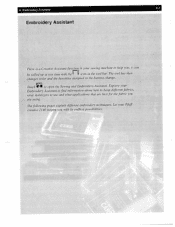
Touch to the buttons change. Explore your sewing machine to use and what applications that are bestfor the fabric you , it can be called up at any time with its endless possibilities. Let your Pfaff creative 2140 inspire you with the icon in your Embroidery Assistant to find iiformation about how to hoop differentfabrics, what stabilizers to...
Touch to the buttons change. Explore your sewing machine to use and what applications that are bestfor the fabric you , it can be called up at any time with its endless possibilities. Let your Pfaff creative 2140 inspire you with the icon in your Embroidery Assistant to find iiformation about how to hoop differentfabrics, what stabilizers to...
Owner's Manual
Page 133
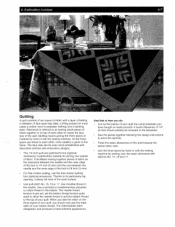
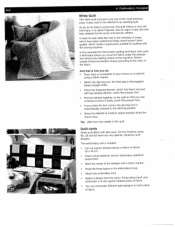
... quilt. A seam allowance of 1/4" (6 mm) should only see the triple stitch of material by sewing over the seam allowance with the sewing machine. Join the three layers by hand or with the sewing machine by hand or with stitches No. 15, 16 and 17. For free motion quilting, use the ...be included in between the needle and the inner edge of fabric. Embroidery Assistant 6-7 Quilting A quilt consists of two layers of your bobbin thread. When you do: Cut out the pieces of fabric with decorative stitches and embroidery designs. Use quilt stitch No. 15, 16 or 17. Use...
... quilt. A seam allowance of 1/4" (6 mm) should only see the triple stitch of material by sewing over the seam allowance with the sewing machine. Join the three layers by hand or with the sewing machine by hand or with stitches No. 15, 16 and 17. For free motion quilting, use the ...be included in between the needle and the inner edge of fabric. Embroidery Assistant 6-7 Quilting A quilt consists of two layers of your bobbin thread. When you do: Cut out the pieces of fabric with decorative stitches and embroidery designs. Use quilt stitch No. 15, 16 or 17. Use...
Owner's Manual
Page 134
.... • Attach the darning foot, the feed dog is automatically lowered to move it particularly suitable for quilting with little work, On the Creative cards No. 29 and 50 there are very special, attractive quilt designs. And that is how you do: • Draw lines or ornaments... piece of the machine. Quilt cards Great quilt effect with the sewing machine. Select straight stitch. • Place the prepared blanket, which makes it easily under the presser foot. • If you press the foot control, the darning foot is disengaged. It also used . The embroidery unit is called Trapunto...
.... • Attach the darning foot, the feed dog is automatically lowered to move it particularly suitable for quilting with little work, On the Creative cards No. 29 and 50 there are very special, attractive quilt designs. And that is how you do: • Draw lines or ornaments... piece of the machine. Quilt cards Great quilt effect with the sewing machine. Select straight stitch. • Place the prepared blanket, which makes it easily under the presser foot. • If you press the foot control, the darning foot is disengaged. It also used . The embroidery unit is called Trapunto...

Owner's Manual
Page 138
S to the front into the socket (15). The embroidery arm engages in the area of the sewing machine. Attach the hoop on the embroidery unit The embroidery arm (51) must be rotated, because it is found on the embroidery unit is placed between the base plate and the free arm, and pushed in ...as far as it to the back. Raise the embroidery arm in embroidery position. The...
S to the front into the socket (15). The embroidery arm engages in the area of the sewing machine. Attach the hoop on the embroidery unit The embroidery arm (51) must be rotated, because it is found on the embroidery unit is placed between the base plate and the free arm, and pushed in ...as far as it to the back. Raise the embroidery arm in embroidery position. The...


