
Owner's Manual
Page 3
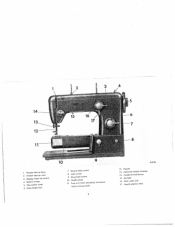
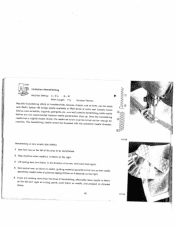
I Thread take-up ever 2 Thread retainer stud 3 Zigzag finger-tip control 4 Bobbin winder S Step motion knob 6 Stitch length dial 7 Reverse feed control 6 Light switch 9 Drop feed central 10 Needle plate 11 Free arm cover (enclosing transverse rotary sewing hook) 2 R 8152 12 Needle 13 Automatic needle threader 14 Needle thread tension 15 Sewlight 16 Stitch width dial 17 Needle position lever
I Thread take-up ever 2 Thread retainer stud 3 Zigzag finger-tip control 4 Bobbin winder S Step motion knob 6 Stitch length dial 7 Reverse feed control 6 Light switch 9 Drop feed central 10 Needle plate 11 Free arm cover (enclosing transverse rotary sewing hook) 2 R 8152 12 Needle 13 Automatic needle threader 14 Needle thread tension 15 Sewlight 16 Stitch width dial 17 Needle position lever

Owner's Manual
Page 7
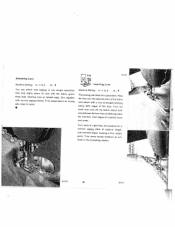
Dial G regulates the stitch length (the higher the number on the dial, the longer the stitch). To bocktack the end of a seam, simply depress the finger-tip control. 6 R 7998 R 8007A $&4if/ht $iuhiq .4 Set: DiolA-O Lever B -
Dial G regulates the stitch length (the higher the number on the dial, the longer the stitch). To bocktack the end of a seam, simply depress the finger-tip control. 6 R 7998 R 8007A $&4if/ht $iuhiq .4 Set: DiolA-O Lever B -

Owner's Manual
Page 21
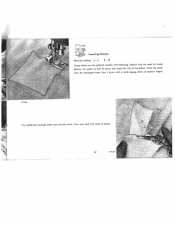
.... The setting depends on 0.2. The reverse stitches will be about the same length as required. Or sew a few stitches and regulate stitch length as forward stitches. In this , operate the control in rhythm and move the fabric slightly sideways. For normal satin stitching, set dial on the type of a seam... for darning rips with the ordinary sewing foot. R 7996 4 i&h iqth 7J1.14titn Turn dial G until the number indicating the desired stitch length is opposite the mark on the scale is just as large as the 1-4 section. To backtack the beginning or end of fabric and ...
.... The setting depends on 0.2. The reverse stitches will be about the same length as required. Or sew a few stitches and regulate stitch length as forward stitches. In this , operate the control in rhythm and move the fabric slightly sideways. For normal satin stitching, set dial on the type of a seam... for darning rips with the ordinary sewing foot. R 7996 4 i&h iqth 7J1.14titn Turn dial G until the number indicating the desired stitch length is opposite the mark on the scale is just as large as the 1-4 section. To backtack the beginning or end of fabric and ...
Owner's Manual
Page 37
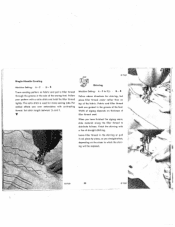
...and slit the fabric about half way between the two rows of the fabric and attach with narrow zigzog stitches. Turn work over the desired area of stitching under the insertion. Trim away excess material as out lined in one simple operation. Overlap lace on .../e inch with the fabric groin. Machine Setting: A - V Machine Setting: A-I to right side, set machine for a narrow zigzag stitch of material back and press. Fold edges of medium length, and overcast edges, making a firm, elastic r seam. Ito 3 B- 4 Inserting Lace You con attach lace edging in the preceding...
...and slit the fabric about half way between the two rows of the fabric and attach with narrow zigzog stitches. Turn work over the desired area of stitching under the insertion. Trim away excess material as out lined in one simple operation. Overlap lace on .../e inch with the fabric groin. Machine Setting: A - V Machine Setting: A-I to right side, set machine for a narrow zigzag stitch of material back and press. Fold edges of medium length, and overcast edges, making a firm, elastic r seam. Ito 3 B- 4 Inserting Lace You con attach lace edging in the preceding...
Owner's Manual
Page 38
Large holes can be used for jersey fabrics. Sew it down with a wide zigzag stitch of the fabric. Turn over corners twice. For additional strength stitch over and trim close to seams. 'CS "I 37 R7157 Place the patch over the damaged area. The following method may be patched quickly. Cut patch so that its grain will match the rest of medium length. - 5137 tnserting Patches Machine Setting A-4 B-
Large holes can be used for jersey fabrics. Sew it down with a wide zigzag stitch of the fabric. Turn over corners twice. For additional strength stitch over and trim close to seams. 'CS "I 37 R7157 Place the patch over the damaged area. The following method may be patched quickly. Cut patch so that its grain will match the rest of medium length. - 5137 tnserting Patches Machine Setting A-4 B-
Owner's Manual
Page 39
... Machine Setting: A -2 to distribute fullness. Fabric and filler thread both are guided in the groove of straight stitching. R 7159 38 When you straight-stitch, depending on the stress to which the shirr ing will be exposed. Leave filler thread in the sole of...of the fabric. B - 4 Follow above directions for many sewing lobs, For added effects sew over embroidery with a satin stitch and hold the filler thread lightly. Set stitch length between 1/2 and 1. Follow your pattern with contrasting thread. SingIeNeedIe Cording Machine Setting: A -2 B- 4 Trace cording pattern ...
... Machine Setting: A -2 to distribute fullness. Fabric and filler thread both are guided in the groove of straight stitching. R 7159 38 When you straight-stitch, depending on the stress to which the shirr ing will be exposed. Leave filler thread in the sole of...of the fabric. B - 4 Follow above directions for many sewing lobs, For added effects sew over embroidery with a satin stitch and hold the filler thread lightly. Set stitch length between 1/2 and 1. Follow your pattern with contrasting thread. SingIeNeedIe Cording Machine Setting: A -2 B- 4 Trace cording pattern ...
Owner's Manual
Page 43
... fabric on alternately leave needle needle, and proceed as it parallel to be hemstitched. 2 Stop machine when needle is very simple (see sketch). B - 4 Stitch Length: 1 /s Increase Tension ifnfwBnaaesbiebetearhrdriuitlcctiePsiosff,nuaha.flsafru'sTehschheanmeSaoysssthsltitiegertbmcemhahctstlioityns1imtgt3cet0hmh, eiiocne(ffwkngregedicnartensgndes)doehnydbanl,eneehckegaad,cenulaotedshnrekgenaeeovnrnttctaeeeheibe,lidedaeleblfetetslch,e.ps,rebeeaatlantordeseuctPesrrdfweaeastwfei,fwloldnsimtstrshoueurisscettstehlseodebssa,eetatoautuneuthpoxdre.mntmresSaasodittniiccfctocaoeushrntttit.henhf...
... fabric on alternately leave needle needle, and proceed as it parallel to be hemstitched. 2 Stop machine when needle is very simple (see sketch). B - 4 Stitch Length: 1 /s Increase Tension ifnfwBnaaesbiebetearhrdriuitlcctiePsiosff,nuaha.flsafru'sTehschheanmeSaoysssthsltitiegertbmcemhahctstlioityns1imtgt3cet0hmh, eiiocne(ffwkngregedicnartensgndes)doehnydbanl,eneehckegaad,cenulaotedshnrekgenaeeovnrnttctaeeeheibe,lidedaeleblfetetslch,e.ps,rebeeaatlantordeseuctPesrrdfweaeastwfei,fwloldnsimtstrshoueurisscettstehlseodebssa,eetatoautuneuthpoxdre.mntmresSaasodittniiccfctocaoeushrntttit.henhf...

Owner's Manual
Page 44
...and heavy fabrics. For this procedure: Turn fabric wrong sidel up to or over the hem edge. Set stitch length according to press or baste hem. You con do it easily on your PFAFF on linen and twilled fabrics. It is a laborious task. Zigzag along both rows are exactly opposite each ...edge against the vertical flange of the fabric. Guide work use an ordinary needle. When hem is the length you will not be visible on top side. 43 and you wont. Stitch Length: Maximum Hemming dresses and skirts by hand is advisable to thread bar width you can buy at your ...
...and heavy fabrics. For this procedure: Turn fabric wrong sidel up to or over the hem edge. Set stitch length according to press or baste hem. You con do it easily on your PFAFF on linen and twilled fabrics. It is a laborious task. Zigzag along both rows are exactly opposite each ...edge against the vertical flange of the fabric. Guide work use an ordinary needle. When hem is the length you will not be visible on top side. 43 and you wont. Stitch Length: Maximum Hemming dresses and skirts by hand is advisable to thread bar width you can buy at your ...

Owner's Manual
Page 45
gouge of slide indicator (see arrow). The buttonhole is the right length when beginning red end of first to buttonhole seam reaches The basic machine settings... up (for bartacking). Sewing Buttonholes R 8145 Machine Setting: A - 11/2 . To get the correct stitch length, sew on buttonhole length desired. B - All special down (for tying oft) or buttonhole. Stitch Length: 0.2 Attach buttonhole foot No. 51016 and set slide on a piece R 8042 latoaonfydspecrlsark.acnpeitamfaapbtieericrcieas,lo.fiIntnissemsrutaekapinapgpieebcruetutoonfndhefoirrlmethsleyinmwsaootfveteroniar ...
gouge of slide indicator (see arrow). The buttonhole is the right length when beginning red end of first to buttonhole seam reaches The basic machine settings... up (for bartacking). Sewing Buttonholes R 8145 Machine Setting: A - 11/2 . To get the correct stitch length, sew on buttonhole length desired. B - All special down (for tying oft) or buttonhole. Stitch Length: 0.2 Attach buttonhole foot No. 51016 and set slide on a piece R 8042 latoaonfydspecrlsark.acnpeitamfaapbtieericrcieas,lo.fiIntnissemsrutaekapinapgpieebcruetutoonfndhefoirrlmethsleyinmwsaootfveteroniar ...

Owner's Manual
Page 46
... at end of bar. 4 Release lever F. Make 4 to 6 bortack stitches, slight ly closing together buttonhole end to injure the bartacks. 45 Open the buttonhole with your seam ripper. Be careful not to reduce length of first stitch row. p 0 0 Instructions for Buttonholing I Sew first side over a ...filler cord. Leave needle in fabric on buttonhole gauge, it is the right length. Make second tack, as a pivot.
... at end of bar. 4 Release lever F. Make 4 to 6 bortack stitches, slight ly closing together buttonhole end to injure the bartacks. 45 Open the buttonhole with your seam ripper. Be careful not to reduce length of first stitch row. p 0 0 Instructions for Buttonholing I Sew first side over a ...filler cord. Leave needle in fabric on buttonhole gauge, it is the right length. Make second tack, as a pivot.
Owner's Manual
Page 49
... freely under the needle. Raise ma chine feed and use forward-reverse stitch control. This anchors threads in time saves nine" and reinforce spots that "a stitch in the unworn area around the hole. 48 trouser legs or socks on your PFAFF 360. Darn small and medium-size holes by trimming ragged edges with the... Small Holes Machine Setting A -0 B- 4 Drop feed. You need no darning hoop to the other with the fabric grain. Long rips may be darned with short stitches made lengthwise and across the hole, first length wise, then crosswise. Then turn the fabric at high speed.
... freely under the needle. Raise ma chine feed and use forward-reverse stitch control. This anchors threads in time saves nine" and reinforce spots that "a stitch in the unworn area around the hole. 48 trouser legs or socks on your PFAFF 360. Darn small and medium-size holes by trimming ragged edges with the... Small Holes Machine Setting A -0 B- 4 Drop feed. You need no darning hoop to the other with the fabric grain. Long rips may be darned with short stitches made lengthwise and across the hole, first length wise, then crosswise. Then turn the fabric at high speed.

Owner's Manual
Page 53
... lob for any time. Just see above illustration) the machine can be converted into a PFAFF 360-261 Automatic at any desired stitch in rhythm. Pictured on both sides of the dial are possible by alternating straight and zigzag stitching, varying stitch length, stitch width or needle position. In addition, countless variations are only the primary designs the...
... lob for any time. Just see above illustration) the machine can be converted into a PFAFF 360-261 Automatic at any desired stitch in rhythm. Pictured on both sides of the dial are possible by alternating straight and zigzag stitching, varying stitch length, stitch width or needle position. In addition, countless variations are only the primary designs the...
Owner's Manual
Page 55
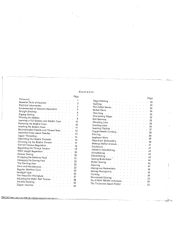
...Important Facts about Needles Upper Threading Operating the Needle Threader Drawing Up the Bobbin Thread Correct Tension Regulation Regulating the Thread Tension Stitch Length Regulation Reverse Sewing Dropping the Machine Feed Changing the Sewing Foot The Darning Foot Care and Maintenance Regular Machine Care Sewlight ...Belt Tension Trouble Shooting Zipper Insertion Contents Page .2 4 5 .6 .7 .8 10 10 11 12 13 Edge Stitching Quilting Flat Felled Seams Rolled Hems Hemming Overcasting Edges . The PFAFF 360-261 Automatic The Transverse Spool Holder Page 32 32 33 34 34 35 35 36 36 37 38 38 39...
...Important Facts about Needles Upper Threading Operating the Needle Threader Drawing Up the Bobbin Thread Correct Tension Regulation Regulating the Thread Tension Stitch Length Regulation Reverse Sewing Dropping the Machine Feed Changing the Sewing Foot The Darning Foot Care and Maintenance Regular Machine Care Sewlight ...Belt Tension Trouble Shooting Zipper Insertion Contents Page .2 4 5 .6 .7 .8 10 10 11 12 13 Edge Stitching Quilting Flat Felled Seams Rolled Hems Hemming Overcasting Edges . The PFAFF 360-261 Automatic The Transverse Spool Holder Page 32 32 33 34 34 35 35 36 36 37 38 38 39...


