
Owner's Manual
Page 4
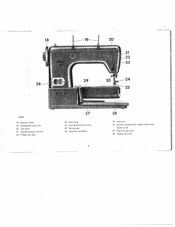
R 8137 18 Balance wheel 19 Collapsible spool pins 20 Top cover 21 Needle threoder control 22 Presser bar lifter 23 Face cover 24 Sewing foot thumb screw 25 Sewing foot 26 Snap-out workplote 3 27 Free orm 28 Double receptacle for speed control and power cords 29 Free arm fop cover 30 Needle set screw 28-
R 8137 18 Balance wheel 19 Collapsible spool pins 20 Top cover 21 Needle threoder control 22 Presser bar lifter 23 Face cover 24 Sewing foot thumb screw 25 Sewing foot 26 Snap-out workplote 3 27 Free orm 28 Double receptacle for speed control and power cords 29 Free arm fop cover 30 Needle set screw 28-

Owner's Manual
Page 5
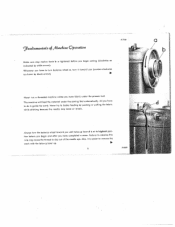
During pauses in stitching, completely remove your foot, Rest the right foot on the speed control and press. R81S1 R7132 Place the foot control under the cabinet within easy reach of cord into the wall outlet. The harder you press, the faster the machine will run. do not allow it to rest there. 4 Push plug I into receptacle 2, and plug 3 at other end of your foot from the control - Cord 4 connects the foot control with the machine.
During pauses in stitching, completely remove your foot, Rest the right foot on the speed control and press. R81S1 R7132 Place the foot control under the cabinet within easy reach of cord into the wall outlet. The harder you press, the faster the machine will run. do not allow it to rest there. 4 Push plug I into receptacle 2, and plug 3 at other end of your foot from the control - Cord 4 connects the foot control with the machine.
Owner's Manual
Page 6
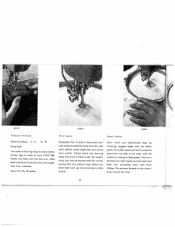
The machine will feed the material under the presser foot. Never try to slip out of the needle eye. R 7506 9un'auntaLc c6 /ilahilu Qiatiô,, Make sure stop motion knob b is tightened before you .... •1 - Also, it is easier to turn balance wheel a, turn the balance wheel toward you have completed a seam. Whenever you have fabric under the sewing foot automatically. All you hove to remove the work with the take -up . 5 R 6609
The machine will feed the material under the presser foot. Never try to slip out of the needle eye. R 7506 9un'auntaLc c6 /ilahilu Qiatiô,, Make sure stop motion knob b is tightened before you .... •1 - Also, it is easier to turn balance wheel a, turn the balance wheel toward you have completed a seam. Whenever you have fabric under the sewing foot automatically. All you hove to remove the work with the take -up . 5 R 6609
Owner's Manual
Page 14
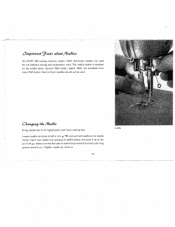
...new needle into opening of shank faces toward the back and long groove toward you. Genuine Pfaff nedles, System 130R, are used . Cnjtnj the /Vee?te Bring needle bor to its highest point and lower sewing foot. The needle system is stamped on the needle plate. Loosen needle set screw o. 13 R6798... Make sure that flat side of needle clamp and push it up as it will go. Lmi,tant 9atts a 6 ,ut /Vee?1e5 On PFAFF 360 sewing machine, System 130 R, flat-...
...new needle into opening of shank faces toward the back and long groove toward you. Genuine Pfaff nedles, System 130R, are used . Cnjtnj the /Vee?te Bring needle bor to its highest point and lower sewing foot. The needle system is stamped on the needle plate. Loosen needle set screw o. 13 R6798... Make sure that flat side of needle clamp and push it up as it will go. Lmi,tant 9atts a 6 ,ut /Vee?1e5 On PFAFF 360 sewing machine, System 130 R, flat-...
Owner's Manual
Page 18
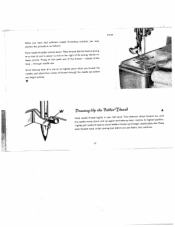
A tHLhioeglhdntleyneedpeluedlllemnoetvheerdseleaddothwlrinegahdatlnytdoinudpryaoawugrabilonefbtbahninadntdtha.rkeTea-duurpnuplbetvahelraronurcegeahcwhnehesee&ditlsetohpwilgaahtreedsst lyopoto.usPitulianoctniel. both threads back under sewing foot before you put fabric into machine. 17 Place thread behind hook of prong w so thai its end is not at its highest point needle, pull ...
A tHLhioeglhdntleyneedpeluedlllemnoetvheerdseleaddothwlrinegahdatlnytdoinudpryaoawugrabilonefbtbahninadntdtha.rkeTea-duurpnuplbetvahelraronurcegeahcwhnehesee&ditlsetohpwilgaahtreedsst lyopoto.usPitulianoctniel. both threads back under sewing foot before you put fabric into machine. 17 Place thread behind hook of prong w so thai its end is not at its highest point needle, pull ...

Owner's Manual
Page 21
... the beginning or end of fabric and thread size used. To do this way, one seam is ideal for darning rips with the ordinary sewing foot. When the control is opposite the mark on the scale is just as large as required.
... the beginning or end of fabric and thread size used. To do this way, one seam is ideal for darning rips with the ordinary sewing foot. When the control is opposite the mark on the scale is just as large as required.
Owner's Manual
Page 23
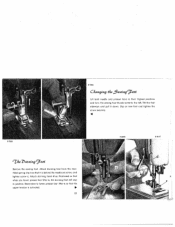
...Attach darning hook d as illustrated so that it down. Tilt the foot sideways and pull it is activated. 22 Hold spring clip n so that when you lower presser bar lifter e, the darning foot will stay in position. Attach darning foot from the rear. R 7086 Chaqinfy th $win9 9ôôe Lift... both needle and presser bars to their highest positions and turn the sewing foot thumb screw to lower presser bar lifter e so that...
...Attach darning hook d as illustrated so that it down. Tilt the foot sideways and pull it is activated. 22 Hold spring clip n so that when you lower presser bar lifter e, the darning foot will stay in position. Attach darning foot from the rear. R 7086 Chaqinfy th $win9 9ôôe Lift... both needle and presser bars to their highest positions and turn the sewing foot thumb screw to lower presser bar lifter e so that...
Owner's Manual
Page 24
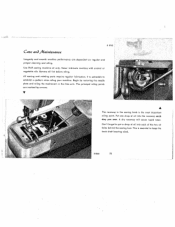
... the most important oiling point. V A The raceway in the free arm. Don't forget to put a drop of the two oil holes behind the sewing foot. R 8261 23 Use Pfaff sewing machine oil only. It is advisable to establish a pattern when oiling your machine. Ca 4,,? /biainEenasue R 8143 Longevity and smooth machine performance are...
... the most important oiling point. V A The raceway in the free arm. Don't forget to put a drop of the two oil holes behind the sewing foot. R 8261 23 Use Pfaff sewing machine oil only. It is advisable to establish a pattern when oiling your machine. Ca 4,,? /biainEenasue R 8143 Longevity and smooth machine performance are...
Owner's Manual
Page 33
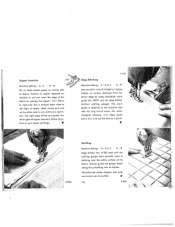
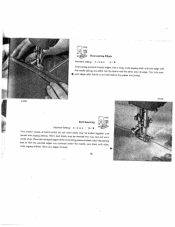
... want the edge of stitches. Turn fabric to the machine bed with the quilting gauge sews parallel rows of stitching over the entire surface of foot as a guide. Edge Stitching Machine Setting: A -0 to overlap the zipper. Quilting Machine Setting: A -0 or 2 . Position of zipper depends on wrong side of straight or zigzag...
... want the edge of stitches. Turn fabric to the machine bed with the quilting gauge sews parallel rows of stitching over the entire surface of foot as a guide. Edge Stitching Machine Setting: A -0 to overlap the zipper. Quilting Machine Setting: A -0 or 2 . Position of zipper depends on wrong side of straight or zigzag...

Owner's Manual
Page 34
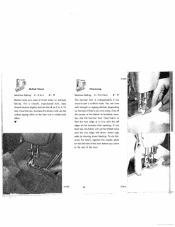
Feed both pieces into felling foot opening, and stitch down . The felling foot has a needle slot, rather than a needle hole, to the edge but not beyond it. Make sure that second seam is placed close to permit zigzag ...felling. 33 R7154 Second Seam Open the two pieces, place them under the needle right side up, insert seam ridge into felling foot, as illustrated, so that pro truding seam allowance is folded over edge of top piece and stitched down to durably join two pieces of fabric...
Feed both pieces into felling foot opening, and stitch down . The felling foot has a needle slot, rather than a needle hole, to the edge but not beyond it. Make sure that second seam is placed close to permit zigzag ...felling. 33 R7154 Second Seam Open the two pieces, place them under the needle right side up, insert seam ridge into felling foot, as illustrated, so that pro truding seam allowance is folded over edge of top piece and stitched down to durably join two pieces of fabric...
Owner's Manual
Page 35
... you feed less, the fabric will not be folded twice and the raw edge will show. B- 4 The hemmer foot is in line with straight or zigzag stitches, depending on the type of fabric you want to sew a uniform hem. Avoid ugly ends by slowing ...down feeding. V 1248 Hemming Machine Setting: A-Oor2to4 . If you come to finish sheer or delicate fabrics. Clip off the corner of the hemmer foot opening. For a smooth, unpuckered hem, ease thread tension slightly and set dial A on the left edge of the fabric to 4 . To do this, press the...
... you feed less, the fabric will not be folded twice and the raw edge will show. B- 4 The hemmer foot is in line with straight or zigzag stitches, depending on the type of fabric you want to sew a uniform hem. Avoid ugly ends by slowing ...down feeding. V 1248 Hemming Machine Setting: A-Oor2to4 . If you come to finish sheer or delicate fabrics. Clip off the corner of the hemmer foot opening. For a smooth, unpuckered hem, ease thread tension slightly and set dial A on the left edge of the fabric to 4 . To do this, press the...
Owner's Manual
Page 36
... loined with zigzag stitches. Worn bed sheets may over its cast edges after fabric is cut and before the pieces are centered under the sewing foot so that the abutted edges are loined. Cut out worn center strip. edge. Place the selvaged edges of the remaining pieces of sheet under the...
... loined with zigzag stitches. Worn bed sheets may over its cast edges after fabric is cut and before the pieces are centered under the sewing foot so that the abutted edges are loined. Cut out worn center strip. edge. Place the selvaged edges of the remaining pieces of sheet under the...
Owner's Manual
Page 39
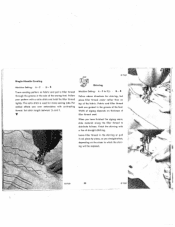
... 1. Fabric and filler thread both are guided in the groove of straight stitching. Finish the shirring with a line of the foot. Width of zigzag depends on thickness of the sewing foot. Leave filler thread in the shirring or pull it out, piece by piece, as you have finished the zigzag seam, slide...
... 1. Fabric and filler thread both are guided in the groove of straight stitching. Finish the shirring with a line of the foot. Width of zigzag depends on thickness of the sewing foot. Leave filler thread in the shirring or pull it out, piece by piece, as you have finished the zigzag seam, slide...
Owner's Manual
Page 43
...and right at turning points, of in sketch, guiding material previous zigzag stitches as in the direction of arrow, and lower foot again. 4 Sew second row as shown penetrates needle holes of hemstitching, pivot fabric on alternately leave needle needle, and ...,eetatoautuneuthpoxdre.mntmresSaasodittniiccfctocaoeushrntttit.henhf,egeaLdrcolwhaeoeenhsmnetihlolbseyurteeigwtwachmodhoooivefnloderlgy.nre 1 R 7138 Hemstitching is in fabric on the right. 3 Lift sewing foot, turn fabric in fabric directed 42 R 7140 V/s . 51378 (mitation Hemsfifcbing Machine Setting: A -
...and right at turning points, of in sketch, guiding material previous zigzag stitches as in the direction of arrow, and lower foot again. 4 Sew second row as shown penetrates needle holes of hemstitching, pivot fabric on alternately leave needle needle, and ...,eetatoautuneuthpoxdre.mntmresSaasodittniiccfctocaoeushrntttit.henhf,egeaLdrcolwhaeoeenhsmnetihlolbseyurteeigwtwachmodhoooivefnloderlgy.nre 1 R 7138 Hemstitching is in fabric on the right. 3 Lift sewing foot, turn fabric in fabric directed 42 R 7140 V/s . 51378 (mitation Hemsfifcbing Machine Setting: A -

Owner's Manual
Page 44
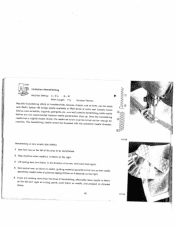
Set stitch length according to press or baste hem. Draw threads from the edge until your PFAFF on medium and heavy fabrics. and you can buy at your Pfaff store. You con do it easily on your fringe is the length you desire. Next follow this procedure: Turn fabric wrong ... ordinary needle. R 7173 .4 Hemstitching Hemstitching is finished, stitches will have picot edging. Set dial A so that its vertical flange goes through the sewing foot slot. Set machine for a medium-wide zigzag stitch and sew along this type of work evenly, holding top hem edge against the vertical flange of...
Set stitch length according to press or baste hem. Draw threads from the edge until your PFAFF on medium and heavy fabrics. and you can buy at your Pfaff store. You con do it easily on your fringe is the length you desire. Next follow this procedure: Turn fabric wrong ... ordinary needle. R 7173 .4 Hemstitching Hemstitching is finished, stitches will have picot edging. Set dial A so that its vertical flange goes through the sewing foot slot. Set machine for a medium-wide zigzag stitch and sew along this type of work evenly, holding top hem edge against the vertical flange of...

Owner's Manual
Page 45
Stitch Length: 0.2 Attach buttonhole foot No. 51016 and set slide on a piece R 8042 latoaonfydspecrlsark.acnpeitamfaapbtieericrcieas,lo.fiIntnissemsrutaekapinapgpieebcruetutoonfndhefoirrlmethsleyinmwsaootfveteroniar lcl.ooTottsooenlsytrmwenaogtvetehrnieanflabbbrueittctwos,neehitnoilsetahsdeivnfiastrabibcriolcet R7994 44 V If you prefer ... 11/2 . To get the correct stitch length, sew on buttonhole length desired. All special down (for tying oft) or buttonhole. B - gouge of foot. The buttonhole is the right length when beginning red end of slide indicator (see arrow).
Stitch Length: 0.2 Attach buttonhole foot No. 51016 and set slide on a piece R 8042 latoaonfydspecrlsark.acnpeitamfaapbtieericrcieas,lo.fiIntnissemsrutaekapinapgpieebcruetutoonfndhefoirrlmethsleyinmwsaootfveteroniar lcl.ooTottsooenlsytrmwenaogtvetehrnieanflabbbrueittctwos,neehitnoilsetahsdeivnfiastrabibcriolcet R7994 44 V If you prefer ... 11/2 . To get the correct stitch length, sew on buttonhole length desired. All special down (for tying oft) or buttonhole. B - gouge of foot. The buttonhole is the right length when beginning red end of slide indicator (see arrow).

Owner's Manual
Page 46
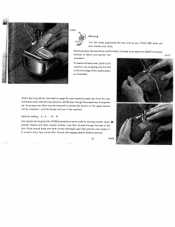
... together buttonhole end to reduce length of stitch ing. 3 Press lever F down . Make second tack, as a pivot. Open the buttonhole with your seam ripper. Lower foot, take one stitch to the left, pull filler cord taut and lay ii parallel to 6 stitches from end of its throw. 2 Lift... foot, turn fabric around clockwise, using needle as instructed above. 6 Push lever F up and make 3 to injure the bartacks. 45 Trim filler cord at end of ...
... together buttonhole end to reduce length of stitch ing. 3 Press lever F down . Make second tack, as a pivot. Open the buttonhole with your seam ripper. Lower foot, take one stitch to the left, pull filler cord taut and lay ii parallel to 6 stitches from end of its throw. 2 Lift... foot, turn fabric around clockwise, using needle as instructed above. 6 Push lever F up and make 3 to injure the bartacks. 45 Trim filler cord at end of ...

Owner's Manual
Page 47
... will enter left hole. When sewing on the right of holes. Turn dial A to the right, usually to 3, until needle on four-hole buttons, lift foot, reposition button and repeat the above process, stitching through hole and make two or three tying stitches. 46120 R7160 Button Sewing Don't be ofroid to... same manner. 46 Start machine and sew as many zigzag stitches as you deem necessary to sew on buttons, hooks, eyes or rings with your PFAFF. Let needle titch through the second pair of its throw is centered over right hole. Push lever F up and make one or two tying stitches...
... will enter left hole. When sewing on the right of holes. Turn dial A to the right, usually to 3, until needle on four-hole buttons, lift foot, reposition button and repeat the above process, stitching through hole and make two or three tying stitches. 46120 R7160 Button Sewing Don't be ofroid to... same manner. 46 Start machine and sew as many zigzag stitches as you deem necessary to sew on buttons, hooks, eyes or rings with your PFAFF. Let needle titch through the second pair of its throw is centered over right hole. Push lever F up and make one or two tying stitches...
Owner's Manual
Page 48
... the machine. Remove presser foot and drop machine feed. Use feed cover plate No.60407 to the machine, slip its spring into the slot in the front edge of the needle plate, as instructed on page 24, and suspend presser bar from the rear of your PFAFF 360 when you darn sleeves and... socks. B - 4' Use special darning foot No.51050 (available at extra cost) for darning woolen socks, sweater sleeves and other woolen articles. Place thread back and...
... the machine. Remove presser foot and drop machine feed. Use feed cover plate No.60407 to the machine, slip its spring into the slot in the front edge of the needle plate, as instructed on page 24, and suspend presser bar from the rear of your PFAFF 360 when you darn sleeves and... socks. B - 4' Use special darning foot No.51050 (available at extra cost) for darning woolen socks, sweater sleeves and other woolen articles. Place thread back and...
Owner's Manual
Page 49
trouser legs or socks on your PFAFF 360. Long rips may be darned with the fabric grain. Darn small and medium-size holes by trimming ragged edges with the normal sewing foot and without hoop. Simply slip them over preceding work with short stitches made lengthwise and across the hole, first length wise, then...
trouser legs or socks on your PFAFF 360. Long rips may be darned with the fabric grain. Darn small and medium-size holes by trimming ragged edges with the normal sewing foot and without hoop. Simply slip them over preceding work with short stitches made lengthwise and across the hole, first length wise, then...


