
Owner's Manual
Page 2
... if you are now the proud owner of your machine. Follow these simple instructions and familiarize yourself sewing exciting on your PFAFF dealer. the sewing machine with the exclusive automatic features of a PFAFF 360 - G.M. with countless creative possibilities. He will help you have any time. You will find If you at any sewing problems...
... if you are now the proud owner of your machine. Follow these simple instructions and familiarize yourself sewing exciting on your PFAFF dealer. the sewing machine with the exclusive automatic features of a PFAFF 360 - G.M. with countless creative possibilities. He will help you have any time. You will find If you at any sewing problems...
Owner's Manual
Page 3
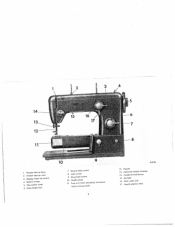
I Thread take-up ever 2 Thread retainer stud 3 Zigzag finger-tip control 4 Bobbin winder S Step motion knob 6 Stitch length dial 7 Reverse feed control 6 Light switch 9 Drop feed central 10 Needle plate 11 Free arm cover (enclosing transverse rotary sewing hook) 2 R 8152 12 Needle 13 Automatic needle threader 14 Needle thread tension 15 Sewlight 16 Stitch width dial 17 Needle position lever
I Thread take-up ever 2 Thread retainer stud 3 Zigzag finger-tip control 4 Bobbin winder S Step motion knob 6 Stitch length dial 7 Reverse feed control 6 Light switch 9 Drop feed central 10 Needle plate 11 Free arm cover (enclosing transverse rotary sewing hook) 2 R 8152 12 Needle 13 Automatic needle threader 14 Needle thread tension 15 Sewlight 16 Stitch width dial 17 Needle position lever
Owner's Manual
Page 6
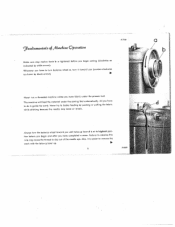
... while stitching because the needle may cause the thread to turn balance wheel a, turn the balance wheel toward you have fabric under the sewing foot automatically. Also, it toward you have completed a seam. R 7506 9un'auntaLc c6 /ilahilu Qiatiô,, Make sure stop motion knob b is guide the work with the...
... while stitching because the needle may cause the thread to turn balance wheel a, turn the balance wheel toward you have fabric under the sewing foot automatically. Also, it toward you have completed a seam. R 7506 9un'auntaLc c6 /ilahilu Qiatiô,, Make sure stop motion knob b is guide the work with the...
Owner's Manual
Page 8
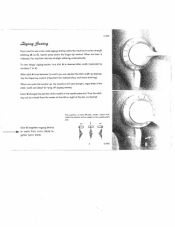
... up, the machine will sew straight, regardless of the slot, as desired. cp cip 7 R7995 When the lever is released, the machine resumes straight stitching automatically. The position of lever B (left or right of the stitch width set (ideal for straight stitching (A on 0), merely press down the finger-tip control. To...
... up, the machine will sew straight, regardless of the slot, as desired. cp cip 7 R7995 When the lever is released, the machine resumes straight stitching automatically. The position of lever B (left or right of the stitch width set (ideal for straight stitching (A on 0), merely press down the finger-tip control. To...
Owner's Manual
Page 10
... wound a few turns, break off end of thread and continue winding at base of thread through slot in bobbin, from inside. Bobbin winder will stop automatically when bobbin is full. Press in lever i. You may continue sewing while you don't want a full bobbin, press out lever I when sufficient amount of thread...
... wound a few turns, break off end of thread and continue winding at base of thread through slot in bobbin, from inside. Bobbin winder will stop automatically when bobbin is full. Press in lever i. You may continue sewing while you don't want a full bobbin, press out lever I when sufficient amount of thread...

Owner's Manual
Page 15
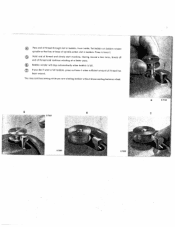
Lead thread clockwise around tension and pull it will do this for you easily and quickly. 14 Bring take-up lever 4 as high as it between any two of the tension discs 3. Then thread needle, front to left through both thread retainer openings 2 (see illustration opposite). The automatic needle threader will go and pass thread from right to back. Pull thread into slots at left of thread guides 5 and 6 and then into the stot at its end. t9 1heain Place spool of thread on spool pin I and lead thread end through one of the holes at left of needle clamp 7.
Lead thread clockwise around tension and pull it will do this for you easily and quickly. 14 Bring take-up lever 4 as high as it between any two of the tension discs 3. Then thread needle, front to left through both thread retainer openings 2 (see illustration opposite). The automatic needle threader will go and pass thread from right to back. Pull thread into slots at left of thread guides 5 and 6 and then into the stot at its end. t9 1heain Place spool of thread on spool pin I and lead thread end through one of the holes at left of needle clamp 7.

Owner's Manual
Page 21
... the ordinary sewing foot. To backtack the beginning or end of fabric and thread size used. This feature is released, the machine resumes forward sewing automatically. In this , operate the control in rhythm and move the fabric slightly sideways. R 7996 4 i&h iqth 7J1.14titn Turn dial G until the number indicating the desired...
... the ordinary sewing foot. To backtack the beginning or end of fabric and thread size used. This feature is released, the machine resumes forward sewing automatically. In this , operate the control in rhythm and move the fabric slightly sideways. R 7996 4 i&h iqth 7J1.14titn Turn dial G until the number indicating the desired...

Owner's Manual
Page 22
The machine feed is turned to the right as far as it will cease feeding. When the control is dropped for darning hoop embroidery and button sewing. '711mn9 £1 2h /i1.uhuw 9e? To lower feed below the needle plate, turn drop feed control clockwise, Fabric will go feeding of the fabric resumes automatically when you start sewing. 21
The machine feed is turned to the right as far as it will cease feeding. When the control is dropped for darning hoop embroidery and button sewing. '711mn9 £1 2h /i1.uhuw 9e? To lower feed below the needle plate, turn drop feed control clockwise, Fabric will go feeding of the fabric resumes automatically when you start sewing. 21
Owner's Manual
Page 50
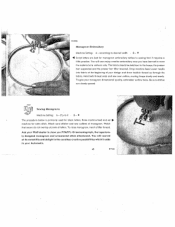
... bar lifter lowered, Drop machine feed, Lower needle into fabric at joints of monogram. Watch that seams do not overlap at the beginning of your Pfaff dealer to desired width B- 4 4 Script letters are closely spaced. 46121 Sewing Monograms Machine Setting: A - 21/2 to 3 . Ask your design ...The fabric should be held taut in the countless creative possibilities which it adds to move the material at a uniform rote. To give your Automatic. 49 R7165 Be sure stitches are best for monogram embroidery without a sewing foot. To raise monogram, insert a filler thread. Attach cord ...
... bar lifter lowered, Drop machine feed, Lower needle into fabric at joints of monogram. Watch that seams do not overlap at the beginning of your Pfaff dealer to desired width B- 4 4 Script letters are closely spaced. 46121 Sewing Monograms Machine Setting: A - 21/2 to 3 . Ask your design ...The fabric should be held taut in the countless creative possibilities which it adds to move the material at a uniform rote. To give your Automatic. 49 R7165 Be sure stitches are best for monogram embroidery without a sewing foot. To raise monogram, insert a filler thread. Attach cord ...

Owner's Manual
Page 51
.... Additional parts for heavier cording are available at extra cost. The interchangeable double-needle holder is available at extra cost. Cording Ta card on your PFAFF Automatic, use Cording Kit No. 50177 which is easy ta attach. R 8146 The Cording Kit comprises: 4 double-needle holders for mounting feed cover plate. R 7370 Changing...
.... Additional parts for heavier cording are available at extra cost. The interchangeable double-needle holder is available at extra cost. Cording Ta card on your PFAFF Automatic, use Cording Kit No. 50177 which is easy ta attach. R 8146 The Cording Kit comprises: 4 double-needle holders for mounting feed cover plate. R 7370 Changing...

Owner's Manual
Page 53
...on both sides of these designs are illustrated below. Just see above illustration) the machine can be converted into a PFAFF 360-261 Automatic at any special skill. With the PFAFF Automatic you . - 5137Q Ornamental Sewing You can do. The range of the pattern or using one or two needles....glad to do this , press control F down in a matter of the embroidery design dial (see your PFAFF 360 can sew an endless variety of beautiful decorative designs completely automatically and as simply as any plain seam. In addition, countless variations are only the primary designs the machine...
...on both sides of these designs are illustrated below. Just see above illustration) the machine can be converted into a PFAFF 360-261 Automatic at any special skill. With the PFAFF Automatic you . - 5137Q Ornamental Sewing You can do. The range of the pattern or using one or two needles....glad to do this , press control F down in a matter of the embroidery design dial (see your PFAFF 360 can sew an endless variety of beautiful decorative designs completely automatically and as simply as any plain seam. In addition, countless variations are only the primary designs the machine...
Owner's Manual
Page 55
Shirring Applique Work Openwork Embroidery . Sewing Monograms . . The PFAFF 360-261 Automatic The Transverse Spool Holder Page 32 32 33 34 34 35 35 36 36 37 38 38 39 40 41 41 42 43 43 44 ...
Shirring Applique Work Openwork Embroidery . Sewing Monograms . . The PFAFF 360-261 Automatic The Transverse Spool Holder Page 32 32 33 34 34 35 35 36 36 37 38 38 39 40 41 41 42 43 43 44 ...

