

Owner's Manual
Page 2
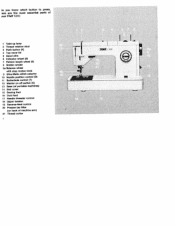
... ofthePfaff 1213 2 arts of Ptaff machines 214 and 1222-E 3 viachine drive 4 3 reparations for bobbin winding 5 Removing the bobbin case 6 Bobbin winding 7 Disengaging the sewing mechanism 7 Inserting the bobbin 8 Inserting the bobbin case 9 Upper threading 10 Automatic needle threader 11 Drawing up the bobbin thread 12 Thread cutter 12 Before you start sewing 13 Ultra-Matic stitch...
... ofthePfaff 1213 2 arts of Ptaff machines 214 and 1222-E 3 viachine drive 4 3 reparations for bobbin winding 5 Removing the bobbin case 6 Bobbin winding 7 Disengaging the sewing mechanism 7 Inserting the bobbin 8 Inserting the bobbin case 9 Upper threading 10 Automatic needle threader 11 Drawing up the bobbin thread 12 Thread cutter 12 Before you start sewing 13 Ultra-Matic stitch...
Owner's Manual
Page 4
o you know which button to press, ere are the most essential parts of tour Pfaff 1213: 1 Take-up lever 2 Thread retainer stud 3 Push button (K) 4 Top cover lid 5 Spool pins 6 Indicator wheel (S) 7 Pattern length wheel (E) 8 Bobbin winder Ba Balance wheel with stop motion knob 9 Ultra-Matic stitch selector 10 Needle position control (D) 11 Buttonhole...
o you know which button to press, ere are the most essential parts of tour Pfaff 1213: 1 Take-up lever 2 Thread retainer stud 3 Push button (K) 4 Top cover lid 5 Spool pins 6 Indicator wheel (S) 7 Pattern length wheel (E) 8 Bobbin winder Ba Balance wheel with stop motion knob 9 Ultra-Matic stitch selector 10 Needle position control (D) 11 Buttonhole...

Owner's Manual
Page 5
_____ •PAFF 1222E • • and this is how your Pfaff 1214 or 1 222-E looks: 1 Take-up lever 2 Thread retainer stud 3 Push button (K) 4 Topcoverlid 5 Spool pins 6 7 Indicator wheel (S) Pattern length wheel (E) 8 Bobbin winder 8a Balance wheel with stop motion knob (Pfaff 1214) 9 Ultra-Matic stitch selector 10 Needle position control (D) 11 Buttonhole control (1) 12...
_____ •PAFF 1222E • • and this is how your Pfaff 1214 or 1 222-E looks: 1 Take-up lever 2 Thread retainer stud 3 Push button (K) 4 Topcoverlid 5 Spool pins 6 7 Indicator wheel (S) Pattern length wheel (E) 8 Bobbin winder 8a Balance wheel with stop motion knob (Pfaff 1214) 9 Ultra-Matic stitch selector 10 Needle position control (D) 11 Buttonhole control (1) 12...

Owner's Manual
Page 6
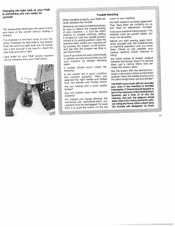
Just plug in the machine base, and plug B into the wall socket. Push the master plug into socket A in the machine, wind the bobbin and thread the needle. All you have to do now is push button C which is the on-off control of your machine This button also switches on the glare-free sewing light. 4 Th. Place the foot control under the table in a convenient position. o start sewing right away. only a few simple steps are necessary.
Just plug in the machine base, and plug B into the wall socket. Push the master plug into socket A in the machine, wind the bobbin and thread the needle. All you have to do now is push button C which is the on-off control of your machine This button also switches on the glare-free sewing light. 4 Th. Place the foot control under the table in a convenient position. o start sewing right away. only a few simple steps are necessary.

Owner's Manual
Page 7
To wind the bobbin, turn to sew a seam: an upper and a lower thread. These two threads are locked together in this way is illustrated below. For step-by pushing button C (page 4). The seam produced in the middle of the fabric to page 7. If your seam doesn't look like the illustration, turn the machine on by -step bobbin winding instructions please refer to form a lock stitch. The sewing mechanism must be disengaged (see page 7). Before you start winding the bobbin remember that you need two threads to page 21.
To wind the bobbin, turn to sew a seam: an upper and a lower thread. These two threads are locked together in this way is illustrated below. For step-by pushing button C (page 4). The seam produced in the middle of the fabric to page 7. If your seam doesn't look like the illustration, turn the machine on by -step bobbin winding instructions please refer to form a lock stitch. The sewing mechanism must be disengaged (see page 7). Before you start winding the bobbin remember that you need two threads to page 21.

Owner's Manual
Page 8
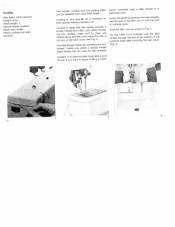
When you hold the bobbin case by its open the free-arm cover and swing it toward the left. Lift latch K (see ill.) and pull out the bobbin case with the bobbin. Then - On the Pfaff 1213 remove the bed cover. The bobbin cannot faH out as long as you release the latch, the empty bobbin drops out. lift latch K and pull out the bobbin case with the bobbin. On Ptaff machines 1214 and 1222E open latch. just like with the Pfaff 1213 - ro remove the bobbin case. \ Make sure the needle is posiboned above the need'e plato.
When you hold the bobbin case by its open the free-arm cover and swing it toward the left. Lift latch K (see ill.) and pull out the bobbin case with the bobbin. Then - On the Pfaff 1213 remove the bed cover. The bobbin cannot faH out as long as you release the latch, the empty bobbin drops out. lift latch K and pull out the bobbin case with the bobbin. On Ptaff machines 1214 and 1222E open latch. just like with the Pfaff 1213 - ro remove the bobbin case. \ Make sure the needle is posiboned above the need'e plato.

Owner's Manual
Page 9
...The sewing mechanism is re-engaged automatically on one of them. I to wind the bobbin and disengage the sewing mechanism: Raise both spool pins and place a spool of thread on starting the machine, On the Pfaff 1222-E, the sewing mechanism is engaged or disengaged by pressing down on... bobbin winder disc S where it is held in the above illustration, Wind the thread clockwise around the bobbin a few times. For details please refer to the bobbin, as shown in position magnetically...
...The sewing mechanism is re-engaged automatically on one of them. I to wind the bobbin and disengage the sewing mechanism: Raise both spool pins and place a spool of thread on starting the machine, On the Pfaff 1222-E, the sewing mechanism is engaged or disengaged by pressing down on... bobbin winder disc S where it is held in the above illustration, Wind the thread clockwise around the bobbin a few times. For details please refer to the bobbin, as shown in position magnetically...

Owner's Manual
Page 10
Leave about three inches of thread hanging from the top down towards you draw the thread, the bobbin should rotate clock wise (as indicated by an arrow). and under the spring. As you . Fig. 2: Pull the thread into the bobbin case, making sure the thread end drops from the bobbin case. 2 insert the bobbin into the bobbin se. $ Fig. 1: Insert the filled bobbin into the slot Fig. 3: . . .
Leave about three inches of thread hanging from the top down towards you draw the thread, the bobbin should rotate clock wise (as indicated by an arrow). and under the spring. As you . Fig. 2: Pull the thread into the bobbin case, making sure the thread end drops from the bobbin case. 2 insert the bobbin into the bobbin se. $ Fig. 1: Insert the filled bobbin into the slot Fig. 3: . . .

Owner's Manual
Page 11
• and to replace the bobbin case in the machine Lift latch K and push the bobbin case onto center stud S, making sure its slot (see arrow) points upwards. Release the latch and press against the bobbin case until you hear it snap into place.
• and to replace the bobbin case in the machine Lift latch K and push the bobbin case onto center stud S, making sure its slot (see arrow) points upwards. Release the latch and press against the bobbin case until you hear it snap into place.

Owner's Manual
Page 17
... is to be pushed to positions B and C. Position C (illustrated below ) is used for bobbin winding The needle is raised automatically to its various posi tions: 1. When you need to tell you 've finished sewing on your Pfaff 1222E. This position is raised and the sewing mechanism disengaged for threading the needle and removing... used when -- you push the presser bar lifter to its high est point. Hold the presser bar lifter in case of seam interruptions, when the bobbin becomes empty, or when the...
... is to be pushed to positions B and C. Position C (illustrated below ) is used for bobbin winding The needle is raised automatically to its various posi tions: 1. When you need to tell you 've finished sewing on your Pfaff 1222E. This position is raised and the sewing mechanism disengaged for threading the needle and removing... used when -- you push the presser bar lifter to its high est point. Hold the presser bar lifter in case of seam interruptions, when the bobbin becomes empty, or when the...

Owner's Manual
Page 21
... tension, or to the left (L) are set at our factory, using the most popular threads. Always use the same size thread on the bobbin and in Fig. 1. The lower tension is provided with your thumb rather than your machine', as fol lows; The nor mal tension setting is...tension dial is regulated by arrows. The higher the number, the tighter the tension. If you can pull the thread from the bobbin easily against little resistance, the bobbin thread tension is between 3 and 5. Perfect seams through properly balanced tensions V Both ten&ons btanced The thread tensions are indicated...
... tension, or to the left (L) are set at our factory, using the most popular threads. Always use the same size thread on the bobbin and in Fig. 1. The lower tension is provided with your thumb rather than your machine', as fol lows; The nor mal tension setting is...tension dial is regulated by arrows. The higher the number, the tighter the tension. If you can pull the thread from the bobbin easily against little resistance, the bobbin thread tension is between 3 and 5. Perfect seams through properly balanced tensions V Both ten&ons btanced The thread tensions are indicated...
Owner's Manual
Page 30
... (see Fig. 1). Select the distance between the twin needles and the size of the machine base after removing the bed cover (Fig. 3). On the Pfaff 1213 Portable, pull the filler thread through the slot at the bottom of the filler cord to trans J I 3 1 Twin needle, cording foot and ...cording plate can be obtained from your Pfaff dealer. If you prefer a special thread, pearl thread can be used . Hold the filler cord as a trimming on woollens is made with two needle...
... (see Fig. 1). Select the distance between the twin needles and the size of the machine base after removing the bed cover (Fig. 3). On the Pfaff 1213 Portable, pull the filler thread through the slot at the bottom of the filler cord to trans J I 3 1 Twin needle, cording foot and ...cording plate can be obtained from your Pfaff dealer. If you prefer a special thread, pearl thread can be used . Hold the filler cord as a trimming on woollens is made with two needle...

Owner's Manual
Page 38
... only. The machine is thus set for a medium stitch density (see ill, above , left seam. Knob D now turns until it as long as -ieedle and bobbin thread Oneck to sew the second bartack. 5, Release control T. Turn knob D clockwise until it toward ±, the stitches are out (see ill. The machine is...
... only. The machine is thus set for a medium stitch density (see ill, above , left seam. Knob D now turns until it as long as -ieedle and bobbin thread Oneck to sew the second bartack. 5, Release control T. Turn knob D clockwise until it toward ±, the stitches are out (see ill. The machine is...

Owner's Manual
Page 40
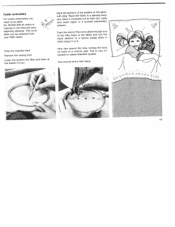
Once you have acquired a little practice, you want to embroider monograms in a darning hoop and lower the presser bar lifter and draw up the bobbin thread. 42 Move the hoop slowly and evenly, and follow the traced outlines as if you were writing. Straight-lined monograms can be able to ...
Once you have acquired a little practice, you want to embroider monograms in a darning hoop and lower the presser bar lifter and draw up the bobbin thread. 42 Move the hoop slowly and evenly, and follow the traced outlines as if you were writing. Straight-lined monograms can be able to ...
Owner's Manual
Page 43
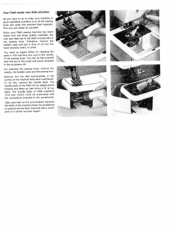
... fabric in a darning hoop and make a crosswise cut at a uniform rate. Sew around the hole, turning the hoop by hand at each dot, using your Pfaff dealer. Eyelet embroidery For eyelet embroidery you need cover plate No. 93-040 946-45 which is very im portant to a narrow zigzag stitch in... 5 or 6. Now sew around every hole twice. 45 Remove the sewing foot. Drop the machine feed. Lower the presser bar lifter and draw up the bobbin thread. Push the stud of the cover plate through one of the eyelets on the fabric with dots. This cover plate can be obtained from...
... fabric in a darning hoop and make a crosswise cut at a uniform rate. Sew around the hole, turning the hoop by hand at each dot, using your Pfaff dealer. Eyelet embroidery For eyelet embroidery you need cover plate No. 93-040 946-45 which is very im portant to a narrow zigzag stitch in... 5 or 6. Now sew around every hole twice. 45 Remove the sewing foot. Drop the machine feed. Lower the presser bar lifter and draw up the bobbin thread. Push the stud of the cover plate through one of the eyelets on the fabric with dots. This cover plate can be obtained from...

Owner's Manual
Page 56
... is broken, you want to sew the first design, for ornamental purposes only. stance, push the first button. In case sewing is interrupted because the bobbin is empty or the needle thread is regulated by turning it to 18 (see a row of fancy-stitch buttons right next to the row of...
... is broken, you want to sew the first design, for ornamental purposes only. stance, push the first button. In case sewing is interrupted because the bobbin is empty or the needle thread is regulated by turning it to 18 (see a row of fancy-stitch buttons right next to the row of...
Owner's Manual
Page 62
... top right). Remove the lint that accumulates in the accessories. The needle plate of the machine feed with the screwdriver included in the vicinity of Pfaff machines 1214 and 1222E must be oiled occasionally is the sewing hook. To do yourself. Take care that has to keep your... of packed lint are best removed with the aid of the sewing hook. Your Pfaff needs very little attention All you can do this , remove the needle plate. For cleaning the sewing hook, remove the needle, the bobbin case and the sewing foot. Since your machine in good operating condition is simply...
... top right). Remove the lint that accumulates in the accessories. The needle plate of the machine feed with the screwdriver included in the vicinity of Pfaff machines 1214 and 1222E must be oiled occasionally is the sewing hook. To do yourself. Take care that has to keep your... of packed lint are best removed with the aid of the sewing hook. Your Pfaff needs very little attention All you can do this , remove the needle plate. For cleaning the sewing hook, remove the needle, the bobbin case and the sewing foot. Since your machine in good operating condition is simply...
Owner's Manual
Page 63
..., setting cover of your machine. Check to its socket, turn the needle position must be If trouble should happen to Has the bobbin case been inserted properly? or darned, we recommend that the presser bar lifter is Before you start sewing, again famil iarize yourself ...pull it out (see ill.). Have the needle position and the stitch length been set horizontally. I 7 Trouble shooting When handled properly, your Pfaff will rarely develop any force. switch your machine off button, and see whether your selector machine, i. following: Has the button with the ...
..., setting cover of your machine. Check to its socket, turn the needle position must be If trouble should happen to Has the bobbin case been inserted properly? or darned, we recommend that the presser bar lifter is Before you start sewing, again famil iarize yourself ...pull it out (see ill.). Have the needle position and the stitch length been set horizontally. I 7 Trouble shooting When handled properly, your Pfaff will rarely develop any force. switch your machine off button, and see whether your selector machine, i. following: Has the button with the ...


