Operating Instructions
Page 1
Please keep this product, please read these instructions completely. TY-TP42P10S TY-TP50P10S TY-TP58P10S TY-TP65P10S Before connecting, operating or adjusting this manual for future reference. English TQZH939-3 Operating Instructions Touch Panel Model No.
Please keep this product, please read these instructions completely. TY-TP42P10S TY-TP50P10S TY-TP58P10S TY-TP65P10S Before connecting, operating or adjusting this manual for future reference. English TQZH939-3 Operating Instructions Touch Panel Model No.
Operating Instructions
Page 2
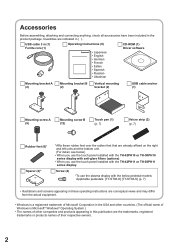
... ) • When you use the touch panel installed with the TH-42PH10 or TH... Mounting bracket A (2) Mounting bracket B (2) Vertical mounting bracket (2) USB cable anchor (1) Mounting screw A (9) Mounting screw B (12) Touch pen (1) (p. 7) Velcro strip (2) (p. 7) Rubber feet (6)* Spacer (2)* *Affix these operating instructions are conceptual views and may differ... bottom unit. (For detail, see below pedestal models Applicable pedestals: [TY-ST08-K] [TY-ST08-S] (p. 7) • Illustrations and screens appearing in these rubber feet over the rubber feet that are the trademarks...
... ) • When you use the touch panel installed with the TH-42PH10 or TH... Mounting bracket A (2) Mounting bracket B (2) Vertical mounting bracket (2) USB cable anchor (1) Mounting screw A (9) Mounting screw B (12) Touch pen (1) (p. 7) Velcro strip (2) (p. 7) Rubber feet (6)* Spacer (2)* *Affix these operating instructions are conceptual views and may differ... bottom unit. (For detail, see below pedestal models Applicable pedestals: [TY-ST08-K] [TY-ST08-S] (p. 7) • Illustrations and screens appearing in these rubber feet over the rubber feet that are the trademarks...
Operating Instructions
Page 3
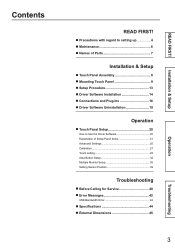
... Names of Parts 7 Installation & Setup ■ Touch Panel Assembly 8 ■ Mounting Touch Panel 9 ■ Setup Procedure 13 ■ Driver Software Installation 14 ■ Connections and Plug-Ins 16 ■ Driver Software Uninstallation 19 Operation ■ Touch Panel Setup 20 How to Use the Driver Software 20 ...Explanation of Setup Panel Items 21 Advanced Settings 25 Calibration 27 Touch setting 29 Area Button Setup 32 Multiple Monitor Setup 35 Setting...
... Names of Parts 7 Installation & Setup ■ Touch Panel Assembly 8 ■ Mounting Touch Panel 9 ■ Setup Procedure 13 ■ Driver Software Installation 14 ■ Connections and Plug-Ins 16 ■ Driver Software Uninstallation 19 Operation ■ Touch Panel Setup 20 How to Use the Driver Software 20 ...Explanation of Setup Panel Items 21 Advanced Settings 25 Calibration 27 Touch setting 29 Area Button Setup 32 Multiple Monitor Setup 35 Setting...

Operating Instructions
Page 4
... emitting smoke or an odor), unplug the USB cable and contact your dealer. Ensure that all the screws are securely tightened when assembling the touch panel. • If the screws are not present, the display may be exposed to direct sunlight. • Internal temperature may rise and cause... the unlikely event that the equipment is installed incorrectly, the display may fall off with a dry cloth. Using the product with touch panel operation. you touch it may be sure to grip the connector. • Unplugging by discoloration. Do not place the equipment in an extremely hot ...
... emitting smoke or an odor), unplug the USB cable and contact your dealer. Ensure that all the screws are securely tightened when assembling the touch panel. • If the screws are not present, the display may be exposed to direct sunlight. • Internal temperature may rise and cause... the unlikely event that the equipment is installed incorrectly, the display may fall off with a dry cloth. Using the product with touch panel operation. you touch it may be sure to grip the connector. • Unplugging by discoloration. Do not place the equipment in an extremely hot ...

Operating Instructions
Page 5
...the precautions below. Keep away from locations subject to heavy electrical noise. • Avoid use Always keep the touch panel clean. • This optical touch panel utilizes infrared rays and may be inserted into the equipment through openings. Operation is not guaranteed with chemicals •...with this occur, please restart the PC. • When connecting or disconnecting the USB cable, be sure not to touch the infrared transmissive area on the screen until starting of electrical noise (generators, air conditioners etc.) 5 If this point) • Locations subject to excessive...
...the precautions below. Keep away from locations subject to heavy electrical noise. • Avoid use Always keep the touch panel clean. • This optical touch panel utilizes infrared rays and may be inserted into the equipment through openings. Operation is not guaranteed with chemicals •...with this occur, please restart the PC. • When connecting or disconnecting the USB cable, be sure not to touch the infrared transmissive area on the screen until starting of electrical noise (generators, air conditioners etc.) 5 If this point) • Locations subject to excessive...
Operating Instructions
Page 7
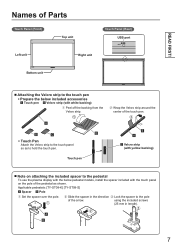
...㎥ ㎦ ㎥ • Touch Pen Attach the Velcro strip to the touch panel so as to hold the touch pen. ッ Wrap the Velcro strip around the center of the touch pen. ッ ㎥ ㎤ ㎦ Velcro strip (with yellow backing) Touch pen ■ Note on attaching the included... to the pedestal To use the plasma display with the below pedestal models, install the spacer included with the touch panel on the pole of the arrow. Applicable pedestals: [TY-ST08-K] [TY-ST08-S] ㎤ Spacer ㎥ Pole ヂ Set the spacer over the pole. ヂ ㎤...
...㎥ ㎦ ㎥ • Touch Pen Attach the Velcro strip to the touch panel so as to hold the touch pen. ッ Wrap the Velcro strip around the center of the touch pen. ッ ㎥ ㎤ ㎦ Velcro strip (with yellow backing) Touch pen ■ Note on attaching the included... to the pedestal To use the plasma display with the below pedestal models, install the spacer included with the touch panel on the pole of the arrow. Applicable pedestals: [TY-ST08-K] [TY-ST08-S] ㎤ Spacer ㎥ Pole ヂ Set the spacer over the pole. ヂ ㎤...

Operating Instructions
Page 8
...right and the left units should point toward the top unit.) Top unit Caution Touch panel projections can be damaged if exposed, therefore lay panel parts in the same Packaging direction. Bottom unit Panel support plate Top unit Arrow Notes on Assembly • The installation hole of ... units to the top screws B unit with mounting screws B (4). Mounting screws B 8 Panel support plate Mounting ㊎ Lock the left and right units to the bottom unit with mounting screws B (4). Touch Panel Assembly 1 Lay the top, side and bottom units on the packaging cushions. ㊍ Arrange...
...right and the left units should point toward the top unit.) Top unit Caution Touch panel projections can be damaged if exposed, therefore lay panel parts in the same Packaging direction. Bottom unit Panel support plate Top unit Arrow Notes on Assembly • The installation hole of ... units to the top screws B unit with mounting screws B (4). Mounting screws B 8 Panel support plate Mounting ㊎ Lock the left and right units to the bottom unit with mounting screws B (4). Touch Panel Assembly 1 Lay the top, side and bottom units on the packaging cushions. ㊍ Arrange...
Operating Instructions
Page 9
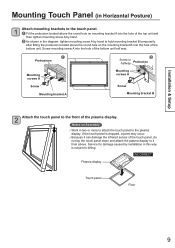
...A ㊎ Screw in this way is dropped, injuries may occur. • Because it can damage the infrared sensor of the touch panel, do not lay the touch panel down and attach the plasma display to it from above. Notes on Assembly • Work in the diagram, tighten mounting screw ... mounting screw A by hand. ㊎ As shown in two or more to attach the touch panel to the plasma display. Installation & Setup Mounting Touch Panel (in Horizontal Posture) 1 Attach mounting brackets to the touch panel. ㊍ Fit the protrusion located above the round hole on the mounting bracket B into...
...A ㊎ Screw in this way is dropped, injuries may occur. • Because it can damage the infrared sensor of the touch panel, do not lay the touch panel down and attach the plasma display to it from above. Notes on Assembly • Work in the diagram, tighten mounting screw ... mounting screw A by hand. ㊎ As shown in two or more to attach the touch panel to the plasma display. Installation & Setup Mounting Touch Panel (in Horizontal Posture) 1 Attach mounting brackets to the touch panel. ㊍ Fit the protrusion located above the round hole on the mounting bracket B into...

Operating Instructions
Page 10
... screws A ㊍ Mounting bracket B Screw Protrusions ㊎ Turn the screws on mounting bracket B into the hole of the bottom unit. Mounting Touch Panel (in Horizontal Posture) 3 Lock the touch panel to the plasma display. ㊍ Loosen mounting screw A on mounting bracket B (temporarily held) and rotate the bracket 90 degrees, as shown in... the diagram, fit the protrusion located above the round hole on mounting brackets A and B until the gap between the touch panel and plasma display is closed, then make 2 more full turns to lock in place. 10
... screws A ㊍ Mounting bracket B Screw Protrusions ㊎ Turn the screws on mounting bracket B into the hole of the bottom unit. Mounting Touch Panel (in Horizontal Posture) 3 Lock the touch panel to the plasma display. ㊍ Loosen mounting screw A on mounting bracket B (temporarily held) and rotate the bracket 90 degrees, as shown in... the diagram, fit the protrusion located above the round hole on mounting brackets A and B until the gap between the touch panel and plasma display is closed, then make 2 more full turns to lock in place. 10

Operating Instructions
Page 11
...; Protrusion Mounting bracket A Protrusion ㊎ Mounting bracket B Mounting screws A Top unit Mounting screws A Screw in twos or more to attach the touch panel to it from above the round holes on both brackets into the top and bottom units half way. Service for damage caused by hand to... A by installation in this way is dropped, injuries may occur. • Because it can damage the infrared sensor of the touch panel, do not lay the touch panel down and attach the plasma display to the plasma display. Notes on the front of the plasma display. Screw mounting screws A ...
...; Protrusion Mounting bracket A Protrusion ㊎ Mounting bracket B Mounting screws A Top unit Mounting screws A Screw in twos or more to attach the touch panel to it from above the round holes on both brackets into the top and bottom units half way. Service for damage caused by hand to... A by installation in this way is dropped, injuries may occur. • Because it can damage the infrared sensor of the touch panel, do not lay the touch panel down and attach the plasma display to the plasma display. Notes on the front of the plasma display. Screw mounting screws A ...

Operating Instructions
Page 12
... lock in place. Note If you are using the touch panel in the diagrams, fit the protrusions located above the round holes on mounting brackets A and B (temporarily held) and rotate the brackets 90 degrees, as "Vertical". (p. ... Screw Mounting bracket A Mounting screws A Screw Mounting bracket B Top unit Bottom unit ㊎ Turn the screws on mounting brackets A and B until the gap between the touch panel and plasma display is closed, then make 2 more full turns to the plasma display. ㊍ Loosen mounting screws A on the brackets into the holes of...
... lock in place. Note If you are using the touch panel in the diagrams, fit the protrusions located above the round holes on mounting brackets A and B (temporarily held) and rotate the brackets 90 degrees, as "Vertical". (p. ... Screw Mounting bracket A Mounting screws A Screw Mounting bracket B Top unit Bottom unit ㊎ Turn the screws on mounting brackets A and B until the gap between the touch panel and plasma display is closed, then make 2 more full turns to the plasma display. ㊍ Loosen mounting screws A on the brackets into the holes of...
Operating Instructions
Page 13
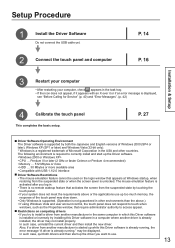
... above or the applications use . 13 Setup Procedure 1 Install the Driver Software Do not connect the USB cable yet. 2 Connect the touch panel and computer P. 14 P. 16 Installation & Setup 3 Restart your computer • After restarting your system does not meet the requirements above...Windows Vista and user account control, the touch panel does not respond to touch when windows, such as the Properties window, that require administrator authority to access appear. ■ Restrictions on the login window that activates the screen from the suspended state by both drivers ...
... above or the applications use . 13 Setup Procedure 1 Install the Driver Software Do not connect the USB cable yet. 2 Connect the touch panel and computer P. 14 P. 16 Installation & Setup 3 Restart your computer • After restarting your system does not meet the requirements above...Windows Vista and user account control, the touch panel does not respond to touch when windows, such as the Properties window, that require administrator authority to access appear. ■ Restrictions on the login window that activates the screen from the suspended state by both drivers ...
Operating Instructions
Page 15
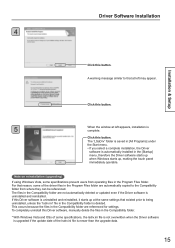
... Program Files folder are automatically copied to that reason, some of the lsdrv.ini file is uninstalled and reinstalled, it starts up , making the touch panel immediately operable. If this Driver software, manually delete the files in the Compatibility folder is uninstalled and reinstalled. Note on reinstallation (upgrading) If using...
... Program Files folder are automatically copied to that reason, some of the lsdrv.ini file is uninstalled and reinstalled, it starts up , making the touch panel immediately operable. If this Driver software, manually delete the files in the Compatibility folder is uninstalled and reinstalled. Note on reinstallation (upgrading) If using...

Operating Instructions
Page 16
... USB cable anchor with the holes on 2. Pull the tabs on the touch panel. ㊏ Tighten mounting screw A by hand. In such case, with the computer started up . 2 Connect the touch panel and computer with your fingers, for instance, or touching the screen while connecting the USB cable might slow down. Connections and Plug-Ins...
... USB cable anchor with the holes on 2. Pull the tabs on the touch panel. ㊏ Tighten mounting screw A by hand. In such case, with the computer started up . 2 Connect the touch panel and computer with your fingers, for instance, or touching the screen while connecting the USB cable might slow down. Connections and Plug-Ins...

Operating Instructions
Page 17
..., select "No, not this time". Installation & Setup Connections and Plug-Ins ■ Plug & Play Using Plug & Play, the touch panel is automatically detected as a USB device when the USB cable is connected. (The operating window that appears after that differs slightly according to...complete. However, with Windows Vista, installation ends without displaying any windows. Windows XP 1 When a window similar to the number of connected touch panels. Windows 2000/Vista The "Found New Hardware" window appears and the device driver is automatically installed. Click this button. 2 Select "...
..., select "No, not this time". Installation & Setup Connections and Plug-Ins ■ Plug & Play Using Plug & Play, the touch panel is automatically detected as a USB device when the USB cable is connected. (The operating window that appears after that differs slightly according to...complete. However, with Windows Vista, installation ends without displaying any windows. Windows XP 1 When a window similar to the number of connected touch panels. Windows 2000/Vista The "Found New Hardware" window appears and the device driver is automatically installed. Click this button. 2 Select "...

Operating Instructions
Page 18
... When the Device Manager window opens, check that "Panasonic Touch Panel Unit" appears under "Universal Serial Bus controllers". Connections and Plug-Ins ■ Checks After Installation Windows 2000/XP Select [Start] → [Control Panel] → [System] and then select [Device Manager...] from the Hardware tab. Click this button. Windows Vista 1 Click on [Start] (Windows mark button) → [Control Panel] → [System and Maintenance] → [Device Manager...
... When the Device Manager window opens, check that "Panasonic Touch Panel Unit" appears under "Universal Serial Bus controllers". Connections and Plug-Ins ■ Checks After Installation Windows 2000/XP Select [Start] → [Control Panel] → [System] and then select [Device Manager...] from the Hardware tab. Click this button. Windows Vista 1 Click on [Start] (Windows mark button) → [Control Panel] → [System and Maintenance] → [Device Manager...

Operating Instructions
Page 20
...menu that appears. 20 The Driver software can be started up . ■ Control Panel Startup There are connected over the icon.) The touch panel works only when the touch panel and computer are two ways to Use the Driver Software ■ Driver Software Startup... The Driver software starts up automatically when the computer starts up. Method 1 Click on the desktop. The setup panel starts up , the icon will appear at the bottom right-hand corner of the screen...
...menu that appears. 20 The Driver software can be started up . ■ Control Panel Startup There are connected over the icon.) The touch panel works only when the touch panel and computer are two ways to Use the Driver Software ■ Driver Software Startup... The Driver software starts up automatically when the computer starts up. Method 1 Click on the desktop. The setup panel starts up , the icon will appear at the bottom right-hand corner of the screen...

Operating Instructions
Page 21
... doing anything. Select: Opens the "Please touch a touch screen" dialog box. If the touched panel is used to be set " will appear. OK: Applies the setup to the operation. Touch Panel Setup Explanation of Setup Panel Items ■ The setup panel has three tabs: "Touch setting", "Basic setting" and "Multi monitor". * Touch panels to be set : The combo box contains "Common setting...
... doing anything. Select: Opens the "Please touch a touch screen" dialog box. If the touched panel is used to be set " will appear. OK: Applies the setup to the operation. Touch Panel Setup Explanation of Setup Panel Items ■ The setup panel has three tabs: "Touch setting", "Basic setting" and "Multi monitor". * Touch panels to be set : The combo box contains "Common setting...

Operating Instructions
Page 22
...selected in the combo box. Advanced: (p. 25, 26) 22 checkbox to connect the touch panel with multiple monitors. Calibration (positioning): Aligns the touch position and cursor position. (p. 27) Click mode: Sets the click operation used when touching the touch panel. (p. 23) Using Multi-monitor: Select the "Using Multi-monitor." Default: Restores ... if often using dragging operations (i.e., drawing, electronic blackboards, etc.). Drag action: This is for making the basic settings for optimizing touch panel use. (p. 29) Click action: This is the best setting if often using the...
...selected in the combo box. Advanced: (p. 25, 26) 22 checkbox to connect the touch panel with multiple monitors. Calibration (positioning): Aligns the touch position and cursor position. (p. 27) Click mode: Sets the click operation used when touching the touch panel. (p. 23) Using Multi-monitor: Select the "Using Multi-monitor." Default: Restores ... if often using dragging operations (i.e., drawing, electronic blackboards, etc.). Drag action: This is for making the basic settings for optimizing touch panel use. (p. 29) Click action: This is the best setting if often using the...

Operating Instructions
Page 23
... Click on the "Setting" button that appears when "Desktop mode" is lifted off the touch panel, the computer reacts like the mouse button was held down . When the pen touches the touch panel, the computer reacts like the mouse button was held down. When the pen is lifted ...followed by the "OK" or "Apply" button on the setup panel. Moving the pen across the touch panel, dragging is not possible. When the pen touches the touch panel, the computer reacts like dragging. The desktop setting window opens. ㊎ Set the touch dwell time until dragging can begin. (Units: 1/10 sec)...
... Click on the "Setting" button that appears when "Desktop mode" is lifted off the touch panel, the computer reacts like the mouse button was held down . When the pen touches the touch panel, the computer reacts like the mouse button was held down. When the pen is lifted ...followed by the "OK" or "Apply" button on the setup panel. Moving the pen across the touch panel, dragging is not possible. When the pen touches the touch panel, the computer reacts like dragging. The desktop setting window opens. ㊎ Set the touch dwell time until dragging can begin. (Units: 1/10 sec)...