
Proprietary Telephone
Page 8
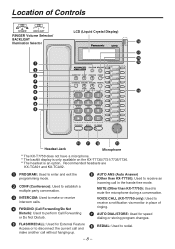
...): Used to receive an incoming call in place of Controls RINGER 21 0 BACKLIGHT RINGER Volume Selector/ BACKLIGHT Illumination Selector 1 2 3 4 5 6 7 8 9 LCD (Liquid Crystal Display) 18 17 16 15 14 Headset Jack 10 11 12 13 Microphone * The KX-T7750 does not have a microphone. * The backlit display is only available on the KX-T7730/7731/7735/7736. * The...
...): Used to receive an incoming call in place of Controls RINGER 21 0 BACKLIGHT RINGER Volume Selector/ BACKLIGHT Illumination Selector 1 2 3 4 5 6 7 8 9 LCD (Liquid Crystal Display) 18 17 16 15 14 Headset Jack 10 11 12 13 Microphone * The KX-T7750 does not have a microphone. * The backlit display is only available on the KX-T7730/7731/7735/7736. * The...
Proprietary Telephone
Page 9
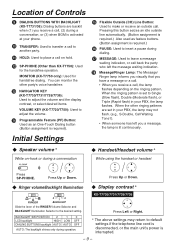
... AUTO: The backlight shines only during a conversation SP-PHONE Handset/Headset volume * While using the handset or headset Press SP-PHONE. When the ringing pattern is set in your ... is lit continuously. Ringer volume/Backlight illumination Display contrast * RINGER 21 0 BACKLIGHT Slide the lever of Controls 9 DIALING BUTTONS WITH BACKLIGHT (KX-T7731/36): Dialing buttons are set to ... (CO) Line Button: Used to place a call on -hook or during operation. MONITOR (KX-T7750 only): Used for the handsfree operation. You can monitor the other ringing patterns are backlit when (1) ...
... AUTO: The backlight shines only during a conversation SP-PHONE Handset/Headset volume * While using the handset or headset Press SP-PHONE. When the ringing pattern is set in your ... is lit continuously. Ringer volume/Backlight illumination Display contrast * RINGER 21 0 BACKLIGHT Slide the lever of Controls 9 DIALING BUTTONS WITH BACKLIGHT (KX-T7731/36): Dialing buttons are set to ... (CO) Line Button: Used to place a call on -hook or during operation. MONITOR (KX-T7750 only): Used for the handsfree operation. You can monitor the other ringing patterns are backlit when (1) ...
Proprietary Telephone
Page 10
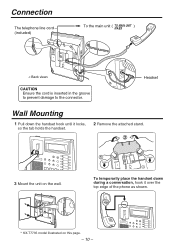
Connection The telephone line cord (included) To the main unit ( TO MAIN UNIT ) /PABX < Back view> CAUTION Ensure the cord is inserted in the groove to prevent damage to the connector. To temporarily place the handset down the handset hook until it over the top edge of the phone as shown. * KX-T7735 model illustrated on the wall. Headset Wall Mounting 1 Pull down during a conversation, hook it locks, so the tab holds the handset. 2 Remove the attached stand. 2 1 3 Mount the unit on this page. - 10 -
Connection The telephone line cord (included) To the main unit ( TO MAIN UNIT ) /PABX < Back view> CAUTION Ensure the cord is inserted in the groove to prevent damage to the connector. To temporarily place the handset down the handset hook until it over the top edge of the phone as shown. * KX-T7735 model illustrated on the wall. Headset Wall Mounting 1 Pull down during a conversation, hook it locks, so the tab holds the handset. 2 Remove the attached stand. 2 1 3 Mount the unit on this page. - 10 -


