Operating Instructions
Page 2
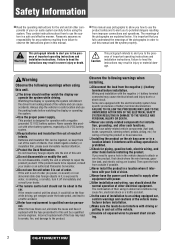
It is exposed to prevent short circuiting. 2 CQ-C7205U/C7105U ence of the vehicle and can be repaired, consult your dealer. ❑ The remote control unit should not lie about in and out of order. If an infant ingests a battery or insulation film, please seek ...Caution This pictograph intends to alert you fully understand the meanings of the pictographs in it off immediately and consult your dealer or an authorized Panasonic Servicenter. ❑ Do not use safety-related vehicle components (fuel tank, brake, suspension, steering wheel, pedals, airbag, etc.) for wiring...
It is exposed to prevent short circuiting. 2 CQ-C7205U/C7105U ence of the vehicle and can be repaired, consult your dealer. ❑ The remote control unit should not lie about in and out of order. If an infant ingests a battery or insulation film, please seek ...Caution This pictograph intends to alert you fully understand the meanings of the pictographs in it off immediately and consult your dealer or an authorized Panasonic Servicenter. ❑ Do not use safety-related vehicle components (fuel tank, brake, suspension, steering wheel, pedals, airbag, etc.) for wiring...

Operating Instructions
Page 3
...before disposal or storage. ● Dispose of the battery according to damage the leads. Panasonic is exposed to water, moisture, or dust. The use of parts other than those supplied...engine turned off. Do not throw a battery into contact with your dealer. Prevent them from the remote control unit when not using this unit. ❑ Keep the sound volume at a convenient angle..., but not more than 30˚. ering them in a plastic bag or cov- CQ-C7205U/C7105U 3 Observe the following the instructions to properly install and wire the product could cause an ...
...before disposal or storage. ● Dispose of the battery according to damage the leads. Panasonic is exposed to water, moisture, or dust. The use of parts other than those supplied...engine turned off. Do not throw a battery into contact with your dealer. Prevent them from the remote control unit when not using this unit. ❑ Keep the sound volume at a convenient angle..., but not more than 30˚. ering them in a plastic bag or cov- CQ-C7205U/C7105U 3 Observe the following the instructions to properly install and wire the product could cause an ...

Operating Instructions
Page 5
... due to improvements. ¡ Mounting Collar and Trim Plate are mounted on the main unit at shipment. (YFC054C089CA) Q'ty: 1 CQ-C7205U/C7105U 5 Nut (5 mmø) (YEP0FZ5739) Q'ty: 1 set Owners Information Card POWER SOURCE MENU SRC SEL SET VOL BAND MUTE 12... RANDOM SCAN 45 3 REPEAT 6 78 TUNE #0 NUMBER 9 TUNE DISP CAR AUDIO Remote Control Unit (including a battery) (CR2025) (EUR7641010) Q'ty: 1 Power Connector (YGAJ021009) Q'ty: 1 Mounting Collar...
... due to improvements. ¡ Mounting Collar and Trim Plate are mounted on the main unit at shipment. (YFC054C089CA) Q'ty: 1 CQ-C7205U/C7105U 5 Nut (5 mmø) (YEP0FZ5739) Q'ty: 1 set Owners Information Card POWER SOURCE MENU SRC SEL SET VOL BAND MUTE 12... RANDOM SCAN 45 3 REPEAT 6 78 TUNE #0 NUMBER 9 TUNE DISP CAR AUDIO Remote Control Unit (including a battery) (CR2025) (EUR7641010) Q'ty: 1 Power Connector (YGAJ021009) Q'ty: 1 Mounting Collar...

Operating Instructions
Page 10
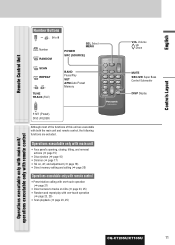
... Power (a page 14, 16) TUNE (a page 20) TRACK (FILE) (a page 22, 24) SQ Sound Quality (a page 18) MENU (a page 29, 30) DIM Dimmer (a page 17) Remote Control Sensor u OPEN (eject) (a page 15) TILT (a page 15) Main Unit VOL (a page 15) PUSH SEL Select (a page 28) MUTE (a page 15) SBC-SW Super... (a page 14) y / 5 Pause/Play D·M Direct Memory (a page 20) (a page 22, 24) APM Auto Preset Memory (a page 21) Disc slot When Face Plate Opens 10 CQ-C7205U/C7105U
... Power (a page 14, 16) TUNE (a page 20) TRACK (FILE) (a page 22, 24) SQ Sound Quality (a page 18) MENU (a page 29, 30) DIM Dimmer (a page 17) Remote Control Sensor u OPEN (eject) (a page 15) TILT (a page 15) Main Unit VOL (a page 15) PUSH SEL Select (a page 28) MUTE (a page 15) SBC-SW Super... (a page 14) y / 5 Pause/Play D·M Direct Memory (a page 20) (a page 22, 24) APM Auto Preset Memory (a page 21) Disc slot When Face Plate Opens 10 CQ-C7205U/C7105U
Operating Instructions
Page 11
... Super Bass Control-Subwoofer DISP Display Operations executable only with main unit/ operations executable only with both the main unit and remote control, the following functions are executable with remote control CQ-C7205U/C7105U 11 Operations executable only with main unit ¡ Face panel's opening, closing, tilting, and removal actions (a page 15) ¡ Disc...
... Super Bass Control-Subwoofer DISP Display Operations executable only with main unit/ operations executable only with both the main unit and remote control, the following functions are executable with remote control CQ-C7205U/C7105U 11 Operations executable only with main unit ¡ Face panel's opening, closing, tilting, and removal actions (a page 15) ¡ Disc...

Operating Instructions
Page 12
... a battery into the groove, and push the holder in the direction of the arrow, and at room temperature) Remote Control Preparation 3 12 CQ-C7205U/C7105U For using a tough pointed object. The demonstration screen automatically appears if no operation is activated. Cautions ¡Remove ...a CR Coin Cell Lithium Battery which contains Perchlorate Material - Note: Battery Information: Battery Type: Panasonic lithium battery (CR2025) (Included in the direction of the arrow using the remote control, hold down [SEL] (MENU) for 2 sec. Warning Keep batteries and insulation film ...
... a battery into the groove, and push the holder in the direction of the arrow, and at room temperature) Remote Control Preparation 3 12 CQ-C7205U/C7105U For using a tough pointed object. The demonstration screen automatically appears if no operation is activated. Cautions ¡Remove ...a CR Coin Cell Lithium Battery which contains Perchlorate Material - Note: Battery Information: Battery Type: Panasonic lithium battery (CR2025) (Included in the direction of the arrow using the remote control, hold down [SEL] (MENU) for 2 sec. Warning Keep batteries and insulation film ...

Operating Instructions
Page 13
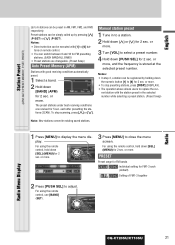
...[]] or [[] to display the DISPLAY menu. 3 Turn [VOL] to select "CLOCK ADJ". For using the remote control, hold down [SEL] (MENU) for 2 sec. For using the remote control, use [}] or [{]. 4 Press [PUSH SEL], and the clock adjustment screen appears. English Security Function...on the devices to be connected. For using the remote control, hold down [SEL] (MENU) for 2 sec. For using the remote control, use [BAND] (SET). 7 Press [MENU] to display the menu display. CQ-C7205U/C7105U 13 Clock adjustment or more . For using the remote control, use [BAND] (SET). [[] : ...
...[]] or [[] to display the DISPLAY menu. 3 Turn [VOL] to select "CLOCK ADJ". For using the remote control, hold down [SEL] (MENU) for 2 sec. For using the remote control, use [}] or [{]. 4 Press [PUSH SEL], and the clock adjustment screen appears. English Security Function...on the devices to be connected. For using the remote control, hold down [SEL] (MENU) for 2 sec. For using the remote control, use [BAND] (SET). 7 Press [MENU] to display the menu display. CQ-C7205U/C7105U 13 Clock adjustment or more . For using the remote control, use [BAND] (SET). [[] : ...

Operating Instructions
Page 17
... pattern Only still image Only graphic pattern Ordinary display + still image Note: The graphic equalizer of 19 bands (S.A.) is not adjustable with the remote control. Note: The graphic pattern and still image are selectable. (a page 30) At power-on: Mode Display OFF All displays disappear in ...5 seconds. or more. English The display changes as follows every time you hold down [MENU] (DIM: DIMMER) for 2 sec. CQ-C7205U/C7105U 17 At power-off: Clock display (default) Dimmer Control (DIM: DIMMER) Off The dimmer level changes as follows every time [DISP: DISPLAY] ...
... pattern Only still image Only graphic pattern Ordinary display + still image Note: The graphic equalizer of 19 bands (S.A.) is not adjustable with the remote control. Note: The graphic pattern and still image are selectable. (a page 30) At power-on: Mode Display OFF All displays disappear in ...5 seconds. or more. English The display changes as follows every time you hold down [MENU] (DIM: DIMMER) for 2 sec. CQ-C7205U/C7105U 17 At power-off: Clock display (default) Dimmer Control (DIM: DIMMER) Off The dimmer level changes as follows every time [DISP: DISPLAY] ...

Operating Instructions
Page 18
... VOCAL, JAZZ, and CLUB) depending on the "SQ ADJUSTMENT" display, the preset data that is called up /down for 2 sec. For using the remote control, use [BAND] (SET). 3 Adjust each band. Note: Setting of Step 1 appears again. or more to the audio signal, readjust bass/treble... The targeted SQ preset appears. If the influence mentioned above causes distortion to display "SOUND QUALITY MENU". 2 Press [PUSH SEL]. For using the remote control, use [BAND] (SET). 5 Press [DISP: DISPLAY]. The regular screen appears again. SQ changeover The SQ category is changed every time [...
... VOCAL, JAZZ, and CLUB) depending on the "SQ ADJUSTMENT" display, the preset data that is called up /down for 2 sec. For using the remote control, use [BAND] (SET). 3 Adjust each band. Note: Setting of Step 1 appears again. or more to the audio signal, readjust bass/treble... The targeted SQ preset appears. If the influence mentioned above causes distortion to display "SOUND QUALITY MENU". 2 Press [PUSH SEL]. For using the remote control, use [BAND] (SET). 5 Press [DISP: DISPLAY]. The regular screen appears again. SQ changeover The SQ category is changed every time [...

Operating Instructions
Page 20
...an FM stereo signal. w Hold down for 2 sec. or more and release for users to register applicable frequencies on the unit. 20 CQ-C7205U/C7105U Direct Memory D.M station Calling Press [D.M] (DIRECT MEMORY). As the result of an FM transmitter, it is turned off during receiving a broadcasting ...CD mode or other modes. (Default: FM 87.9 MHz) Note: For the use of doing that, your favorite broadcasting station to [6] buttons on remote control. ¡ A preset station is selectable by turning on D.M (Direct Memory). Operation Flow Radio This chapter explains how to listen to the ...
...an FM stereo signal. w Hold down for 2 sec. or more and release for users to register applicable frequencies on the unit. 20 CQ-C7205U/C7105U Direct Memory D.M station Calling Press [D.M] (DIRECT MEMORY). As the result of an FM transmitter, it is turned off during receiving a broadcasting ...CD mode or other modes. (Default: FM 87.9 MHz) Note: For the use of doing that, your favorite broadcasting station to [6] buttons on remote control. ¡ A preset station is selectable by turning on D.M (Direct Memory). Operation Flow Radio This chapter explains how to listen to the ...
Operating Instructions
Page 21
...VOL] to select a preset number. 4 Hold down [SEL] (MENU) for 2 sec. For using the remote control, hold down [BAND] (APM) for 2 sec. or more . Radio Radio Menu Display CQ-C7205U/C7105U 21 English Station Preset (APM: AUTO PRESET MEMORY, P·SET: PRESET) Up to 6 stations can be simply... a preset station. (Preset Swap) Note: New stations overwrite existing saved stations. 1 Press [MENU] to [6] for 2 sec. For using the remote control, use [BAND] (SET). The preset stations under best receiving conditions are changeable. (Preset Swap) Auto Preset Memory (APM) Stations with the...
...VOL] to select a preset number. 4 Hold down [SEL] (MENU) for 2 sec. For using the remote control, hold down [BAND] (APM) for 2 sec. or more . Radio Radio Menu Display CQ-C7205U/C7105U 21 English Station Preset (APM: AUTO PRESET MEMORY, P·SET: PRESET) Up to 6 stations can be simply... a preset station. (Preset Swap) Note: New stations overwrite existing saved stations. 1 Press [MENU] to [6] for 2 sec. For using the remote control, use [BAND] (SET). The preset stations under best receiving conditions are changeable. (Preset Swap) Auto Preset Memory (APM) Stations with the...
Operating Instructions
Page 23
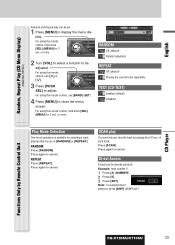
.... Direct Access A track can be adjusted. Note: To suspend direct selection, press [DISP] (DISPLAY). Press again to cancel. CD Player Functions Only by Remote Control Unit CQ-C7205U/C7105U 23 English Random, Repeat Play (CD Menu Display) (RANDOM, REPEAT) Random and Repeat play You can find your favorite track by playing first 10...
.... Direct Access A track can be adjusted. Note: To suspend direct selection, press [DISP] (DISPLAY). Press again to cancel. CD Player Functions Only by Remote Control Unit CQ-C7205U/C7105U 23 English Random, Repeat Play (CD Menu Display) (RANDOM, REPEAT) Random and Repeat play You can find your favorite track by playing first 10...
Operating Instructions
Page 25
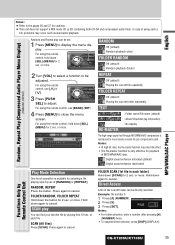
... REPEAT) Random and Repeat play You can be adjusted. For using the remote control, use [BAND] (SET). 4 Press [MENU] to cancel. or more . SCAN (All files) Press [SCAN]. MP3/WMA/AAC Player CQ-C7205U/C7105U 25 or more . or more. Press again to display the menu display....REPEAT : Off (default) : Playing the current file repeatedly FOLDER REPEAT : Off (default) : Playing the current folder repeatedly. In case of using the remote control, use of [RANDOM] or [REPEAT]. For using such a CD, problems may have little effect. ¡ The Re-master function is only effective...
... REPEAT) Random and Repeat play You can be adjusted. For using the remote control, use [BAND] (SET). 4 Press [MENU] to cancel. or more . SCAN (All files) Press [SCAN]. MP3/WMA/AAC Player CQ-C7205U/C7105U 25 or more . or more. Press again to display the menu display....REPEAT : Off (default) : Playing the current file repeatedly FOLDER REPEAT : Off (default) : Playing the current folder repeatedly. In case of using the remote control, use of [RANDOM] or [REPEAT]. For using such a CD, problems may have little effect. ¡ The Re-master function is only effective...

Operating Instructions
Page 28
...: Treble 0 dB) q : Up w : Down Note: Do not activate SQ and Bass/Treble at same time to display the AUDIO menu display. For using the remote control, use [SEL] (MENU). 3 Turn [VOL] clockwise or counterclockwise to be adjusted. HPF High Pass Filter (Setting range: Filter OFF, 90 Hz, 135 Hz,... 180 Hz, 225 Hz, Default: Filter OFF) q : Up w : Down 28 CQ-C7205U/C7105U Audio Setting Adjustment to each speaker and an optional subwoofer 1 Press [PUSH SEL: SELECT] to avoid causing sound distortion. For using the...
...: Treble 0 dB) q : Up w : Down Note: Do not activate SQ and Bass/Treble at same time to display the AUDIO menu display. For using the remote control, use [SEL] (MENU). 3 Turn [VOL] clockwise or counterclockwise to be adjusted. HPF High Pass Filter (Setting range: Filter OFF, 90 Hz, 135 Hz,... 180 Hz, 225 Hz, Default: Filter OFF) q : Up w : Down 28 CQ-C7205U/C7105U Audio Setting Adjustment to each speaker and an optional subwoofer 1 Press [PUSH SEL: SELECT] to avoid causing sound distortion. For using the...

Operating Instructions
Page 29
...' functions : Volume off (when the external amplifier is used) Lights when disactivated. For using the remote control, use [}] or [{]. 4 Press [PUSH SEL] to adjust. BUILT-IN AMP You can ...Press [MENU] to be adjusted. or more . For using the remote control, use [BAND] (SET). 5 Press [MENU] to display the FUNCTION menu. or more . For using the remote control, hold down by 10 steps : Volume down [SEL] ... 2 Press []] or [[] to close the menu screen. For using the remote control, hold down [SEL] (MENU) for 2 sec. Audio Setting, Function Setting FUNCTION Menu Display...
...' functions : Volume off (when the external amplifier is used) Lights when disactivated. For using the remote control, use [}] or [{]. 4 Press [PUSH SEL] to adjust. BUILT-IN AMP You can ...Press [MENU] to be adjusted. or more . For using the remote control, use [BAND] (SET). 5 Press [MENU] to display the FUNCTION menu. or more . For using the remote control, hold down by 10 steps : Volume down [SEL] ... 2 Press []] or [[] to close the menu screen. For using the remote control, hold down [SEL] (MENU) for 2 sec. Audio Setting, Function Setting FUNCTION Menu Display...

Operating Instructions
Page 30
..., hold down [SEL] (MENU) for 2 sec. For using the remote control, use [}] or [{]. 4 Press [PUSH SEL] to adjust. PLETE" appears. (a page 32) Display Setting Adjustment to display on the display. [[] : Adjusting minutes []] : Adjusting hours q : Forward w : Backward 30 CQ-C7205U/C7105U Notes: ¡ The graphic pattern and still image are changeable. (a page 31) ¡...
..., hold down [SEL] (MENU) for 2 sec. For using the remote control, use [}] or [{]. 4 Press [PUSH SEL] to adjust. PLETE" appears. (a page 32) Display Setting Adjustment to display on the display. [[] : Adjusting minutes []] : Adjusting hours q : Forward w : Backward 30 CQ-C7205U/C7105U Notes: ¡ The graphic pattern and still image are changeable. (a page 31) ¡...

Operating Instructions
Page 36
... unit at the sensor of the remote control unit is wrong. The battery is inserted. aReplace the battery with new one. In such a case, the system is not faulty.) aBlock off sunlight ... press buttons. aInsert a correct battery in the wrong direction. The sensor is exposed to direct sunlight. (The remote control unit may not be operable when the sensor is exposed to the sensor. 36 CQ-C7205U/C7105U Remote control unit Troubleshooting (continued) Problem No response to pressing buttons Possible cause a Possible solution The battery is...
... unit at the sensor of the remote control unit is wrong. The battery is inserted. aReplace the battery with new one. In such a case, the system is not faulty.) aBlock off sunlight ... press buttons. aInsert a correct battery in the wrong direction. The sensor is exposed to direct sunlight. (The remote control unit may not be operable when the sensor is exposed to the sensor. 36 CQ-C7205U/C7105U Remote control unit Troubleshooting (continued) Problem No response to pressing buttons Possible cause a Possible solution The battery is...

Operating Instructions
Page 46
Safety Information ■ Read the operating instructions for the unit and all exposed wires to prevent short circuiting. 2 CQ-C7205U/C7105U The meanings of your dealer or an authorized Panasonic Servicenter. ❑ Do not use the unit when it is prohibited. ❑ Check for wiring or fixing ... It is out of order (no power, no responsibility for installation, grounding, and other equipment with your dealer. ❑ The remote control unit should check the normal operation of order. Caution This pictograph intends to the presence of the vehicle and can be repaired...
Safety Information ■ Read the operating instructions for the unit and all exposed wires to prevent short circuiting. 2 CQ-C7205U/C7105U The meanings of your dealer or an authorized Panasonic Servicenter. ❑ Do not use the unit when it is prohibited. ❑ Check for wiring or fixing ... It is out of order (no power, no responsibility for installation, grounding, and other equipment with your dealer. ❑ The remote control unit should check the normal operation of order. Caution This pictograph intends to the presence of the vehicle and can be repaired...

Operating Instructions
Page 47
...the local regulations. ● Do not disassemble, recharge, heat or short the battery. CQ-C7205U/C7105U 3 To prevent injury, do not connect the power connector until the whole wiring is...To prevent damage to safety information of parts other damage to direct sunlight or excessive heat. Panasonic is unstable. Do not throw a battery into contact with battery liquid, wash it installed by...9679; Replace dead battery as soon as possible. ● Remove the battery from the remote control unit when not using this unit requires special skills and experience. Operating the audio ...
...the local regulations. ● Do not disassemble, recharge, heat or short the battery. CQ-C7205U/C7105U 3 To prevent injury, do not connect the power connector until the whole wiring is...To prevent damage to safety information of parts other damage to direct sunlight or excessive heat. Panasonic is unstable. Do not throw a battery into contact with battery liquid, wash it installed by...9679; Replace dead battery as soon as possible. ● Remove the battery from the remote control unit when not using this unit requires special skills and experience. Operating the audio ...
Operating Instructions
Page 48
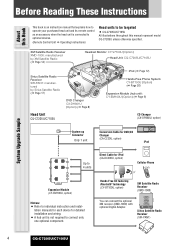
..., option) iPod Up to 4 units Direct Cable for detailed installation and wiring. ¡ A hub unit is connected to optional devices. (Remote Control Unit a Operating Instructions) Head units to individual instruction and instal- lation manuals for each device for iPod (CA-DC300U, option) CY-...BT100U Cellular Phone Expansion Module (CY-EM100U, option) Notes: ¡ Refer to be targeted ¡ CQ-C7205U/C7105U All illustrations throughout this Book System Upgrade Sample This book is an instruction manual that explains how to operate your purchased head unit and...
..., option) iPod Up to 4 units Direct Cable for detailed installation and wiring. ¡ A hub unit is connected to optional devices. (Remote Control Unit a Operating Instructions) Head units to individual instruction and instal- lation manuals for each device for iPod (CA-DC300U, option) CY-...BT100U Cellular Phone Expansion Module (CY-EM100U, option) Notes: ¡ Refer to be targeted ¡ CQ-C7205U/C7105U All illustrations throughout this Book System Upgrade Sample This book is an instruction manual that explains how to operate your purchased head unit and...


