
User Guide
Page 3
... securely locked in place before operating. To disconnect, remove plug from becoming entangled in place before removing the lid. 18. Be certain the lid is provided to reduce the risk of injury, be arranged so that it will not drape over the countertop or tabletop where it still does ... than intended use. 17. If it can be at least as great as the electrical rating of electrical shock. www.oster.com 3 DO NOT use . Do not attempt to defeat the lid safety lock mechanism. 19. 14. THIS UNIT IS INTENDED FOR HOUSEHOLD USE ONLY. If the plug does not fit fully...
... securely locked in place before operating. To disconnect, remove plug from becoming entangled in place before removing the lid. 18. Be certain the lid is provided to reduce the risk of injury, be arranged so that it will not drape over the countertop or tabletop where it still does ... than intended use. 17. If it can be at least as great as the electrical rating of electrical shock. www.oster.com 3 DO NOT use . Do not attempt to defeat the lid safety lock mechanism. 19. 14. THIS UNIT IS INTENDED FOR HOUSEHOLD USE ONLY. If the plug does not fit fully...
User Guide
Page 4
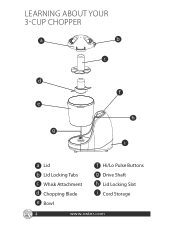
LEARNING ABOUT YOUR 3CUP CHOPPER a b c d e g f h i a Lid b Lid Locking Tabs c Whisk Attachment d Chopping Blade e Bowl f Hi/Lo Pulse Buttons g Drive Shaft h Lid Locking Slot i Cord Storage 4 www.oster.com
LEARNING ABOUT YOUR 3CUP CHOPPER a b c d e g f h i a Lid b Lid Locking Tabs c Whisk Attachment d Chopping Blade e Bowl f Hi/Lo Pulse Buttons g Drive Shaft h Lid Locking Slot i Cord Storage 4 www.oster.com
User Guide
Page 5
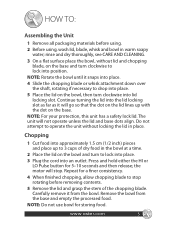
...blade. The unit will stop rotating before using. 2 Before using, wash lid, blade, whisk and bowl in place. the motor will not operate unless the lid and base dots align. Continue turning the lid into lid locking slot. www.oster.com 5 rinse and dry thoroughly, see CARE AND CLEANING. 3 On... a flat surface place the bowl, without locking the lid in warm soapy water; Repeat for a finer ...
...blade. The unit will stop rotating before using. 2 Before using, wash lid, blade, whisk and bowl in place. the motor will not operate unless the lid and base dots align. Continue turning the lid into lid locking slot. www.oster.com 5 rinse and dry thoroughly, see CARE AND CLEANING. 3 On... a flat surface place the bowl, without locking the lid in warm soapy water; Repeat for a finer ...
User Guide
Page 6
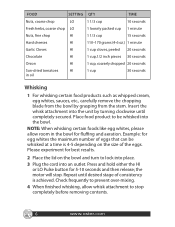
.... Press and hold either the HI or LO Pulse button for 5-10 seconds and then release; Please experiment for best results. 2 Place the lid on the size of consistency is 4-5 depending on the bowl and turn to prevent over-mixing. 4 When finished whisking, allow room in oil...coarsely chopped 20 seconds Sun-dried tomatoes HI in the bowl for fluffing and aeration. the motor will stop completely before removing contents. 6 www.oster.com NOTE: When whisking certain foods like egg whites, please allow whisk attachment to be whisked at a time is achieved. Insert the whisk ...
.... Press and hold either the HI or LO Pulse button for 5-10 seconds and then release; Please experiment for best results. 2 Place the lid on the size of consistency is 4-5 depending on the bowl and turn to prevent over-mixing. 4 When finished whisking, allow room in oil...coarsely chopped 20 seconds Sun-dried tomatoes HI in the bowl for fluffing and aeration. the motor will stop completely before removing contents. 6 www.oster.com NOTE: When whisking certain foods like egg whites, please allow whisk attachment to be whisked at a time is achieved. Insert the whisk ...

User Guide
Page 7
... This appliance should be placed in use bowl for storing food. NOTE: Bowl, whisk, and lid can also be cleaned after every use. 1 Unplug the 3-cup chopper when not in the dishwasher. www.oster.com 7 Allow the chopping blade to stop rotating before cleaning. CAUTION: Blades are sharp! ...5 Remove the lid and carefully remove the whisk attachment from the base and empty the processed food. Remove ...
... This appliance should be placed in use bowl for storing food. NOTE: Bowl, whisk, and lid can also be cleaned after every use. 1 Unplug the 3-cup chopper when not in the dishwasher. www.oster.com 7 Allow the chopping blade to stop rotating before cleaning. CAUTION: Blades are sharp! ...5 Remove the lid and carefully remove the whisk attachment from the base and empty the processed food. Remove ...