Owner Manual
Page 1
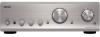
Troubleshooting 18 Specifications ...... Following the instructions in the unit. Please retain this manual will enable you for future reference. Please read this manual thoroughly before making connections and plugging in this manual for purchasing an Onkyo Integrated Amplifier. Back cover page En Contents Integrated Amplifier A-9755/A-9555 Introduction 2 Instruction Manual Connections 10 Enjoying Audio Sources 14 Thank you to obtain optimum performance and listening enjoyment from your new Integrated Amplifier.
Troubleshooting 18 Specifications ...... Following the instructions in the unit. Please retain this manual will enable you for future reference. Please read this manual thoroughly before making connections and plugging in this manual for purchasing an Onkyo Integrated Amplifier. Back cover page En Contents Integrated Amplifier A-9755/A-9555 Introduction 2 Instruction Manual Connections 10 Enjoying Audio Sources 14 Thank you to obtain optimum performance and listening enjoyment from your new Integrated Amplifier.
Owner Manual
Page 4
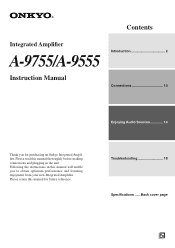
...Features A-9755 Integrated Digital Amplifier ❑ 150 W/Ch into 8 ohms, DIN/300 W/Ch into 4 ohms, JEITA ❑ Exclusive Onkyo VL Digital Technology ❑ Pure Stream Power Supply (2 Transformers) ❑ All Discrete Output Stage Circuitry ❑ Low-Impedance, Thick Bus Plate &#... with RI Dock for the iPod ❑ RI (Remote Interactive) Remote Control A-9555 Integrated Digital Amplifier ❑ 100 W/Ch into 8 ohms, DIN/200 W/Ch into 4 ohms, JEITA ❑ Exclusive Onkyo VL Digital Technology ❑ Pure Stream Power Supply ❑ Discrete Output Stage Circuitry...
...Features A-9755 Integrated Digital Amplifier ❑ 150 W/Ch into 8 ohms, DIN/300 W/Ch into 4 ohms, JEITA ❑ Exclusive Onkyo VL Digital Technology ❑ Pure Stream Power Supply (2 Transformers) ❑ All Discrete Output Stage Circuitry ❑ Low-Impedance, Thick Bus Plate &#... with RI Dock for the iPod ❑ RI (Remote Interactive) Remote Control A-9555 Integrated Digital Amplifier ❑ 100 W/Ch into 8 ohms, DIN/200 W/Ch into 4 ohms, JEITA ❑ Exclusive Onkyo VL Digital Technology ❑ Pure Stream Power Supply ❑ Discrete Output Stage Circuitry...
Owner Manual
Page 5
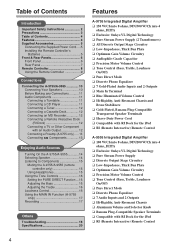
... • Flat batteries should not be removed as soon as possible to the end of the product name indicates the color of the A-9755/A-9555. Specifications and operation are the same regardless of batteries. • If you have the power cord disconnected from the A-9755... is designed for a long time, remove the batteries to use the remote controller for use a power cord other than the one supplied with the A-9755/A-9555. Always connect by plugging into this time. 5 Notes: • If the remote controller doesn't work reliably, try replacing the batteries. • Don't mix ...
... • Flat batteries should not be removed as soon as possible to the end of the product name indicates the color of the A-9755/A-9555. Specifications and operation are the same regardless of batteries. • If you have the power cord disconnected from the A-9755... is designed for a long time, remove the batteries to use the remote controller for use a power cord other than the one supplied with the A-9755/A-9555. Always connect by plugging into this time. 5 Notes: • If the remote controller doesn't work reliably, try replacing the batteries. • Don't mix ...

Owner Manual
Page 6
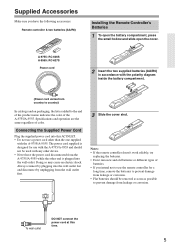
... when the LOUDNESS function is on. L Input selector indicator (15) These indicators show the currently selected input source. When set to ON, the A-9755/A-9555 can be used to set to On or Standby. C PHONES jack (15) This phone jack is for connecting a standard pair of stereo headphones for adjusting... the level of bass sounds. You can be set the A-9755/A-9555 to OFF, the A-9755/A-9555 is completely shutdown. It flashes more quickly if any of the speakers is on . J POWER AMP DIRECT (MAIN IN) button ...
... when the LOUDNESS function is on. L Input selector indicator (15) These indicators show the currently selected input source. When set to ON, the A-9755/A-9555 can be used to set to On or Standby. C PHONES jack (15) This phone jack is for connecting a standard pair of stereo headphones for adjusting... the level of bass sounds. You can be set the A-9755/A-9555 to OFF, the A-9755/A-9555 is completely shutdown. It flashes more quickly if any of the speakers is on . J POWER AMP DIRECT (MAIN IN) button ...
Owner Manual
Page 7
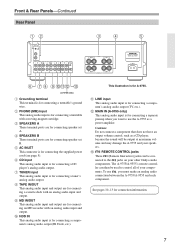
...B PHONO (MM) input This analog audio input is for connecting a separate preamp when you must make an analog audio connection between the A-9755/A-9555 and each component. E AC INLET This connector is for A-9755. This illustration is for connecting the supplied power cord (see page 5). The A-9755...analog audio input is for connecting a component's analog audio output (RI Dock, etc.). nected to use , you want to the jacks on your other Onkyo audio components. nents. To use the A-9755 as a CD player, because the sound will be used to control all of your speakers. M REMOTE ...
...B PHONO (MM) input This analog audio input is for connecting a separate preamp when you must make an analog audio connection between the A-9755/A-9555 and each component. E AC INLET This connector is for A-9755. This illustration is for connecting the supplied power cord (see page 5). The A-9755...analog audio input is for connecting a component's analog audio output (RI Dock, etc.). nected to use , you want to the jacks on your other Onkyo audio components. nents. To use the A-9755 as a CD player, because the sound will be used to control all of your speakers. M REMOTE ...
Owner Manual
Page 8
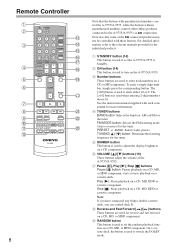
...9 L 0 A M B 8 Note that some of the A-9755/A-9555. Note also that the buttons with parenthesized numbers control the A-9755/A-9555, while the buttons without parenthesized numbers control other Onkyo products connected to the A-9755/A-9555 via connection. button: Selects radio presets. On a cassette deck, the ..., MD, HDD or cassette component. D TUNER buttons BAND button: Selects the band (ex. Note: If you have connected any Onkyo double cassette deck, you can control deck B. TUNING [ ]/[ ] button: Determine the listening frequency for the individual products. F VOLUME...
...9 L 0 A M B 8 Note that some of the A-9755/A-9555. Note also that the buttons with parenthesized numbers control the A-9755/A-9555, while the buttons without parenthesized numbers control other Onkyo products connected to the A-9755/A-9555 via connection. button: Selects radio presets. On a cassette deck, the ..., MD, HDD or cassette component. D TUNER buttons BAND button: Selects the band (ex. Note: If you have connected any Onkyo double cassette deck, you can control deck B. TUNING [ ]/[ ] button: Determine the listening frequency for the individual products. F VOLUME...
Owner Manual
Page 9
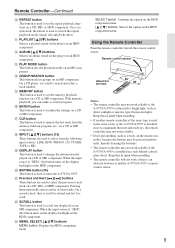
...custom program. T MUTING button (15) This button is used for rewind and fast forward. On a cassette deck, they're used to mute the A-9755/A-9555. W MENU, SELECT, [ ]/[ ] buttons MENU button: Displays the HDD component menu. O MEMORY button This button is used to set the memory playback ... settings on a CD or MD component. Pressing them repeatedly selects earlier or later tracks. On a CD player, it and the A-9755/A-9555's remote control sensor. 9 Keep this in mind when installing. • If another remote controller of the same type is subjected to select...
...custom program. T MUTING button (15) This button is used for rewind and fast forward. On a cassette deck, they're used to mute the A-9755/A-9555. W MENU, SELECT, [ ]/[ ] buttons MENU button: Displays the HDD component menu. O MEMORY button This button is used to set the memory playback ... settings on a CD or MD component. Pressing them repeatedly selects earlier or later tracks. On a CD player, it and the A-9755/A-9555's remote control sensor. 9 Keep this in mind when installing. • If another remote controller of the same type is subjected to select...
Owner Manual
Page 10
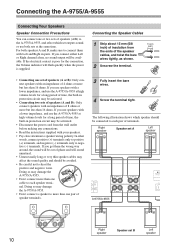
..., the Volume indicator will be connected to negative (-) terminals. If you use speakers with Left and Right in protection circuit may damage the A-9755/A-9555. • Don't connect more but less than 16 ohms. If you connect either Left or Right channel alone, no sound output will fl...cable to connect them the wrong way around, the sound will be out of speakers (A/B) to speaker wiring polarity. If you use the A-9755/A-9555 at high volume levels for a long period of time, the built-in protection circuit may be activated. • Disconnect the power cord from the...
..., the Volume indicator will be connected to negative (-) terminals. If you use speakers with Left and Right in protection circuit may damage the A-9755/A-9555. • Don't connect more but less than 16 ohms. If you connect either Left or Right channel alone, no sound output will fl...cable to connect them the wrong way around, the sound will be out of speakers (A/B) to speaker wiring polarity. If you use the A-9755/A-9555 at high volume levels for a long period of time, the built-in protection circuit may be activated. • Disconnect the power cord from the...
Owner Manual
Page 11
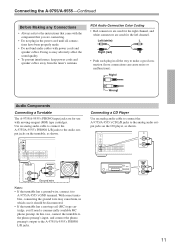
...from the tuner's antenna. In this case, connect the turntable to the phono preamp's input, and connect the phono preamp's output to A-9755/A-9555's GND terminal. RCA Audio Connection Color Coding • Red connectors are used for use with moving -coil (MC) type cartridge, you are ...plug in the power cord until all the way to make a good connection (loose connections can cause noise or malfunctions). Connecting the A-9755/A-9555-Continued Before Making any Connections • Always refer to the instructions that came with the component that you 'll need a commercially available MC...
...from the tuner's antenna. In this case, connect the turntable to the phono preamp's input, and connect the phono preamp's output to A-9755/A-9555's GND terminal. RCA Audio Connection Color Coding • Red connectors are used for use with moving -coil (MC) type cartridge, you are ...plug in the power cord until all the way to make a good connection (loose connections can cause noise or malfunctions). Connecting the A-9755/A-9555-Continued Before Making any Connections • Always refer to the instructions that came with the component that you 'll need a commercially available MC...
Owner Manual
Page 12
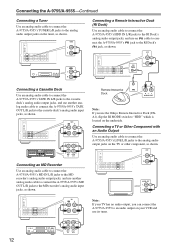
... the RI Dock's jack, as shown. Connecting the A-9755/A-9555-Continued Connecting a Tuner Use an analog audio cable to connect the A-9755/A-9555's TUNER L/R jacks to the analog audio output jacks on your TV has no audio output, you use the Onkyo Remote Interactive Dock (DSA1), flip the RI MODE switch... to "HDD" which is located on the TV or other component, as shown. / REC PLAY (IN) (OUT) Connecting an MD Recorder Use an analog audio cable to connect the A-9755/A-9555's MD IN L/R jacks to...
... the RI Dock's jack, as shown. Connecting the A-9755/A-9555-Continued Connecting a Tuner Use an analog audio cable to connect the A-9755/A-9555's TUNER L/R jacks to the analog audio output jacks on your TV has no audio output, you use the Onkyo Remote Interactive Dock (DSA1), flip the RI MODE switch... to "HDD" which is located on the TV or other component, as shown. / REC PLAY (IN) (OUT) Connecting an MD Recorder Use an analog audio cable to connect the A-9755/A-9555's MD IN L/R jacks to...
Owner Manual
Page 13
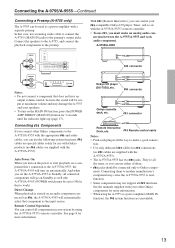
... same, so you can use the following system functions. Connect the speakers to the A-9755, and connect the playback components to Onkyo components. nection between the A-9755/A-9555 and each plug in all components in your system by using the A-9755 as well (the A-9755...the appropriate and audio cables, you can use either of them to another manufacturer's component may damage the A-9755 and your other Onkyo components to the A-9755/A-9555 with a separate preamp. With (Remote Interactive), you must be connected only to the preamp. Direct Change When playback is started on...
... same, so you can use the following system functions. Connect the speakers to the A-9755, and connect the playback components to Onkyo components. nection between the A-9755/A-9555 and each plug in all components in your system by using the A-9755 as well (the A-9755...the appropriate and audio cables, you can use either of them to another manufacturer's component may damage the A-9755 and your other Onkyo components to the A-9755/A-9555 with a separate preamp. With (Remote Interactive), you must be connected only to the preamp. Direct Change When playback is started on...
Owner Manual
Page 14
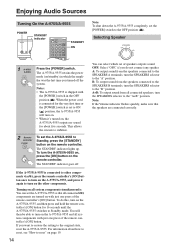
... seconds. A: To output sound from the speakers connected to the SPEAKERS B terminals, turn the SPEAKERS selector to the "A+B" position. The A-9755/A-9555 retains the power mode (on with just one press of the remote controller's [ON] button. The STANDBY indicator goes off the system. Turning on...OFF position ( ). This allows the circuits to stabilize. 2 Remote controller To set the [POWER] switch to the original state, reset the A-9755/A-9555. To do not connect any speaker. OFF: Select "OFF," if you do this, turn on page 19. 14 You can set of speakers ...
... seconds. A: To output sound from the speakers connected to the SPEAKERS B terminals, turn the SPEAKERS selector to the "A+B" position. The A-9755/A-9555 retains the power mode (on with just one press of the remote controller's [ON] button. The STANDBY indicator goes off the system. Turning on...OFF position ( ). This allows the circuits to stabilize. 2 Remote controller To set the [POWER] switch to the original state, reset the A-9755/A-9555. To do not connect any speaker. OFF: Select "OFF," if you do this, turn on page 19. 14 You can set of speakers ...
Owner Manual
Page 15
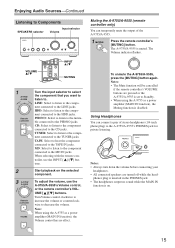
...listen to the HDD jacks. HDD: Select to listen to the component connected to . When selecting with the remote controller, use the A-9755/A-9555's Volume control, or the remote controller's VOLUME [ ]/[ ] buttons. Notes: • The Mute function will be cancelled if the remote ... connected to the PHONO jacks. Using Headphones You can temporarily mute the output of stereo headphones (1/4-inch phone plug) to the A-9755/A-9555's PHONES jack for private listening. Notes: • Always turn down the volume before connecting your headphones. • All connected speakers ...
...listen to the HDD jacks. HDD: Select to listen to the component connected to . When selecting with the remote controller, use the A-9755/A-9555's Volume control, or the remote controller's VOLUME [ ]/[ ] buttons. Notes: • The Mute function will be cancelled if the remote ... connected to the PHONO jacks. Using Headphones You can temporarily mute the output of stereo headphones (1/4-inch phone plug) to the A-9755/A-9555's PHONES jack for private listening. Notes: • Always turn down the volume before connecting your headphones. • All connected speakers ...
Owner Manual
Page 18
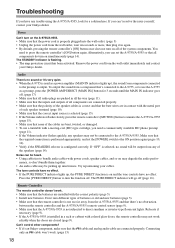
... configured correctly. To output the sound from the wall outlet, wait ten seconds or more, then plug it 's an Onkyo component, make sure that the A-9755/A-9555 is output. If you can be connected to turn on may not work . • Make sure that 's connected to the A-...; By default, pressing the remote controller's [ON] button once does not turn on all components do turn the function off (page 16). Try repositioning your Onkyo dealer. Can't control other components? • If it in a rack or cabinet with a moving-coil (MC) type cartridge, you need to use a...
... configured correctly. To output the sound from the wall outlet, wait ten seconds or more, then plug it 's an Onkyo component, make sure that the A-9755/A-9555 is output. If you can be connected to turn on may not work . • Make sure that 's connected to the A-...; By default, pressing the remote controller's [ON] button once does not turn on all components do turn the function off (page 16). Try repositioning your Onkyo dealer. Can't control other components? • If it in a rack or cabinet with a moving-coil (MC) type cartridge, you need to use a...
Owner Manual
Page 19
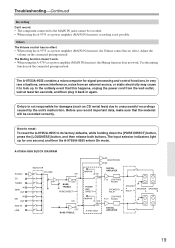
...mode. Others The Volume control has no effect. Use the muting function on the connected preamp instead. Onkyo is not possible. The input selector indicators light up . A-9755/A-9555 BLOCK DIAGRAM PHONO CD TUNER IN TAPE OUT IN MD OUT HDD IN LINE HEADPHONE SELECTOR VOLUME ON OFF... as CD rental fees) due to unsuccessful recordings caused by the unit's malfunction. Adjust the volume on the connected preamp instead. The A-9755/A-9555 contains a microcomputer for damages (such as a power amplifier (MAIN IN function), recording is not responsible for signal processing and control ...
...mode. Others The Volume control has no effect. Use the muting function on the connected preamp instead. Onkyo is not possible. The input selector indicators light up . A-9755/A-9555 BLOCK DIAGRAM PHONO CD TUNER IN TAPE OUT IN MD OUT HDD IN LINE HEADPHONE SELECTOR VOLUME ON OFF... as CD rental fees) due to unsuccessful recordings caused by the unit's malfunction. Adjust the volume on the connected preamp instead. The A-9755/A-9555 contains a microcomputer for damages (such as a power amplifier (MAIN IN function), recording is not responsible for signal processing and control ...
Owner Manual
Page 20
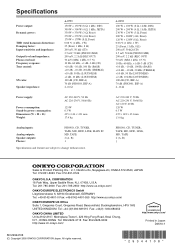
...: Speaker outputs: Phones: PHONO, CD, TUNER, TAPE, MD, HDD, LINE, MAIN IN MD, TAPE 2 (A, B) 1 Specifications and features are subject to change without notice. A-9555 100 W + 100 W (8 Ω, 1 kHz, DIN) 200 W + 200 W (4 Ω, 1 kHz, JEITA) 230 W + 230 W (3 Ω, Front) 200 W + 200W (4 Ω, Front) 120 W + 120W ...-cho, Neyagawa-shi, OSAKA 572-8540, JAPAN Tel: 072-831-8023 Fax: 072-831-8124 ONKYO U.S.A. Tel: 201-785-2600 Fax: 201-785-2650 http://www.us.onkyo.com/ ONKYO EUROPE ELECTRONICS GmbH Liegnitzerstrasse 6, 82194 Groebenzell, GERMANY Tel: +49-8142-4401-0 Fax: +49-8142...
...: Speaker outputs: Phones: PHONO, CD, TUNER, TAPE, MD, HDD, LINE, MAIN IN MD, TAPE 2 (A, B) 1 Specifications and features are subject to change without notice. A-9555 100 W + 100 W (8 Ω, 1 kHz, DIN) 200 W + 200 W (4 Ω, 1 kHz, JEITA) 230 W + 230 W (3 Ω, Front) 200 W + 200W (4 Ω, Front) 120 W + 120W ...-cho, Neyagawa-shi, OSAKA 572-8540, JAPAN Tel: 072-831-8023 Fax: 072-831-8124 ONKYO U.S.A. Tel: 201-785-2600 Fax: 201-785-2650 http://www.us.onkyo.com/ ONKYO EUROPE ELECTRONICS GmbH Liegnitzerstrasse 6, 82194 Groebenzell, GERMANY Tel: +49-8142-4401-0 Fax: +49-8142...