
Instruction Manual
Page 1
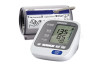
INSTRUCTION MANUAL 7 series Blood Pressure Monitor with ComFitTM Cuff Model BP760 ESPAÑOL ENGLISH
INSTRUCTION MANUAL 7 series Blood Pressure Monitor with ComFitTM Cuff Model BP760 ESPAÑOL ENGLISH

Instruction Manual
Page 2
TABLE OF CONTENTS Before Using the Monitor Introduction 4 Safety Information 5 Operating the Device 5 Risk of Electrical Shock 7 Care and Maintenance 7 Before Taking a Measurement 8 Operating Instructions Know Your Unit 9 Unit Display 11 Display Symbols 12 Irregular Heartbeat Symbol 12 Movement Error Symbol 12 Morning Hypertension Symbol 13 Heartbeat Symbol 14 Average Value Symbol 14 Morning Average Symbol 14 Evening Average Symbol 14 Cuff Wrap Guide Symbol 14 Using the AC Adapter 15 Battery Installation 17 Setting the Date and Time 19 Applying the Arm Cuff 23 2
TABLE OF CONTENTS Before Using the Monitor Introduction 4 Safety Information 5 Operating the Device 5 Risk of Electrical Shock 7 Care and Maintenance 7 Before Taking a Measurement 8 Operating Instructions Know Your Unit 9 Unit Display 11 Display Symbols 12 Irregular Heartbeat Symbol 12 Movement Error Symbol 12 Morning Hypertension Symbol 13 Heartbeat Symbol 14 Average Value Symbol 14 Morning Average Symbol 14 Evening Average Symbol 14 Cuff Wrap Guide Symbol 14 Using the AC Adapter 15 Battery Installation 17 Setting the Date and Time 19 Applying the Arm Cuff 23 2
Instruction Manual
Page 4
... and converts the movements into a digital reading. The BP760 comes with ComFitTM Cuff. Before Using the Monitor INTRODUCTION Thank you for future reference. This means the monitor detects your blood's movement through your product on-line at www.register-omron.com Your new digital blood pressure monitor uses the oscillometric method of blood pressure measurement.
... and converts the movements into a digital reading. The BP760 comes with ComFitTM Cuff. Before Using the Monitor INTRODUCTION Thank you for future reference. This means the monitor detects your blood's movement through your product on-line at www.register-omron.com Your new digital blood pressure monitor uses the oscillometric method of blood pressure measurement.

Instruction Manual
Page 5
... if not avoided, may be a diagnostic device. CAUTION Indicates a potentially hazardous situation which , if not avoided, could result in death or serious injury. The monitor is qualified to the equipment or other literature in the box before operating the unit. 5 Self-diagnosis and treatment using measured results may result in... rinse with plenty of clean water. If battery fluid should always be followed including the warnings and cautions listed in this blood pressure monitor. DO NOT adjust medication based on measurement results from this instruction manual.
... if not avoided, may be a diagnostic device. CAUTION Indicates a potentially hazardous situation which , if not avoided, could result in death or serious injury. The monitor is qualified to the equipment or other literature in the box before operating the unit. 5 Self-diagnosis and treatment using measured results may result in... rinse with plenty of clean water. If battery fluid should always be followed including the warnings and cautions listed in this blood pressure monitor. DO NOT adjust medication based on measurement results from this instruction manual.

Instruction Manual
Page 7
.... Do not overload power outlets. Do not submerge the device or any of the components in a clean, safe location. Changes or modification not approved by Omron Healthcare will void the user warranty. Do not disassemble or attempt to strong shocks, such as dropping the unit on the floor. Plug the device... into the electrical outlet with wet hands. Store the device and the components in water. CARE AND MAINTENANCE Do not subject the monitor to repair the unit or components. 7
.... Do not overload power outlets. Do not submerge the device or any of the components in a clean, safe location. Changes or modification not approved by Omron Healthcare will void the user warranty. Do not disassemble or attempt to strong shocks, such as dropping the unit on the floor. Plug the device... into the electrical outlet with wet hands. Store the device and the components in water. CARE AND MAINTENANCE Do not subject the monitor to repair the unit or components. 7

Instruction Manual
Page 10
KNOW YOUR UNIT Components: Air Tube Housing Cord Air Plug (Connects to Air Jack) Arm Cuff AC Adapter INSTRUCTION MANUAL 7 series Blood Pressure Monitor with ComFitTM Cuff Model BP760 ESPAÑOL ENGLISH Storage Case Instruction Manual Quick Start Guide 10
KNOW YOUR UNIT Components: Air Tube Housing Cord Air Plug (Connects to Air Jack) Arm Cuff AC Adapter INSTRUCTION MANUAL 7 series Blood Pressure Monitor with ComFitTM Cuff Model BP760 ESPAÑOL ENGLISH Storage Case Instruction Manual Quick Start Guide 10

Instruction Manual
Page 12
...The Movement Error Symbol is defined as Normal Heartbeat a rhythm that varies by less than the Blood average rhythm detected while the monitor pressure is measuring the systolic and diastolic blood pressure. Irregular Heartbeat Short Long If the irregular heartbeat symbol ( ) Pulse displays ...with the measurement values. Take another measurement, remain still during the measurement. DISPLAY SYMBOLS IRREGULAR HEARTBEAT SYMBOL ( ) When the monitor detects an irregular rhythm two or more than 25% from Pulse the average rhythm or 25% more times during the measurement, ...
...The Movement Error Symbol is defined as Normal Heartbeat a rhythm that varies by less than the Blood average rhythm detected while the monitor pressure is measuring the systolic and diastolic blood pressure. Irregular Heartbeat Short Long If the irregular heartbeat symbol ( ) Pulse displays ...with the measurement values. Take another measurement, remain still during the measurement. DISPLAY SYMBOLS IRREGULAR HEARTBEAT SYMBOL ( ) When the monitor detects an irregular rhythm two or more than 25% from Pulse the average rhythm or 25% more times during the measurement, ...

Instruction Manual
Page 13
... pressure goal for the Diastolic Blood Pressure value when viewing the Morning Averages and the Evening Averages in the memory. The monitor is above 135 for the Systolic Blood Pressure value and/or 85 for certain patients, including diabetic patients, pregnant women,... and patients with your measurement values. 1American Heart Association Scientific Statement 2004 13 Omron Healthcare recommends you contact your physician if the MORNING HYPERTENSION SYMBOL and/or the HEARTBEAT SYMBOL appear on age and morbidity. MORNING...
... pressure goal for the Diastolic Blood Pressure value when viewing the Morning Averages and the Evening Averages in the memory. The monitor is above 135 for the Systolic Blood Pressure value and/or 85 for certain patients, including diabetic patients, pregnant women,... and patients with your measurement values. 1American Heart Association Scientific Statement 2004 13 Omron Healthcare recommends you contact your physician if the MORNING HYPERTENSION SYMBOL and/or the HEARTBEAT SYMBOL appear on age and morbidity. MORNING...

Instruction Manual
Page 15
.... USING THE AC ADAPTER IMPORTANT SAFETY INSTRUCTIONS SAVE THESE INSTRUCTIONS - The measurement results will not be correctly oriented in the U.S.A., use with this monitor. • We recommend you may damage the unit. 15 For connection to a power supply not in a vertical or floor mount position. CAUTION ... accessories. DANGER TO REDUCE THE RISK OF FIRE OR ELECTRIC SHOCK, CAREFULLY FOLLOW THESE INSTRUCTIONS. NOTES: • Use only the authorized Omron AC Adapter that came with the device may need to be deleted. If no batteries are installed, you install the batteries even if the...
.... USING THE AC ADAPTER IMPORTANT SAFETY INSTRUCTIONS SAVE THESE INSTRUCTIONS - The measurement results will not be correctly oriented in the U.S.A., use with this monitor. • We recommend you may damage the unit. 15 For connection to a power supply not in a vertical or floor mount position. CAUTION ... accessories. DANGER TO REDUCE THE RISK OF FIRE OR ELECTRIC SHOCK, CAREFULLY FOLLOW THESE INSTRUCTIONS. NOTES: • Use only the authorized Omron AC Adapter that came with the device may need to be deleted. If no batteries are installed, you install the batteries even if the...

Instruction Manual
Page 16
Housing Cord TO DISCONNECT THE AC ADAPTER ① Hold the Housing to remove the AC Adapter from the electrical outlet. ② Remove the AC Adapter plug from the monitor. CAUTION Do not overload power outlets. Plug the device into a 120V AC outlet (60 cycles). USING THE AC ADAPTER TO CONNECT THE AC ADAPTER ① Insert the AC Adapter Plug into the AC Adapter Jack on the back side of the monitor as illustrated. ② Plug the AC Adapter into the appropriate voltage outlet. 16 WARNING Do not plug or unplug the power cord into the electrical outlet with wet hands.
Housing Cord TO DISCONNECT THE AC ADAPTER ① Hold the Housing to remove the AC Adapter from the electrical outlet. ② Remove the AC Adapter plug from the monitor. CAUTION Do not overload power outlets. Plug the device into a 120V AC outlet (60 cycles). USING THE AC ADAPTER TO CONNECT THE AC ADAPTER ① Insert the AC Adapter Plug into the AC Adapter Jack on the back side of the monitor as illustrated. ② Plug the AC Adapter into the appropriate voltage outlet. 16 WARNING Do not plug or unplug the power cord into the electrical outlet with wet hands.

Instruction Manual
Page 18
... will be reset to that of the previous use. Longlife alkaline batteries are removed while the unit is still on the display screen turn the monitor off before replacing the batteries. If the batteries are recommended. If "-:--" appears on the display, refer to page 19, "Setting the Date and Time". •...
... will be reset to that of the previous use. Longlife alkaline batteries are removed while the unit is still on the display screen turn the monitor off before replacing the batteries. If the batteries are recommended. If "-:--" appears on the display, refer to page 19, "Setting the Date and Time". •...

Instruction Manual
Page 19
If the date and time are stored in the memory for the 10-minute period, this week and the last seven weeks. The monitor can also calculate an average reading based on the two readings. • If one reading is stored in the memory for this reading is based ... readings are not set correctly, the measurement values stored in the evening. SETTING THE DATE AND TIME Set the monitor to 60 measurement values with the dates and times. The Blood Pressure Monitor automatically stores up to the current date and time before taking a measurement for measurements in the morning and in...
If the date and time are stored in the memory for the 10-minute period, this week and the last seven weeks. The monitor can also calculate an average reading based on the two readings. • If one reading is stored in the memory for this reading is based ... readings are not set correctly, the measurement values stored in the evening. SETTING THE DATE AND TIME Set the monitor to 60 measurement values with the dates and times. The Blood Pressure Monitor automatically stores up to the current date and time before taking a measurement for measurements in the morning and in...

Instruction Manual
Page 22
Press the SET button to advance by increments of one minute. TO TURN THE MONITOR OFF Press the START/STOP button. 22 Press the Up button ( ) to set the minute setting. 7. The minute flashes on the display. 6. SETTING THE MINUTE Press the Up button ( ) to set the current hour. Press the SET button to advance by increments of one hour. SETTING THE HOUR The time is set using AM or PM. SETTING THE DATE AND TIME 5.
Press the SET button to advance by increments of one minute. TO TURN THE MONITOR OFF Press the START/STOP button. 22 Press the Up button ( ) to set the minute setting. 7. The minute flashes on the display. 6. SETTING THE MINUTE Press the Up button ( ) to set the current hour. Press the SET button to advance by increments of one hour. SETTING THE HOUR The time is set using AM or PM. SETTING THE DATE AND TIME 5.

Instruction Manual
Page 27
Self-diagnosis and treatment using the memory function. In rare circumstances when a higher inflation may be necessary, the monitor automatically re-inflates the cuff up to the section "Applying the Arm Cuff", reapply the cuff and take another measurement. 27 If is displayed while .... WARNING Contact your physician for any other purpose. If the cuff is not applied correctly, is applied correctly during the inflation. CUFF WRAP GUIDE This monitor checks whether the arm cuff is displayed. TAKING A MEASUREMENT The...
Self-diagnosis and treatment using the memory function. In rare circumstances when a higher inflation may be necessary, the monitor automatically re-inflates the cuff up to the section "Applying the Arm Cuff", reapply the cuff and take another measurement. 27 If is displayed while .... WARNING Contact your physician for any other purpose. If the cuff is not applied correctly, is applied correctly during the inflation. CUFF WRAP GUIDE This monitor checks whether the arm cuff is displayed. TAKING A MEASUREMENT The...

Instruction Manual
Page 28
...measurement, press the START/STOP button. The Heartbeat Symbol ( ) flashes at every heartbeat. 28 As the cuff inflates, the monitor automatically determines your arm and remain still until the entire measurement process is started. Do not move your ideal inflation level. NOTE...: To stop inflating, start deflating and will turn off. 2. All symbols appear on the display. This monitor detects the pulse during inflation. Inflation stops automatically and the measurement is completed. As the cuff deflates, decreasing numbers appear on the ...
...measurement, press the START/STOP button. The Heartbeat Symbol ( ) flashes at every heartbeat. 28 As the cuff inflates, the monitor automatically determines your arm and remain still until the entire measurement process is started. Do not move your ideal inflation level. NOTE...: To stop inflating, start deflating and will turn off. 2. All symbols appear on the display. This monitor detects the pulse during inflation. Inflation stops automatically and the measurement is completed. As the cuff deflates, decreasing numbers appear on the ...

Instruction Manual
Page 29
...to turn off . Follow the instructions of your physician. When the measurement is not intended to be dangerous. NOTE: The monitor will automatically turn the monitor off after two minutes. WARNING The monitor is complete, the arm cuff completely deflates. TAKING A MEASUREMENT 3. Your blood pressure and pulse rate are displayed. 4. ... your physician for specific information about your blood pressure. WARNING DO NOT adjust medication based on measurement results from this blood pressure monitor. Press the START/STOP button to diagnose and treat High Blood Pressure.
...to turn off . Follow the instructions of your physician. When the measurement is not intended to be dangerous. NOTE: The monitor will automatically turn the monitor off after two minutes. WARNING The monitor is complete, the arm cuff completely deflates. TAKING A MEASUREMENT 3. Your blood pressure and pulse rate are displayed. 4. ... your physician for specific information about your blood pressure. WARNING DO NOT adjust medication based on measurement results from this blood pressure monitor. Press the START/STOP button to diagnose and treat High Blood Pressure.

Instruction Manual
Page 30
TAKING A MEASUREMENT SPECIAL CONDITIONS CAUTION Inflating to 40 mmHg higher than your systolic pressure is complete, the arm cuff completely deflates. When the measurement is known to be more pressure than necessary may result in bruising where the cuff is applied. NOTES: • Do not apply more than 220 mmHg, press and hold the START/STOP button until the monitor inflates 30 to a higher pressure than necessary. • The monitor will not inflate above 299 mmHg. Your blood pressure and pulse rate are displayed. 30 If your expected systolic pressure.
TAKING A MEASUREMENT SPECIAL CONDITIONS CAUTION Inflating to 40 mmHg higher than your systolic pressure is complete, the arm cuff completely deflates. When the measurement is known to be more pressure than necessary may result in bruising where the cuff is applied. NOTES: • Do not apply more than 220 mmHg, press and hold the START/STOP button until the monitor inflates 30 to a higher pressure than necessary. • The monitor will not inflate above 299 mmHg. Your blood pressure and pulse rate are displayed. 30 If your expected systolic pressure.

Instruction Manual
Page 31
The monitor automatically stores up to 60 sets of Evening Averages. NOTES: • If two sets of measurement ... taken without setting the date and time, "-:--" is deleted to save the most recent reading. USING THE MEMORY FUNCTION The monitor is designed to store the blood pressure and the pulse rate in the memory for the 10 minutes period, the average is... most recent sets of measurement values taken within 10 minutes of the most recent values. The monitor also stores 8 weeks of Morning Averages and 8 weeks of measurement values (blood pressure and pulse rate). AVERAGING FUNCTION The...
The monitor automatically stores up to 60 sets of Evening Averages. NOTES: • If two sets of measurement ... taken without setting the date and time, "-:--" is deleted to save the most recent reading. USING THE MEMORY FUNCTION The monitor is designed to store the blood pressure and the pulse rate in the memory for the 10 minutes period, the average is... most recent sets of measurement values taken within 10 minutes of the most recent values. The monitor also stores 8 weeks of Morning Averages and 8 weeks of measurement values (blood pressure and pulse rate). AVERAGING FUNCTION The...

Instruction Manual
Page 33
USING THE MEMORY FUNCTION MORNING AND EVENING AVERAGES The monitor calculates and displays a weekly average for measurements taken in the morning ( ) and evening ( ). The monitor stores 8 weeks of Morning Averages and 8 weeks of Evening Averages. Measurement times must be between : 7:00 PM and 1:59 AM. 33 NOTE: The week begins Sunday at 4:00 AM MORNING AVERAGES Morning averages are based on the first reading. EVENING AVERAGES Evening averages are based on the last reading. Measurement times must be between : 4:00 AM and 9:59 AM.
USING THE MEMORY FUNCTION MORNING AND EVENING AVERAGES The monitor calculates and displays a weekly average for measurements taken in the morning ( ) and evening ( ). The monitor stores 8 weeks of Morning Averages and 8 weeks of Evening Averages. Measurement times must be between : 7:00 PM and 1:59 AM. 33 NOTE: The week begins Sunday at 4:00 AM MORNING AVERAGES Morning averages are based on the first reading. EVENING AVERAGES Evening averages are based on the last reading. Measurement times must be between : 4:00 AM and 9:59 AM.

Instruction Manual
Page 34
With each press of the Up ( ) button, the values are displayed from 7 week ago to the recent. Press the Down ( ) button to turn the monitor off. 34 The average for the current week "THIS WEEK" appears on the display. 2. Press the START/STOP button to display the previous weeks. NOTE: ...
With each press of the Up ( ) button, the values are displayed from 7 week ago to the recent. Press the Down ( ) button to turn the monitor off. 34 The average for the current week "THIS WEEK" appears on the display. 2. Press the START/STOP button to display the previous weeks. NOTE: ...


