
Instruction Manual
Page 1
INSTRUCTION MANUAL 7 series Blood Pressure Monitor with ComFitTM Cuff Model BP760 ESPAÑOL ENGLISH
INSTRUCTION MANUAL 7 series Blood Pressure Monitor with ComFitTM Cuff Model BP760 ESPAÑOL ENGLISH

Instruction Manual
Page 2
TABLE OF CONTENTS Before Using the Monitor Introduction 4 Safety Information 5 Operating the Device 5 Risk of Electrical Shock 7 Care and Maintenance 7 Before Taking a Measurement 8 Operating Instructions Know Your Unit 9 Unit Display 11 Display Symbols 12 Irregular Heartbeat Symbol 12 Movement Error Symbol 12 Morning Hypertension Symbol 13 Heartbeat Symbol 14 Average Value Symbol 14 Morning Average Symbol 14 Evening Average Symbol 14 Cuff Wrap Guide Symbol 14 Using the AC Adapter 15 Battery Installation 17 Setting the Date and Time 19 Applying the Arm Cuff 23 2
TABLE OF CONTENTS Before Using the Monitor Introduction 4 Safety Information 5 Operating the Device 5 Risk of Electrical Shock 7 Care and Maintenance 7 Before Taking a Measurement 8 Operating Instructions Know Your Unit 9 Unit Display 11 Display Symbols 12 Irregular Heartbeat Symbol 12 Movement Error Symbol 12 Morning Hypertension Symbol 13 Heartbeat Symbol 14 Average Value Symbol 14 Morning Average Symbol 14 Evening Average Symbol 14 Cuff Wrap Guide Symbol 14 Using the AC Adapter 15 Battery Installation 17 Setting the Date and Time 19 Applying the Arm Cuff 23 2

Instruction Manual
Page 3
TABLE OF CONTENTS Taking a Measurement 27 Cuff Wrap Guide 27 Special Conditions 30 Using the Memory Function 31 Averaging Function 31 To Display the Measurement Values 32 Morning and Evening Averages 33 Morning Averages 33 Evening Averages 33 To Display Morning and Evening Averages 34 Display Combinations 35 To Delete All Values Stored in the Memory 36 Care and Maintenance Care and Maintenance 37 Error Indicators and Troubleshooting Tips 39 FCC Statement 41 Limited Warranties 42 Specifications 43 3
TABLE OF CONTENTS Taking a Measurement 27 Cuff Wrap Guide 27 Special Conditions 30 Using the Memory Function 31 Averaging Function 31 To Display the Measurement Values 32 Morning and Evening Averages 33 Morning Averages 33 Evening Averages 33 To Display Morning and Evening Averages 34 Display Combinations 35 To Delete All Values Stored in the Memory 36 Care and Maintenance Care and Maintenance 37 Error Indicators and Troubleshooting Tips 39 FCC Statement 41 Limited Warranties 42 Specifications 43 3
Instruction Manual
Page 4
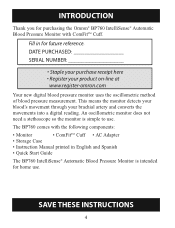
...; Storage Case • Instruction Manual printed in for future reference. An oscillometric monitor does not need a stethoscope so the monitor is intended for purchasing the Omron® BP760 IntelliSense® Automatic Blood Pressure Monitor with ComFitTM Cuff. This means the monitor detects your blood's movement through your product on-line at www.register...
...; Storage Case • Instruction Manual printed in for future reference. An oscillometric monitor does not need a stethoscope so the monitor is intended for purchasing the Omron® BP760 IntelliSense® Automatic Blood Pressure Monitor with ComFitTM Cuff. This means the monitor detects your blood's movement through your product on-line at www.register...

Instruction Manual
Page 6
...other types of the instruction manual if your systolic pressure is known to be more than necessary may result in bruising where the cuff is applied. This may cause environmental pollution. Do not use with this device on infants or persons who cannot express their intentions. ...Use only Omron authorized parts and accessories. It may damage the unit. Use only 1.5V alkaline batteries with the device may result in the adult population...
...other types of the instruction manual if your systolic pressure is known to be more than necessary may result in bruising where the cuff is applied. This may cause environmental pollution. Do not use with this device on infants or persons who cannot express their intentions. ...Use only Omron authorized parts and accessories. It may damage the unit. Use only 1.5V alkaline batteries with the device may result in the adult population...

Instruction Manual
Page 8
... readings for consistency. 8 Try to measure your blood pressure at about the same time each day for your feet flat on a table so that the cuff is at least 15 minutes prior to taking a measurement. Wait 2-3 minutes between measurements. Stress raises blood pressure. Avoid taking the blood pressure measurement. You need...
... readings for consistency. 8 Try to measure your blood pressure at about the same time each day for your feet flat on a table so that the cuff is at least 15 minutes prior to taking a measurement. Wait 2-3 minutes between measurements. Stress raises blood pressure. Avoid taking the blood pressure measurement. You need...

Instruction Manual
Page 10
KNOW YOUR UNIT Components: Air Tube Housing Cord Air Plug (Connects to Air Jack) Arm Cuff AC Adapter INSTRUCTION MANUAL 7 series Blood Pressure Monitor with ComFitTM Cuff Model BP760 ESPAÑOL ENGLISH Storage Case Instruction Manual Quick Start Guide 10
KNOW YOUR UNIT Components: Air Tube Housing Cord Air Plug (Connects to Air Jack) Arm Cuff AC Adapter INSTRUCTION MANUAL 7 series Blood Pressure Monitor with ComFitTM Cuff Model BP760 ESPAÑOL ENGLISH Storage Case Instruction Manual Quick Start Guide 10

Instruction Manual
Page 12
... measurement, the Irregular Heartbeat Symbol ( ) will appear on the display with your measurement results, we Blood recommend you move your doctor. Please remove the arm cuff, and wait 2-3 minutes. DISPLAY SYMBOLS IRREGULAR HEARTBEAT SYMBOL ( ) When the monitor detects an irregular rhythm two or more than the Blood average rhythm detected while...
... measurement, the Irregular Heartbeat Symbol ( ) will appear on the display with your measurement results, we Blood recommend you move your doctor. Please remove the arm cuff, and wait 2-3 minutes. DISPLAY SYMBOLS IRREGULAR HEARTBEAT SYMBOL ( ) When the monitor detects an irregular rhythm two or more than the Blood average rhythm detected while...

Instruction Manual
Page 14
... ) The Evening Average symbol is displayed while taking a measurement or using the memory function. The Heartbeat Symbol flashes at every heartbeat. CUFF WRAP GUIDE SYMBOL( / ) When the cuff is applied correctly, ( ) is displayed when viewing Evening Averages using the Memory Function. DISPLAY SYMBOLS HEARTBEAT SYMBOL ( ) TAKING A ...Function. MORNING AVERAGE SYMBOL ( ) The Morning Average symbol is displayed when you press the memory button. If the cuff is not applied correctly, ( ) is displayed. 14 The most recent average reading appears on the display during the measurement.
... ) The Evening Average symbol is displayed while taking a measurement or using the memory function. The Heartbeat Symbol flashes at every heartbeat. CUFF WRAP GUIDE SYMBOL( / ) When the cuff is applied correctly, ( ) is displayed when viewing Evening Averages using the Memory Function. DISPLAY SYMBOLS HEARTBEAT SYMBOL ( ) TAKING A ...Function. MORNING AVERAGE SYMBOL ( ) The Morning Average symbol is displayed when you press the memory button. If the cuff is not applied correctly, ( ) is displayed. 14 The most recent average reading appears on the display during the measurement.

Instruction Manual
Page 23
CAUTION This device is securely inserted in the main unit. 2. Remove tight-fitting clothing from your upper left arm. 23 APPLYING THE CUFF ON THE LEFT ARM 1. APPLYING THE ARM CUFF CAUTION Read all of the information in the instruction manual and any other literature in the adult population. Make sure the air plug is intended for use this device on infants or persons who cannot express their intentions. Do not use in measuring blood pressure and pulse rate in the box before operating the unit.
CAUTION This device is securely inserted in the main unit. 2. Remove tight-fitting clothing from your upper left arm. 23 APPLYING THE CUFF ON THE LEFT ARM 1. APPLYING THE ARM CUFF CAUTION Read all of the information in the instruction manual and any other literature in the adult population. Make sure the air plug is intended for use this device on infants or persons who cannot express their intentions. Do not use in measuring blood pressure and pulse rate in the box before operating the unit.

Instruction Manual
Page 24
Hold the thumb grip on the cuff securely with your right hand. Sit on a table so the cuff is level with your left arm on a chair with your feet flat on the floor. Place your left hand upward. 24 Thumb Grip Cloth Fastener 5. Turn the palm of your heart. 4. APPLYING THE ARM CUFF 3.
Hold the thumb grip on the cuff securely with your right hand. Sit on a table so the cuff is level with your left arm on a chair with your feet flat on the floor. Place your left hand upward. 24 Thumb Grip Cloth Fastener 5. Turn the palm of your heart. 4. APPLYING THE ARM CUFF 3.

Instruction Manual
Page 25
The air tube runs down the inside of the cuff should be approximately 1/2" above your arm using the cloth fastener. 25 Apply the cuff to your left upper arm so the blue stripe is on the inside of your middle finger. Blue Stripe 1/2 inch (1 - 2 cm) Air Tube 7. Wrap the cuff firmly in place around your elbow. The bottom of your arm and aligned with your arm. APPLYING THE ARM CUFF 6.
The air tube runs down the inside of the cuff should be approximately 1/2" above your arm using the cloth fastener. 25 Apply the cuff to your left upper arm so the blue stripe is on the inside of your middle finger. Blue Stripe 1/2 inch (1 - 2 cm) Air Tube 7. Wrap the cuff firmly in place around your elbow. The bottom of your arm and aligned with your arm. APPLYING THE ARM CUFF 6.

Instruction Manual
Page 26
Apply the cuff to your right upper arm so the thumb grip is centered on the air tube. Thumb Grip NOTE: Be careful not to the cuff. 26 APPLYING THE ARM CUFF APPLYING THE CUFF ON THE RIGHT ARM When taking a measurement using the right arm use this instruction for Step 6 on page 25. This will restrict the flow of air to rest your arm on the inside of the cuff should be approximately 1/2'' above your inner arm. The bottom of your elbow.
Apply the cuff to your right upper arm so the thumb grip is centered on the air tube. Thumb Grip NOTE: Be careful not to the cuff. 26 APPLYING THE ARM CUFF APPLYING THE CUFF ON THE RIGHT ARM When taking a measurement using the right arm use this instruction for Step 6 on page 25. This will restrict the flow of air to rest your arm on the inside of the cuff should be approximately 1/2'' above your inner arm. The bottom of your elbow.

Instruction Manual
Page 27
...the device only as intended. Do not use the device for specific information about your physician or licensed healthcare provider. If the cuff is not applied correctly, is displayed, refer to 30 mmHg higher than the initial inflation and restarts the measurement. If is ...displayed. WARNING Contact your physician for any other purpose. CUFF WRAP GUIDE This monitor checks whether the arm cuff is displayed while taking a measurement or using measured results may be dangerous. TAKING A MEASUREMENT The monitor ...
...the device only as intended. Do not use the device for specific information about your physician or licensed healthcare provider. If the cuff is not applied correctly, is displayed, refer to 30 mmHg higher than the initial inflation and restarts the measurement. If is ...displayed. WARNING Contact your physician for any other purpose. CUFF WRAP GUIDE This monitor checks whether the arm cuff is displayed while taking a measurement or using measured results may be dangerous. TAKING A MEASUREMENT The monitor ...

Instruction Manual
Page 28
... appear on the display. Do not move your ideal inflation level. As the cuff deflates, decreasing numbers appear on the display. TAKING A MEASUREMENT 1. The cuff starts to inflate automatically. The Heartbeat Symbol ( ) flashes at every heartbeat. 28 As the cuff inflates, the monitor automatically determines your arm and remain still until the entire...
... appear on the display. Do not move your ideal inflation level. As the cuff deflates, decreasing numbers appear on the display. TAKING A MEASUREMENT 1. The cuff starts to inflate automatically. The Heartbeat Symbol ( ) flashes at every heartbeat. 28 As the cuff inflates, the monitor automatically determines your arm and remain still until the entire...

Instruction Manual
Page 29
... two minutes. Press the START/STOP button to be dangerous. Only a physician is not intended to turn off . When the measurement is complete, the arm cuff completely deflates.
... two minutes. Press the START/STOP button to be dangerous. Only a physician is not intended to turn off . When the measurement is complete, the arm cuff completely deflates.

Instruction Manual
Page 30
If your expected systolic pressure. When the measurement is applied. Your blood pressure and pulse rate are displayed. 30 TAKING A MEASUREMENT SPECIAL CONDITIONS CAUTION Inflating to a higher pressure than your systolic pressure is known to 40 mmHg higher than necessary may result in bruising where the cuff is complete, the arm cuff completely deflates. NOTES: • Do not apply more than 220 mmHg, press and hold the START/STOP button until the monitor inflates 30 to be more pressure than necessary. • The monitor will not inflate above 299 mmHg.
If your expected systolic pressure. When the measurement is applied. Your blood pressure and pulse rate are displayed. 30 TAKING A MEASUREMENT SPECIAL CONDITIONS CAUTION Inflating to a higher pressure than your systolic pressure is known to 40 mmHg higher than necessary may result in bruising where the cuff is complete, the arm cuff completely deflates. NOTES: • Do not apply more than 220 mmHg, press and hold the START/STOP button until the monitor inflates 30 to be more pressure than necessary. • The monitor will not inflate above 299 mmHg.

Instruction Manual
Page 37
... placed under the main unit so that it does not damage the display. Do not forcefully bend the arm cuff or air tube. CAUTION Do not subject the monitor to clean the cuff. Do not use . Do not attempt to strong shocks, such as dropping the unit on the floor. Clean the...
... placed under the main unit so that it does not damage the display. Do not forcefully bend the arm cuff or air tube. CAUTION Do not subject the monitor to clean the cuff. Do not use . Do not attempt to strong shocks, such as dropping the unit on the floor. Clean the...

Instruction Manual
Page 39
...Movement during measurement. Refer to "Taking a Measurement". Apply the arm cuff correctly. Air is not applied correctly. Replace the cuff with the arm cuff. If "E2" appears repeatedly, inflate the cuff manually until it is interfering with the new one. Contact Customer ...talk during measurement. Refer to "Applying the Arm Cuff". Clothing is 30 to "Applying the Arm Cuff". Refer to "Battery Installation". 39 Cuff over inflated. Remove any clothing interfering with the arm cuff. ERROR INDICATORS AND TROUBLESHOOTING TIPS ERROR INDICATORS SYMBOL ...
...Movement during measurement. Refer to "Taking a Measurement". Apply the arm cuff correctly. Air is not applied correctly. Replace the cuff with the arm cuff. If "E2" appears repeatedly, inflate the cuff manually until it is interfering with the new one. Contact Customer ...talk during measurement. Refer to "Applying the Arm Cuff". Clothing is 30 to "Applying the Arm Cuff". Refer to "Battery Installation". 39 Cuff over inflated. Remove any clothing interfering with the arm cuff. ERROR INDICATORS AND TROUBLESHOOTING TIPS ERROR INDICATORS SYMBOL ...

Instruction Manual
Page 40
Many factors including stress, time of the battery polarities. Measurement values appear too high or too low. Replace all four batteries with new ones. Blood pressure varies constantly. No display appears on the unit. Review the sections "Before Taking a Measurement" and "Taking a Measurement." 40 Check the battery installation for proper placement of day, and how you wrap the cuff, may affect your blood pressure. ERROR INDICATORS AND TROUBLESHOOTING TIPS TROUBLESHOOTING TIPS PROBLEM CAUSES AND SOLUTIONS No power.
Many factors including stress, time of the battery polarities. Measurement values appear too high or too low. Replace all four batteries with new ones. Blood pressure varies constantly. No display appears on the unit. Review the sections "Before Taking a Measurement" and "Taking a Measurement." 40 Check the battery installation for proper placement of day, and how you wrap the cuff, may affect your blood pressure. ERROR INDICATORS AND TROUBLESHOOTING TIPS TROUBLESHOOTING TIPS PROBLEM CAUSES AND SOLUTIONS No power.

