
Instruction Manual
Page 2
TABLE OF CONTENTS Before Using the Monitor Introduction 4 Safety Information 5 Operating the Device 5 Risk of Electrical Shock 7 Care and Maintenance 7 Before Taking a Measurement 8 Operating Instructions Know Your Unit 9 Unit Display 11 Display Symbols 12 Irregular Heartbeat Symbol 12 Movement Error Symbol 12 Morning Hypertension Symbol 13 Heartbeat Symbol 14 Average Value Symbol 14 Morning Average Symbol 14 Evening Average Symbol 14 Cuff Wrap Guide Symbol 14 Using the AC Adapter 15 Battery Installation 17 Setting the Date and Time 19 Applying the Arm Cuff 23 2
TABLE OF CONTENTS Before Using the Monitor Introduction 4 Safety Information 5 Operating the Device 5 Risk of Electrical Shock 7 Care and Maintenance 7 Before Taking a Measurement 8 Operating Instructions Know Your Unit 9 Unit Display 11 Display Symbols 12 Irregular Heartbeat Symbol 12 Movement Error Symbol 12 Morning Hypertension Symbol 13 Heartbeat Symbol 14 Average Value Symbol 14 Morning Average Symbol 14 Evening Average Symbol 14 Cuff Wrap Guide Symbol 14 Using the AC Adapter 15 Battery Installation 17 Setting the Date and Time 19 Applying the Arm Cuff 23 2

Instruction Manual
Page 4
... with ComFitTM Cuff. Before Using the Monitor INTRODUCTION Thank you for purchasing the Omron® BP760 IntelliSense® Automatic Blood Pressure Monitor with the following components: • Monitor • ComFitTM Cuff • AC Adapter • Storage Case • Instruction Manual printed in for home use . SAVE THESE INSTRUCTIONS 4 An oscillometric monitor does not need...
... with ComFitTM Cuff. Before Using the Monitor INTRODUCTION Thank you for purchasing the Omron® BP760 IntelliSense® Automatic Blood Pressure Monitor with the following components: • Monitor • ComFitTM Cuff • AC Adapter • Storage Case • Instruction Manual printed in for home use . SAVE THESE INSTRUCTIONS 4 An oscillometric monitor does not need...

Instruction Manual
Page 9
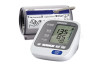
Operating Instructions KNOW YOUR UNIT Main Unit: Display SET Button Up/Down ( / ) Buttons Morning/Evening Average ( ) Button Memory ( ) Button Start/Stop Button Battery Compartment Air Jack AC Adapter Jack 9
Operating Instructions KNOW YOUR UNIT Main Unit: Display SET Button Up/Down ( / ) Buttons Morning/Evening Average ( ) Button Memory ( ) Button Start/Stop Button Battery Compartment Air Jack AC Adapter Jack 9

Instruction Manual
Page 10
KNOW YOUR UNIT Components: Air Tube Housing Cord Air Plug (Connects to Air Jack) Arm Cuff AC Adapter INSTRUCTION MANUAL 7 series Blood Pressure Monitor with ComFitTM Cuff Model BP760 ESPAÑOL ENGLISH Storage Case Instruction Manual Quick Start Guide 10
KNOW YOUR UNIT Components: Air Tube Housing Cord Air Plug (Connects to Air Jack) Arm Cuff AC Adapter INSTRUCTION MANUAL 7 series Blood Pressure Monitor with ComFitTM Cuff Model BP760 ESPAÑOL ENGLISH Storage Case Instruction Manual Quick Start Guide 10

Instruction Manual
Page 15
... OF FIRE OR ELECTRIC SHOCK, CAREFULLY FOLLOW THESE INSTRUCTIONS. Parts and accessories not approved for use an attachment plug adapter of the proper configuration for the power outlet. The power unit (AC Adapter) is intended to be deleted. If no batteries are installed, you install the batteries even if the... oriented in the U.S.A., use with this monitor. • We recommend you may damage the unit. 15 NOTES: • Use only the authorized Omron AC Adapter that came with the device may need to a power supply not in a vertical or floor mount position. CAUTION Use only...
... OF FIRE OR ELECTRIC SHOCK, CAREFULLY FOLLOW THESE INSTRUCTIONS. Parts and accessories not approved for use an attachment plug adapter of the proper configuration for the power outlet. The power unit (AC Adapter) is intended to be deleted. If no batteries are installed, you install the batteries even if the... oriented in the U.S.A., use with this monitor. • We recommend you may damage the unit. 15 NOTES: • Use only the authorized Omron AC Adapter that came with the device may need to a power supply not in a vertical or floor mount position. CAUTION Use only...

Instruction Manual
Page 16
Housing Cord TO DISCONNECT THE AC ADAPTER ① Hold the Housing to remove the AC Adapter from the electrical outlet. ② Remove the AC Adapter plug from the monitor. Plug the device into a 120V AC outlet (60 cycles). CAUTION Do not overload power outlets. USING THE AC ADAPTER TO CONNECT THE AC ADAPTER ① Insert the AC Adapter Plug into the AC Adapter Jack on the back side of the monitor as illustrated. ② Plug the AC Adapter into the appropriate voltage outlet. 16 WARNING Do not plug or unplug the power cord into the electrical outlet with wet hands.
Housing Cord TO DISCONNECT THE AC ADAPTER ① Hold the Housing to remove the AC Adapter from the electrical outlet. ② Remove the AC Adapter plug from the monitor. Plug the device into a 120V AC outlet (60 cycles). CAUTION Do not overload power outlets. USING THE AC ADAPTER TO CONNECT THE AC ADAPTER ① Insert the AC Adapter Plug into the AC Adapter Jack on the back side of the monitor as illustrated. ② Plug the AC Adapter into the appropriate voltage outlet. 16 WARNING Do not plug or unplug the power cord into the electrical outlet with wet hands.

Instruction Manual
Page 37
...attempt to strong shocks, such as dropping the unit on the floor. CAUTION Do not subject the monitor to clean the cuff. Make sure the AC adapter is placed under the main unit so that it does not damage the display. CAUTION Do not submerge the device or any abrasive or volatile...sunlight. CAUTION Store the device and the components in water. Always replace all the batteries with a soft dry cloth. Avoid kinking or sharply bending the AC Adapter cord. Do not use . Remove the batteries if the unit will not be used for three months or longer. Care and Maintenance CARE AND MAINTENANCE...
...attempt to strong shocks, such as dropping the unit on the floor. CAUTION Do not subject the monitor to clean the cuff. Make sure the AC adapter is placed under the main unit so that it does not damage the display. CAUTION Do not submerge the device or any abrasive or volatile...sunlight. CAUTION Store the device and the components in water. Always replace all the batteries with a soft dry cloth. Avoid kinking or sharply bending the AC Adapter cord. Do not use . Remove the batteries if the unit will not be used for three months or longer. Care and Maintenance CARE AND MAINTENANCE...

Instruction Manual
Page 43
SPECIFICATIONS Model: BP760 (HEM-7220-Z) Display: LCD Digital Display Measurement Range: Pressure: 0 to 299 mmHg, Pulse: 40 to change without notice. 43 Accuracy/Calibration: Pressure: ±3mmHg or 2% ... reading Inflation: Automatic by electric pump Deflation: Automatic pressure release valve Rapid Air Release: Automatic exhaust valve Measurement Method: Oscillometric method Power Source: 120V 60Hz AC adapter or 4 "AA" batteries Battery Life: Approx. 500 uses when used 6 times a day with 4 new alkaline batteries Operating Temperature 50ºF to 104ºF (10º...
SPECIFICATIONS Model: BP760 (HEM-7220-Z) Display: LCD Digital Display Measurement Range: Pressure: 0 to 299 mmHg, Pulse: 40 to change without notice. 43 Accuracy/Calibration: Pressure: ±3mmHg or 2% ... reading Inflation: Automatic by electric pump Deflation: Automatic pressure release valve Rapid Air Release: Automatic exhaust valve Measurement Method: Oscillometric method Power Source: 120V 60Hz AC adapter or 4 "AA" batteries Battery Life: Approx. 500 uses when used 6 times a day with 4 new alkaline batteries Operating Temperature 50ºF to 104ºF (10º...