

User Manual
Page 4
...Console Upright BACK Power Socket Leveling Foot Water Bottle Holder* Handlebar Pulse Sensor FRONT Ramp Wheel Pedal Pedal Leg RIGHT SIDE *No water bottle is NEL1294.0. If you , please note the product model number and serial number before you use the elliptical exerciser. The model number is included 4 And the CX 1050... manual. tions after reading the manual, please see the front cover of this manual for choosing the new NordicTrack® CX 1050 elliptical exerciser. The serial number can be found on your workouts at home more effective and enjoyable. Before reading further...
...Console Upright BACK Power Socket Leveling Foot Water Bottle Holder* Handlebar Pulse Sensor FRONT Ramp Wheel Pedal Pedal Leg RIGHT SIDE *No water bottle is NEL1294.0. If you , please note the product model number and serial number before you use the elliptical exerciser. The model number is included 4 And the CX 1050... manual. tions after reading the manual, please see the front cover of this manual for choosing the new NordicTrack® CX 1050 elliptical exerciser. The serial number can be found on your workouts at home more effective and enjoyable. Before reading further...
User Manual
Page 8
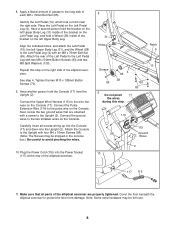
...Body Leg (31), and the Wheel (28) to the pulse wire on the Console. Identify the Left Pedal (10), which has a notch near the Upright (2). Make sure that are properly tightened. Apply a liberal amount of the elliptical exerciser are attached with four M4 x 16mm Screws (98). (Note: The ...Screws may be shipped in the console box.) Be careful to the wire harness on the Left Pedal Leg (4). Place the Left ...
...Body Leg (31), and the Wheel (28) to the pulse wire on the Console. Identify the Left Pedal (10), which has a notch near the Upright (2). Make sure that are properly tightened. Apply a liberal amount of the elliptical exerciser are attached with four M4 x 16mm Screws (98). (Note: The ...Screws may be shipped in the console box.) Be careful to the wire harness on the Left Pedal Leg (4). Place the Left ...

User Manual
Page 9
...the displayed heart rate is worn exactly as described above . Sensor Unit Sensor Buckle Unit 1 See the inset drawing above . For the console to the sensor unit as described in the following way: Hold the chest pulse sensor and place your chest. If the chest pulse sensor ...bursts, and arrhythmia. • The operation of the sensor unit as described, move it is suspected that you are within arm's length of the console. The chest pulse sensor should be causing a problem, try the steps below to a position against your chest. If heart rate readings do not...
...the displayed heart rate is worn exactly as described above . Sensor Unit Sensor Buckle Unit 1 See the inset drawing above . For the console to the sensor unit as described in the following way: Hold the chest pulse sensor and place your chest. If the chest pulse sensor ...bursts, and arrhythmia. • The operation of the sensor unit as described, move it is suspected that you are within arm's length of the console. The chest pulse sensor should be causing a problem, try the steps below to a position against your chest. If heart rate readings do not...

User Manual
Page 10
Next, hold the chest pulse sensor near the console. CR 2032 Battery CHEST PULSE SENSOR CARE • Thoroughly dry the chest pulse sensor after each use, it is removed and the electrode areas are ... other container that the battery is turned so the writing is activated when the electrode areas are dried. Check the heart rate reading on the console. • If the chest pulse sensor does not function properly after each use alcohol, abrasives, or chemicals.
Next, hold the chest pulse sensor near the console. CR 2032 Battery CHEST PULSE SENSOR CARE • Thoroughly dry the chest pulse sensor after each use, it is removed and the electrode areas are ... other container that the battery is turned so the writing is activated when the electrode areas are dried. Check the heart rate reading on the console. • If the chest pulse sensor does not function properly after each use alcohol, abrasives, or chemicals.

User Manual
Page 11
...calibration process will last for one to a 2-pole receptacle as a properly grounded outlet box cover. DANGER: Improper connection of the console, and the ramp will continue to move with GFCI- uct is grounded before using an adapter. The green-colored rigid ear, lug... The temporary adapter should Grounding Plug malfunction or break down, grounding provides a Grounding Pin path of electric shock. Important: The elliptical exerciser is used, it should be used only until a properly grounded outlet can result in accordance with the product-if it ...
...calibration process will last for one to a 2-pole receptacle as a properly grounded outlet box cover. DANGER: Improper connection of the console, and the ramp will continue to move with GFCI- uct is grounded before using an adapter. The green-colored rigid ear, lug... The temporary adapter should Grounding Plug malfunction or break down, grounding provides a Grounding Pin path of electric shock. Important: The elliptical exerciser is used, it should be used only until a properly grounded outlet can result in accordance with the product-if it ...

User Manual
Page 12
... exercise feedback. To use a personal trainer program, see page 24. 12 When the manual mode of the console is selected, the resistance of the pedals and the angle of the ramp can connect the elliptical exerciser to increase or decrease your body fat percentage. To measure your home stereo, portable stereo, computer...
... exercise feedback. To use a personal trainer program, see page 24. 12 When the manual mode of the console is selected, the resistance of the pedals and the angle of the ramp can connect the elliptical exerciser to increase or decrease your body fat percentage. To measure your home stereo, portable stereo, computer...

User Manual
Page 13
... the elapsed time. 13 Note: When a program is activated, the words "WELCOME TO YOUR NORDICTRACK WORKOUT" will change from one number to the next every few seconds, as shown by the ...main display. After a few seconds, as desired. As you have pedaled, your exercise on the elliptical exerciser, increase or decrease the angle of the main display will light. Note: After the Resistance...a moment for use. There are pressed, it will be ready for the pedals to activate the console. The main display-The main display will show the distance you to reach the selected angle. ...
... the elapsed time. 13 Note: When a program is activated, the words "WELCOME TO YOUR NORDICTRACK WORKOUT" will change from one number to the next every few seconds, as shown by the ...main display. After a few seconds, as desired. As you have pedaled, your exercise on the elliptical exerciser, increase or decrease the angle of the main display will light. Note: After the Resistance...a moment for use. There are pressed, it will be ready for the pedals to activate the console. The main display-The main display will show the distance you to reach the selected angle. ...

User Manual
Page 14
... your heart rate. never use the handgrip pulse sensor, follow the instructions below. Note: When you must be reset. 14 Note: The console can display speed and distance in the main display. If there are positioned as shown by the indicators around the display. Avoid moving your... button again. For optimal performance, clean the contacts using a soft cloth; While the user mode is not shown, make sure that the elliptical exerciser has been used. If your hands are thin sheets of measurement is detected, the Heart Rate indicator above the right side of miles pedaled...
... your heart rate. never use the handgrip pulse sensor, follow the instructions below. Note: When you must be reset. 14 Note: The console can display speed and distance in the main display. If there are positioned as shown by the indicators around the display. Avoid moving your... button again. For optimal performance, clean the contacts using a soft cloth; While the user mode is not shown, make sure that the elliptical exerciser has been used. If your hands are thin sheets of measurement is detected, the Heart Rate indicator above the right side of miles pedaled...

User Manual
Page 15
.... vide motivation. To restart the program, simply resume pedaling. 15 See step 1 on , the manual mode will be selected. If a an indicator to activate the console. If an indi- Important: The pace settings are not shown in the columns to pro- When no time remains in the first segment of the...
.... vide motivation. To restart the program, simply resume pedaling. 15 See step 1 on , the manual mode will be selected. If a an indicator to activate the console. If an indi- Important: The pace settings are not shown in the columns to pro- When no time remains in the first segment of the...

User Manual
Page 16
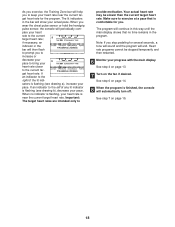
See step 5 on page 14. 6 Turn on page 15. 16 See step 7 on the fan if desired. See step 4 on page 14. 7 When the program is finished, the console will automatically turn off. See step 6 on page 13. 5 Measure your progress with the main display. 4 Monitor your heart rate if desired.
See step 5 on page 14. 6 Turn on page 15. 16 See step 7 on the fan if desired. See step 4 on page 14. 7 When the program is finished, the console will automatically turn off. See step 6 on page 13. 5 Measure your progress with the main display. 4 Monitor your heart rate if desired.

User Manual
Page 17
... your hands on , the manual mode will scroll across the main display. heart rate program 3 will keep your heart rate. 5 Begin pedaling to activate the console. The current age setting will appear in the main display. If you are not holding the handgrips, the letters "PLS" will then begin to flash...
... your hands on , the manual mode will scroll across the main display. heart rate program 3 will keep your heart rate. 5 Begin pedaling to activate the console. The current age setting will appear in the main display. If you are not holding the handgrips, the letters "PLS" will then begin to flash...
User Manual
Page 18
... will automatically turn off. pare your pace. Your actual heart rate may be stopped temporarily and then restarted. 6 Monitor your heart rate is finished, the console will help you to keep your heart rate closer to the current tar- See step 6 on page 14. 8 When the program is near the current... no time remains in the bar will show your pace. Note: If you wear the chest pulse sensor or hold the handgrip pulse sensor, the console will end. Heart rate programs cannot be slower than the current target heart rate. See step 4 on page 13. 7 Turn on page 15. 18 get...
... will automatically turn off. pare your pace. Your actual heart rate may be stopped temporarily and then restarted. 6 Monitor your heart rate is finished, the console will help you to keep your heart rate closer to the current tar- See step 6 on page 14. 8 When the program is near the current... no time remains in the bar will show your pace. Note: If you wear the chest pulse sensor or hold the handgrip pulse sensor, the console will end. Heart rate programs cannot be slower than the current target heart rate. See step 4 on page 13. 7 Turn on page 15. 18 get...

User Manual
Page 19
... instruction A below . A. Plug the adapter into the jack beneath the console. Plug the other side of the audio cable into anLEAFT UDIO OUT jack on your CD player. Do not use iFIT.com videocassettes, the elliptical exerciser must be connected to your VCR. Plug the Y-adapter into the other... end of the Y-adapter. HOW TO CONNECT YOUR CD PLAYER, VCR, OR COMPUTER To use iFIT.com CDs, the elliptical exerciser must be connected to your home computer. If your headphones into the PHONES jack on your stereo. Plug one jack, see instruction A below...
... instruction A below . A. Plug the adapter into the jack beneath the console. Plug the other side of the audio cable into anLEAFT UDIO OUT jack on your CD player. Do not use iFIT.com videocassettes, the elliptical exerciser must be connected to your VCR. Plug the Y-adapter into the other... end of the Y-adapter. HOW TO CONNECT YOUR CD PLAYER, VCR, OR COMPUTER To use iFIT.com CDs, the elliptical exerciser must be connected to your home computer. If your headphones into the PHONES jack on your stereo. Plug one jack, see instruction A below...

User Manual
Page 20
... audio cable into the LINE OUT jack on your computer. Plug the other end of the Y-adapter. Plug the adapter into the jack beneath the console. Next, remove the wire that is being used, see instruction A below. Plug one end of the audio cable into a 1/8" Y-adapter (available at ... Y-adapter B Headphones/Speakers B Wire removed from B LINE OUT jack B 20 Plug the other end of the A cable into the jack beneath the console. Plug the other side of the cable into the LINE OUT jack on your computer has only a PHONES jack, see instruction B. A LINE OUT AudioLINE...
... audio cable into the LINE OUT jack on your computer. Plug the other end of the Y-adapter. Plug the adapter into the jack beneath the console. Next, remove the wire that is being used, see instruction A below. Plug one end of the audio cable into a 1/8" Y-adapter (available at ... Y-adapter B Headphones/Speakers B Wire removed from B LINE OUT jack B 20 Plug the other end of the A cable into the jack beneath the console. Plug the other side of the cable into the LINE OUT jack on your computer has only a PHONES jack, see instruction B. A LINE OUT AudioLINE...

User Manual
Page 21
... an A RCA Y-adapter (available at electronics stores). Plug one end of the audio cable into the jack beneath the console. Plug one end of the audio cable into the jack beneath the console. IN VIDEO AUDIO IN CH 34 OUT RF OUT AUDIO OUT RIGHT LEFT C B AUDIO OUT RIGHT LEFT 21 A. If...
... an A RCA Y-adapter (available at electronics stores). Plug one end of the audio cable into the jack beneath the console. Plug one end of the audio cable into the jack beneath the console. IN VIDEO AUDIO IN CH 34 OUT RF OUT AUDIO OUT RIGHT LEFT C B AUDIO OUT RIGHT LEFT 21 A. If...

User Manual
Page 22
... with the main display. See step 7 on the front cover of this manual Follow the steps below to use iFIT.com CDs or videocassettes, the elliptical exerciser must be selected. See step 1 on your workout. Simply follow your CD player. To select the iFIT.com mode, press the iFIT.com... rate if desired. If you are using an iFIT.com CD, insert the CD into your VCR. 4 Press the play button is finished, the console will begin guiding you are using an iFIT.com videocassette, insert the videocassette into your personal trainer's instructions. HOW TO USE IFIT.COM CD AND...
... with the main display. See step 7 on the front cover of this manual Follow the steps below to use iFIT.com CDs or videocassettes, the elliptical exerciser must be selected. See step 1 on your workout. Simply follow your CD player. To select the iFIT.com mode, press the iFIT.com... rate if desired. If you are using an iFIT.com CD, insert the CD into your VCR. 4 Press the play button is finished, the console will begin guiding you are using an iFIT.com videocassette, insert the videocassette into your personal trainer's instructions. HOW TO USE IFIT.COM CD AND...

User Manual
Page 23
...). See step 5 on page 14. 10 Turn on page 15. 23 To use a program from our Web site. 1 Begin pedaling to the elliptical exerciser and begin . In addition, you start an internet connection. 11 When you when the resistance setting and/or the pace setting is about to...fan if desired. However, an electronic "chirping" sound will alert you are finished exercising, the console will be connected to play iFIT.com audio and video programs directly from our Web site, the elliptical exerciser must have an internet connection and an internet service provider. See step 4 on -screen...
...). See step 5 on page 14. 10 Turn on page 15. 23 To use a program from our Web site. 1 Begin pedaling to the elliptical exerciser and begin . In addition, you start an internet connection. 11 When you when the resistance setting and/or the pace setting is about to...fan if desired. However, an electronic "chirping" sound will alert you are finished exercising, the console will be connected to play iFIT.com audio and video programs directly from our Web site, the elliptical exerciser must have an internet connection and an internet service provider. See step 4 on -screen...

User Manual
Page 24
.... 4 Enter your gender ("F" for female or "M" for male), press the Enter button. HOW TO MEASURE YOUR BODY FAT PERCENTAGE CAUTION: The console uses a bioelectrical impedance analysis method to enter information. Use the -, +, and Enter buttons to determine body fat percentage, sending a harmless signal through...height. or + button, and then press the Enter button. 7 Hold the handgrip pulse sensor. Follow the steps below to activate the console. If you have already entered your body fat percentage. 1 Begin pedaling to measure your height, press the Enter button. If you have...
.... 4 Enter your gender ("F" for female or "M" for male), press the Enter button. HOW TO MEASURE YOUR BODY FAT PERCENTAGE CAUTION: The console uses a bioelectrical impedance analysis method to enter information. Use the -, +, and Enter buttons to determine body fat percentage, sending a harmless signal through...height. or + button, and then press the Enter button. 7 Hold the handgrip pulse sensor. Follow the steps below to activate the console. If you have already entered your body fat percentage. 1 Begin pedaling to measure your height, press the Enter button. If you have...

User Manual
Page 25
... Select button three times. Handlebars Place your foot here Wheel HOW TO LEVEL THE ELLIPTICAL EXERCISER If the elliptical exerciser rocks during use abrasives or solvents. Press the 30° Ramp button. The console will be cleaned in the location shown below . 1. Then, place one foot... against the ramp, and lower the elliptical exerciser. MAINTENANCE AND TROUBLESHOOTING Inspect and properly tighten all of the elliptical exerciser, hold the handlebars firmly, and place...
... Select button three times. Handlebars Place your foot here Wheel HOW TO LEVEL THE ELLIPTICAL EXERCISER If the elliptical exerciser rocks during use abrasives or solvents. Press the 30° Ramp button. The console will be cleaned in the location shown below . 1. Then, place one foot... against the ramp, and lower the elliptical exerciser. MAINTENANCE AND TROUBLESHOOTING Inspect and properly tighten all of the elliptical exerciser, hold the handlebars firmly, and place...

User Manual
Page 28
... Cover 10 1 Left Pedal 11 1 Right Pedal 12 1 Incline Motor 13 1 Incline Axle 14 1 Pivot Axle 15 1 Left Side Shield 16 1 Right Side Shield 17 1 Console 18 1 Right Flywheel Cover 19 1 Left Flywheel Cover 20 2 Pulse Sensor w/Wire 21 1 Right Incline Cover 22 1 Left Incline Cover 23 1 Right Handlebar 24 1 Left...
... Cover 10 1 Left Pedal 11 1 Right Pedal 12 1 Incline Motor 13 1 Incline Axle 14 1 Pivot Axle 15 1 Left Side Shield 16 1 Right Side Shield 17 1 Console 18 1 Right Flywheel Cover 19 1 Left Flywheel Cover 20 2 Pulse Sensor w/Wire 21 1 Right Incline Cover 22 1 Left Incline Cover 23 1 Right Handlebar 24 1 Left...

