

User Manual
Page 1
...? MT ON THE WEB: www.nordictrackservice.com CAUTION Read all precautions and instructions in this manual before contacting Customer Care. www.nordictrack.com Model No. If you have questions, or if parts are damaged or missing, DO NOT CONTACT THE STORE; MT Sat. 8 a.m.-5 p.m. IMPORTANT: Please register this product (see the limited warranty...
...? MT ON THE WEB: www.nordictrackservice.com CAUTION Read all precautions and instructions in this manual before contacting Customer Care. www.nordictrack.com Model No. If you have questions, or if parts are damaged or missing, DO NOT CONTACT THE STORE; MT Sat. 8 a.m.-5 p.m. IMPORTANT: Please register this product (see the limited warranty...
User Manual
Page 2
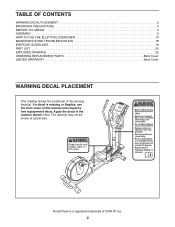
Apply the decal in the location shown. NordicTrack is missing or illegible, see the front cover of this manual and request a free replacement decal. Note: The decal(s) may not be shown at actual ... decal(s). TABLE OF CONTENTS WARNING DECAL PLACEMENT 2 IMPORTANT PRECAUTIONS 3 BEFORE YOU BEGIN 4 ASSEMBLY 5 HOW TO USE THE ELLIPTICAL EXERCISER 10 MAINTENANCE AND TROUBLESHOOTING 18 EXERCISE GUIDELINES 19 PART LIST 20 EXPLODED DRAWING 22 ORDERING REPLACEMENT PARTS Back Cover LIMITED WARRANTY Back Cover WARNING DECAL PLACEMENT This drawing shows the location(s) of ICON IP...
Apply the decal in the location shown. NordicTrack is missing or illegible, see the front cover of this manual and request a free replacement decal. Note: The decal(s) may not be shown at actual ... decal(s). TABLE OF CONTENTS WARNING DECAL PLACEMENT 2 IMPORTANT PRECAUTIONS 3 BEFORE YOU BEGIN 4 ASSEMBLY 5 HOW TO USE THE ELLIPTICAL EXERCISER 10 MAINTENANCE AND TROUBLESHOOTING 18 EXERCISE GUIDELINES 19 PART LIST 20 EXPLODED DRAWING 22 ORDERING REPLACEMENT PARTS Back Cover LIMITED WARRANTY Back Cover WARNING DECAL PLACEMENT This drawing shows the location(s) of ICON IP...

User Manual
Page 3
... and instructions in this product. 1. Before beginning any worn parts immediately. 8. This is not a medical device. It is at all parts regularly. Keep the elliptical exerciser indoors, away from the elliptical exerciser at least 3 ft. (0.9 m) of clearance in general. 12. Place the elliptical exerciser on the elliptical exerciser. Replace any exercise program, consult your back. 11...
... and instructions in this product. 1. Before beginning any worn parts immediately. 8. This is not a medical device. It is at all parts regularly. Keep the elliptical exerciser indoors, away from the elliptical exerciser at least 3 ft. (0.9 m) of clearance in general. 12. Place the elliptical exerciser on the elliptical exerciser. Replace any exercise program, consult your back. 11...
User Manual
Page 4
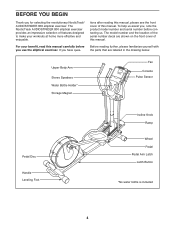
...Before reading further, please familiarize yourself with the parts that are shown on the front cover of this manual carefully before contacting us assist you for selecting the revolutionary NordicTrack® AUDIOSTRIDER 800 elliptical exerciser. If you use the elliptical exerciser. tions after reading this manual, please see... Thank you , note the product model number and serial number before you have ques- The NordicTrack AUDIOSTRIDER 800 elliptical exerciser provides an impressive selection of the serial number decal are labeled in the drawing below. To help us .
...Before reading further, please familiarize yourself with the parts that are shown on the front cover of this manual carefully before contacting us assist you for selecting the revolutionary NordicTrack® AUDIOSTRIDER 800 elliptical exerciser. If you use the elliptical exerciser. tions after reading this manual, please see... Thank you , note the product model number and serial number before you have ques- The NordicTrack AUDIOSTRIDER 800 elliptical exerciser provides an impressive selection of the serial number decal are labeled in the drawing below. To help us .
User Manual
Page 5
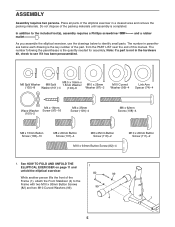
.... Do not dispose of the Frame (1), attach the Front Stabilizer (4) to identify small parts. See HOW TO FOLD AND UNFOLD THE ELLIPTICAL EXERCISER on page 11 and 1 unfold the elliptical exerciser. 82 99 While another person lifts the front of the packing materials until assembly ...included tool(s), assembly requires a Phillips screwdriver mallet . The number following the parentheses is the key number of the part, from the PART LIST near the end of the elliptical exerciser in parentheses below to the Frame with two M10 x 93mm Button Screws (82) and two M10 Curved ...
.... Do not dispose of the Frame (1), attach the Front Stabilizer (4) to identify small parts. See HOW TO FOLD AND UNFOLD THE ELLIPTICAL EXERCISER on page 11 and 1 unfold the elliptical exerciser. 82 99 While another person lifts the front of the packing materials until assembly ...included tool(s), assembly requires a Phillips screwdriver mallet . The number following the parentheses is the key number of the part, from the PART LIST near the end of the elliptical exerciser in parentheses below to the Frame with two M10 x 93mm Button Screws (82) and two M10 Curved ...
User Manual
Page 10
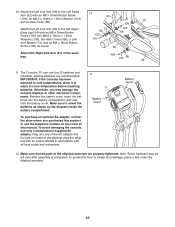
...15mm Button Screw (106) as shown by the diagram inside the battery compartment. To protect the floor or carpet from damage, place a mat under the elliptical exerciser. 10 alkaline batteries are properly tightened. To avoid damaging the console, use four D batteries (not included); Remove the battery cover, insert the ... to orient the batteries as shown. 66 74 103 110 103 66 30 Attach the Right Link Arm (31) in accordance with all parts of the elliptical; Make sure that all local codes and ordinances. 11 11 Battery Cover Battery Cover 12. Attach the Left Link Arm (30) to...
...15mm Button Screw (106) as shown by the diagram inside the battery compartment. To protect the floor or carpet from damage, place a mat under the elliptical exerciser. 10 alkaline batteries are properly tightened. To avoid damaging the console, use four D batteries (not included); Remove the battery cover, insert the ... to orient the batteries as shown. 66 74 103 110 103 66 30 Attach the Right Link Arm (31) in accordance with all parts of the elliptical; Make sure that all local codes and ordinances. 11 11 Battery Cover Battery Cover 12. Attach the Left Link Arm (30) to...
User Manual
Page 18
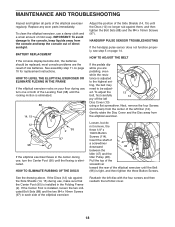
... Disc Cover (13) using a flat screwdriver. MAINTENANCE AND TROUBLESHOOTING Inspect and tighten all parts of a screwdriver downward between the 47 48 114 96 Idler (47) and the Idler Pulley (48). To clean the elliptical exerciser, use , turn the Center Foot (95) until the flexing is installed in ... pedaling, even while the resis- See the drawing above. IMPORTANT: To avoid damage to the highest set- Insert the shaft of the elliptical exerciser regularly. BATTERY REPLACEMENT If the console display become dim, the batteries should be adjust- tance is tight, and then tighten the three...
... Disc Cover (13) using a flat screwdriver. MAINTENANCE AND TROUBLESHOOTING Inspect and tighten all parts of a screwdriver downward between the 47 48 114 96 Idler (47) and the Idler Pulley (48). To clean the elliptical exerciser, use , turn the Center Foot (95) until the flexing is installed in ... pedaling, even while the resis- See the drawing above. IMPORTANT: To avoid damage to the highest set- Insert the shaft of the elliptical exerciser regularly. BATTERY REPLACEMENT If the console display become dim, the batteries should be adjust- tance is tight, and then tighten the three...
User Manual
Page 19
... week, with your everyday life. 19 These guidelines will help you exercise-never hold your training zone. A warm-up to make exercise a regular and enjoyable part of stretching. The three numbers listed above your age define your physician. Remember, the key to strengthen your cardiovascular system, you may affect the accuracy...
... week, with your everyday life. 19 These guidelines will help you exercise-never hold your training zone. A warm-up to make exercise a regular and enjoyable part of stretching. The three numbers listed above your age define your physician. Remember, the key to strengthen your cardiovascular system, you may affect the accuracy...

User Manual
Page 20
... Latch Pedal Arm Latch Spring Pedal Arm Cap Eddy Mechanism Eddy Crank Assembly Pillow Block Idler Idler Pulley Eddy Motor Reed Switch/Wire Key No. PART LIST-Model No.
... Latch Pedal Arm Latch Spring Pedal Arm Cap Eddy Mechanism Eddy Crank Assembly Pillow Block Idler Idler Pulley Eddy Motor Reed Switch/Wire Key No. PART LIST-Model No.

User Manual
Page 21
Description Key No. For information about ordering replacement parts, see the back cover of this manual. *These parts are subject to change without notice. Qty. M8 x 25mm Button Screw M10 x 20mm Button Screw M8 x 25mm Shoulder Screw M8 x 30mm Button Screw 1/4" x 19mm Button ...
Description Key No. For information about ordering replacement parts, see the back cover of this manual. *These parts are subject to change without notice. Qty. M8 x 25mm Button Screw M10 x 20mm Button Screw M8 x 25mm Shoulder Screw M8 x 30mm Button Screw 1/4" x 19mm Button ...

User Manual
Page 24
...the customerʼs responsibility. Some states do not allow limitations on how long an implied warranty lasts. ORDERING REPLACEMENT PARTS To order replacement parts, see the PART LIST and the EXPLODED DRAWING near the end of this manual) LIMITED WARRANTY IMPORTANT: You must be free from defects...to freight damage, abuse, misuse, improper or abnormal usage, or repairs not provided by an ICON authorized service center; For replacement parts shipped while the product is warranted for commercial or rental purposes or as store display models; You may also have other warranty beyond...
...the customerʼs responsibility. Some states do not allow limitations on how long an implied warranty lasts. ORDERING REPLACEMENT PARTS To order replacement parts, see the PART LIST and the EXPLODED DRAWING near the end of this manual) LIMITED WARRANTY IMPORTANT: You must be free from defects...to freight damage, abuse, misuse, improper or abnormal usage, or repairs not provided by an ICON authorized service center; For replacement parts shipped while the product is warranted for commercial or rental purposes or as store display models; You may also have other warranty beyond...


