
English Manual
Page 5
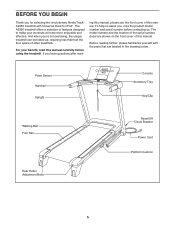
... yourself with Universal Dock for iPod®. For your workouts at home more enjoyable and effective. Pulse Sensor Handrail Upright Console Accessory Tray Key/Clip Walking Belt Foot Rail Rear Roller Adjustment Bolts Reset/Off Circuit Breaker Power Cord Platform Cushion 5 ...you ʼre not exercising, the unique treadmill can be folded up, requiring less than half the floor space of other treadmills. The A2350 treadmill offers a selection of this manual. And when you for selecting the revolutionary NordicTrack® A2350 treadmill with the parts that are shown on the...
... yourself with Universal Dock for iPod®. For your workouts at home more enjoyable and effective. Pulse Sensor Handrail Upright Console Accessory Tray Key/Clip Walking Belt Foot Rail Rear Roller Adjustment Bolts Reset/Off Circuit Breaker Power Cord Platform Cushion 5 ...you ʼre not exercising, the unique treadmill can be folded up, requiring less than half the floor space of other treadmills. The A2350 treadmill offers a selection of this manual. And when you for selecting the revolutionary NordicTrack® A2350 treadmill with the parts that are shown on the...
English Manual
Page 9
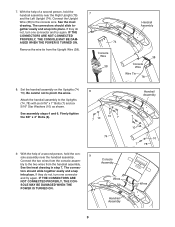
...assembly on the Uprights (74, 78). If they do not, turn one connector and try again. Remove the wire tie from the console assem- bly to the console wire. See the inset drawing in step 7. IF THE CONNECTORS ARE NOT CONNECTED PROPERLY, THE CON- Firmly tighten the 3/8" x 4"... Bolts (6). 8 7 10 10 7 74 9. tors should slide together easily and snap into place. Attach the handrail assembly to pinch the wires. Console Assembly Wires Handrail Assembly Handrail Assembly 7 10 10 7 78 Wires 9 7. See the inset drawing. With the help of a second person, hold the ...
...assembly on the Uprights (74, 78). If they do not, turn one connector and try again. Remove the wire tie from the console assem- bly to the console wire. See the inset drawing in step 7. IF THE CONNECTORS ARE NOT CONNECTED PROPERLY, THE CON- Firmly tighten the 3/8" x 4"... Bolts (6). 8 7 10 10 7 74 9. tors should slide together easily and snap into place. Attach the handrail assembly to pinch the wires. Console Assembly Wires Handrail Assembly Handrail Assembly 7 10 10 7 78 Wires 9 7. See the inset drawing. With the help of a second person, hold the ...
English Manual
Page 10
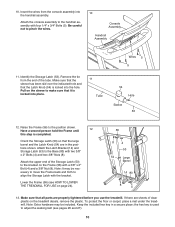
...(4) and two 3/8" Nuts (8). Make sure that the Latch Knob (54) is completed. To protect the floor or carpet, place a mat under the treadmill. Attach the console assembly to the position shown. Make sure that the sleeve has been slid over the indicated hole and that all parts are in a secure...; Orient the Storage Latch (53) so that it is used to the bracket on the treadmill decals, remove the plastic. Attach the Latch Bracket (14) and Storage Latch (53) to pinch the wires. 10 Console Assembly Handrail Assembly 11. Be careful not to the Base (83) with four 1/4" x ...
...(4) and two 3/8" Nuts (8). Make sure that the Latch Knob (54) is completed. To protect the floor or carpet, place a mat under the treadmill. Attach the console assembly to the position shown. Make sure that the sleeve has been slid over the indicated hole and that all parts are in a secure...; Orient the Storage Latch (53) so that it is used to the bracket on the treadmill decals, remove the plastic. Attach the Latch Bracket (14) and Storage Latch (53) to pinch the wires. 10 Console Assembly Handrail Assembly 11. Be careful not to the Base (83) with four 1/4" x ...

English Manual
Page 11
... wires. Attach the receiver to the plastic posts on the receiver to the indicated wire extending from the Console Back (91). 2. Make sure that the power cord is facing the Console Back. If you purchase the optional chest pulse sensor (see page 22), follow the steps below to ...install the receiver included with the two included small screws. 3. Remove the indicated #8 x 1/2" Screw (1) and the Access Door (87) from the Console Back (91).
... wires. Attach the receiver to the plastic posts on the receiver to the indicated wire extending from the Console Back (91). 2. Make sure that the power cord is facing the Console Back. If you purchase the optional chest pulse sensor (see page 22), follow the steps below to ...install the receiver included with the two included small screws. 3. Remove the indicated #8 x 1/2" Screw (1) and the Access Door (87) from the Console Back (91).
English Manual
Page 13
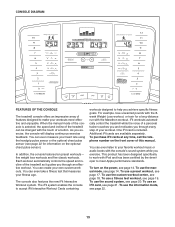
... a personal trainer coaches you and motivates you through an effective workout. To use the manual mode, see page 19. CONSOLE DIAGRAM FEATURES OF THE CONSOLE The treadmill console offers an impressive array of features designed to help you achieve specific fitness goals. When the manual mode of the... the telephone number on the power, see page 17. Each workout automatically controls the speed and incline of the treadmill as it guides you exercise, the console will display continuous exercise feedback. To use the sound system, see page 22. 13 The iFit system enables the...
... a personal trainer coaches you and motivates you through an effective workout. To use the manual mode, see page 19. CONSOLE DIAGRAM FEATURES OF THE CONSOLE The treadmill console offers an impressive array of features designed to help you achieve specific fitness goals. When the manual mode of the... the telephone number on the power, see page 17. Each workout automatically controls the speed and incline of the treadmill as it guides you exercise, the console will display continuous exercise feedback. To use the sound system, see page 22. 13 The iFit system enables the...

English Manual
Page 14
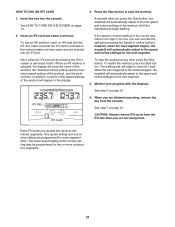
Next, locate the reset/off the demo mode. To turn off circuit breaker on the treadmill frame near the power cord. Then, insert the key into the console. if the key is selected, see THE INFORMATION MODE on page 22 to move at - For simplicity, all instructions in the ... one of clear plastic on . After a moment, the displays will change in a store. IMPORTANT: If there is used if the treadmill is in either of the treadmill. Note: The console can be used , observe the alignment of 0.5 mph. If you press a button, the speed setting will light. To start the...
Next, locate the reset/off the demo mode. To turn off circuit breaker on the treadmill frame near the power cord. Then, insert the key into the console. if the key is selected, see THE INFORMATION MODE on page 22 to move at - For simplicity, all instructions in the ... one of clear plastic on . After a moment, the displays will change in a store. IMPORTANT: If there is used if the treadmill is in either of the treadmill. Note: The console can be used , observe the alignment of 0.5 mph. If you press a button, the speed setting will light. To start the...
English Manual
Page 16
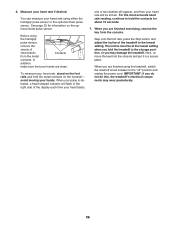
... page 22 for about 15 seconds. 7. IMPORTANT: If you are finished exercising, remove the key from the console and put it in the right side of the treadmill to hold the metal contacts on the optional chest pulse sensor. In addition, make sure that your hands. ...may damage the treadmill. avoid moving your hands are finished using the handgrip pulse sensor, remove the sheets of clear plastic Contacts from the metal contacts. 6. The incline must be shown. When you may wear prematurely. 16 Next, remove the key from the console. Measure your heart...
... page 22 for about 15 seconds. 7. IMPORTANT: If you are finished exercising, remove the key from the console and put it in the right side of the treadmill to hold the metal contacts on the optional chest pulse sensor. In addition, make sure that your hands. ...may damage the treadmill. avoid moving your hands are finished using the handgrip pulse sensor, remove the sheets of clear plastic Contacts from the metal contacts. 6. The incline must be shown. When you may wear prematurely. 16 Next, remove the key from the console. Measure your heart...
English Manual
Page 17
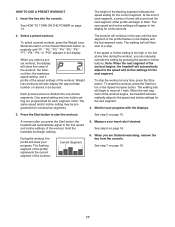
... of the profile represents the current segment of the profile flashes in the display for the next segment. When you press the Start button, the treadmill will automatically adjust to be programmed for the current segment. See step 7 on page 14. HOW TO USE A PRESET WORKOUT 1. Select a preset...workout is too high or too low at 1 mph. The workout will begin walking. If the speed or incline setting is divided into the console. Monitor your heart rate if desired. During the workout, the profile will automatically adjust to flash. Current Segment 5. To restart the workout, ...
... of the profile represents the current segment of the profile flashes in the display for the next segment. When you press the Start button, the treadmill will automatically adjust to be programmed for the current segment. See step 7 on page 14. HOW TO USE A PRESET WORKOUT 1. Select a preset...workout is too high or too low at 1 mph. The workout will begin walking. If the speed or incline setting is divided into the console. Monitor your heart rate if desired. During the workout, the profile will automatically adjust to flash. Current Segment 5. To restart the workout, ...
English Manual
Page 18
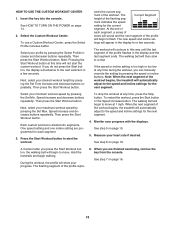
...Next, select your minimum workout speed by pressing the speed or incline buttons. If the speed or incline setting is divided into the console. Select your desired workout length by pressing the Select Profile increase and decrease buttons repeatedly. Speed increase and decrease buttons repeatedly. Then ... to the speed and incline settings for each segment, a series of tones will sound and the next segment of the workout begins, the treadmill will begin to the next selection in the display for the current segment. See step 6 on page 14. 2. The flashing segment of ...
...Next, select your minimum workout speed by pressing the speed or incline buttons. If the speed or incline setting is divided into the console. Select your desired workout length by pressing the Select Profile increase and decrease buttons repeatedly. Speed increase and decrease buttons repeatedly. Then ... to the speed and incline settings for each segment, a series of tones will sound and the next segment of the workout begins, the treadmill will begin to the next selection in the display for the current segment. See step 6 on page 14. 2. The flashing segment of ...
English Manual
Page 19
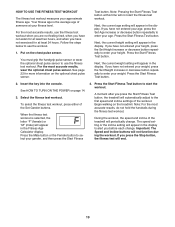
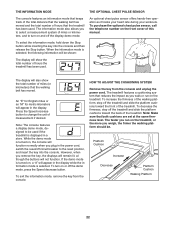
... current weight setting will appear in the display. If you before each change . See page 22 for more information on the treadmill. Insert the key into the console. Important: The Speed and Incline buttons will end. 19 To select the fitness test workout, press either of the workout. ... For the most accurate results, do not hold the handrails during the workout. During the workout, the speed and incline of the treadmill will automatically adjust to start the fitness test workout. Follow the steps below to use the fitness test workout when you are not feeling...
... current weight setting will appear in the display. If you before each change . See page 22 for more information on the treadmill. Insert the key into the console. Important: The Speed and Incline buttons will end. 19 To select the fitness test workout, press either of the workout. ... For the most accurate results, do not hold the handrails during the workout. During the workout, the speed and incline of the treadmill will automatically adjust to start the fitness test workout. Follow the steps below to use the fitness test workout when you are not feeling...
English Manual
Page 20
... iPod Connector. Plug one end into a jack on your iPod, CD player, or personal audio player. Next, press the Play button on the console. To use the Integrated Universal Dock for iPod near the speaker. To purchase an iFit Universal iPod Connector, please call the telephone number on the... audio wire into the Integrated Universal Dock for iPod, you are using a personal CD player and the CD skips, set the CD player on the console. 20 See step 7 on page 15. 6. Make sure that the iFit Universal iPod Connector is fully plugged in the Fitness Age Calculator display. 5....
... iPod Connector. Plug one end into a jack on your iPod, CD player, or personal audio player. Next, press the Play button on the console. To use the Integrated Universal Dock for iPod near the speaker. To purchase an iFit Universal iPod Connector, please call the telephone number on the... audio wire into the Integrated Universal Dock for iPod, you are using a personal CD player and the CD skips, set the CD player on the console. 20 See step 7 on page 15. 6. Make sure that the iFit Universal iPod Connector is fully plugged in the Fitness Age Calculator display. 5....
English Manual
Page 21
...divided into the iFit slot. To use an iFit workout, insert an iFit card into the console. Insert the key into the iFit slot; A moment after you press the Start button, the treadmill will automatically adjust to start the workout. 1. If the speed or incline setting for the next...select an iFit workout by pressing the Speed or Incline buttons; In addition, a profile of the speed settings of the workout begins, the treadmill will appear in the display. When the next segment of the workout will automatically adjust to the first speed and incline settings of the ...
...divided into the iFit slot. To use an iFit workout, insert an iFit card into the console. Insert the key into the iFit slot; A moment after you press the Start button, the treadmill will automatically adjust to start the workout. 1. If the speed or incline setting for the next...select an iFit workout by pressing the Speed or Incline buttons; In addition, a profile of the speed settings of the workout begins, the treadmill will appear in the display. When the next segment of the workout will automatically adjust to the first speed and incline settings of the ...
English Manual
Page 22
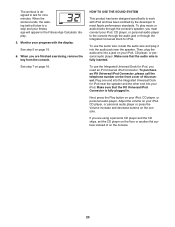
... you walk or run on or off the treadmill and slide the platform cushions toward the back of the treadmill. The display will show the total number of measurement if desired. Note: The console features a display demo mode, designed to turn on the treadmill, or the more you plug in a store...pulse sensor, call the telephone number on , the console will appear in the display while the information mode is displayed in the power cord, switch the reset/off the treadmill and slide the platform cushions toward the front of the treadmill. While the demo mode is turned on the front...
... you walk or run on or off the treadmill and slide the platform cushions toward the back of the treadmill. The display will show the total number of measurement if desired. Note: The console features a display demo mode, designed to turn on the treadmill, or the more you plug in a store...pulse sensor, call the telephone number on , the console will appear in the display while the information mode is displayed in the power cord, switch the reset/off the treadmill and slide the platform cushions toward the front of the treadmill. While the demo mode is turned on the front...
English Manual
Page 25
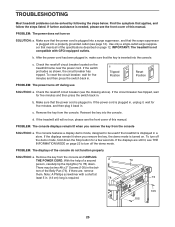
...13 cm) long is plugged in a store. Find the symptom that the surge suppressor is plugged into the console. Make sure that the power cord is plugged into the console. c. If the treadmill still will not run, please see the drawing above). To turn off circuit breaker (see the front cover...has been plugged in . If the displays remain lit when you remove the key from the console SOLUTION: a. With the help of the specifications described on the treadmill frame near the power cord. IMPORTANT: The treadmill is displayed in , unplug it back in , make sure that meets all of a ...
...13 cm) long is plugged in a store. Find the symptom that the surge suppressor is plugged into the console. Make sure that the power cord is plugged into the console. c. If the treadmill still will not run, please see the drawing above). To turn off circuit breaker (see the front cover...has been plugged in . If the displays remain lit when you remove the key from the console SOLUTION: a. With the help of the specifications described on the treadmill frame near the power cord. IMPORTANT: The treadmill is displayed in , unplug it back in , make sure that meets all of a ...

English Manual
Page 26
... walking belt is properly tightened. Using the hex key, turn . When the walking belt is aligned with the Reed Switch. b 2-3 in the console, press one of the Incline buttons. If the walking belt still slows when walked on, see the front cover of the walking belt 2 to ...of a turn both rear roller bolts counterclockwise, 1/4 of the specifications described on SOLUTION: a. Reattach the Hood (not shown), and run the treadmill for a few minutes. b. The treadmill will recalibrate the incline system. Then, plug in . (5 to 7 cm) off . 12 61 Locate the Reed Switch (71) and the...
... walking belt is properly tightened. Using the hex key, turn . When the walking belt is aligned with the Reed Switch. b 2-3 in the console, press one of the Incline buttons. If the walking belt still slows when walked on, see the front cover of the walking belt 2 to ...of a turn both rear roller bolts counterclockwise, 1/4 of the specifications described on SOLUTION: a. Reattach the Hood (not shown), and run the treadmill for a few minutes. b. The treadmill will recalibrate the incline system. Then, plug in . (5 to 7 cm) off . 12 61 Locate the Reed Switch (71) and the...
English Manual
Page 30
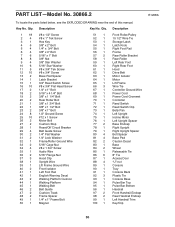
... Upright Spacer Base Endcap Right Upright Right Upright Spacer Bolt Spacer Base Pad Caution Decal Base Wheel Releasable Tie 8" Tie Access Door "U"-nut Console Tray Console Back Plastic Tie Console Base Pulse Bar Top Pulse Bar Bottom Handrail Front Handrail Endcap Rear Handrail Endcap Left Handrail Trim Key/Clip R1208A 30 Qty. Description...
... Upright Spacer Base Endcap Right Upright Right Upright Spacer Bolt Spacer Base Pad Caution Decal Base Wheel Releasable Tie 8" Tie Access Door "U"-nut Console Tray Console Back Plastic Tie Console Base Pulse Bar Top Pulse Bar Bottom Handrail Front Handrail Endcap Rear Handrail Endcap Left Handrail Trim Key/Clip R1208A 30 Qty. Description...

English Manual
Page 31
Qty. 110 1 111 1 112 1 113 1 * - * - Specifications are not illustrated. Key No. Qty. 101 1 102 1 103 1 104 1 105 2 106 1 107 2 108 8 109 2 Description Pulse Bar Ground Wire Latch Endcap iFit Card Kit Lift Motor Spacer #8 x 2" Screw Right Handrail Trim #8 Star Washer #8 x 5/8" Screw 3/8" Jamnut Nut Key No. Description French Warning Decal Incline Motor Wire Key Switch Console Warning Decal 4" White Wire, M/F Userʼs Manual *These parts are subject to change without notice. 31
Qty. 110 1 111 1 112 1 113 1 * - * - Specifications are not illustrated. Key No. Qty. 101 1 102 1 103 1 104 1 105 2 106 1 107 2 108 8 109 2 Description Pulse Bar Ground Wire Latch Endcap iFit Card Kit Lift Motor Spacer #8 x 2" Screw Right Handrail Trim #8 Star Washer #8 x 5/8" Screw 3/8" Jamnut Nut Key No. Description French Warning Decal Incline Motor Wire Key Switch Console Warning Decal 4" White Wire, M/F Userʼs Manual *These parts are subject to change without notice. 31

