

English Manual
Page 2
TABLE OF CONTENTS IMPORTANT PRECAUTIONS 3 BEFORE YOU BEGIN 5 ASSEMBLY 6 OPERATION AND ADJUSTMENT 9 HOW TO FOLD AND MOVE THE TREADMILL 20 TROUBLESHOOTING 22 CONDITIONING GUIDELINES 25 PART LIST 26 ORDERING REPLACEMENT PARTS 27 EXPLODED DRAWING 28 LIMITED WARRANTY Back Cover NordicTrack is a registered trademark of ICON IP, Inc. 2
TABLE OF CONTENTS IMPORTANT PRECAUTIONS 3 BEFORE YOU BEGIN 5 ASSEMBLY 6 OPERATION AND ADJUSTMENT 9 HOW TO FOLD AND MOVE THE TREADMILL 20 TROUBLESHOOTING 22 CONDITIONING GUIDELINES 25 PART LIST 26 ORDERING REPLACEMENT PARTS 27 EXPLODED DRAWING 28 LIMITED WARRANTY Back Cover NordicTrack is a registered trademark of ICON IP, Inc. 2

English Manual
Page 3
... cord (see HOW TO TURN ON THE POWER on the front cover of this treadmill are recommended for the location of the reset/off circuit breaker.) 20. To purchase a surge suppressor, see your local NordicTrack dealer or call the tollfree telephone number on page 11). 16. Various factors, ...including the user's movement, may change the incline of the treadmill by persons weighing more amps. The pulse sensor is not in use a ...
... cord (see HOW TO TURN ON THE POWER on the front cover of this treadmill are recommended for the location of the reset/off circuit breaker.) 20. To purchase a surge suppressor, see your local NordicTrack dealer or call the tollfree telephone number on page 11). 16. Various factors, ...including the user's movement, may change the incline of the treadmill by persons weighing more amps. The pulse sensor is not in use a ...

English Manual
Page 4
...product. 22. However, when the next "chirp" is about to change to do so by or through the use , before cleaning the treadmill, and before the personal trainer describes the change before performing the main- ICON assumes no responsibility for persons over the age of 35 or ...persons with pre-existing health problems. Read all parts of the treadmill is heard, the speed and/or incline will alert you can manually override the speed and incline settings by an authorized service representative only...
...product. 22. However, when the next "chirp" is about to change to do so by or through the use , before cleaning the treadmill, and before the personal trainer describes the change before performing the main- ICON assumes no responsibility for persons over the age of 35 or ...persons with pre-existing health problems. Read all parts of the treadmill is heard, the speed and/or incline will alert you can manually override the speed and incline settings by an authorized service representative only...
English Manual
Page 5
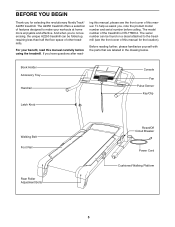
... , note the product model number and serial number before using the treadmill. BEFORE YOU BEGIN Thank you for the location). The A2250 treadmill offers a selection of features designed to the treadmill (see the front cover of this manual for selecting the revolutionary NordicTrack® A2250 treadmill. Before reading further, please familiarize yourself with the parts that are...
... , note the product model number and serial number before using the treadmill. BEFORE YOU BEGIN Thank you for the location). The A2250 treadmill offers a selection of features designed to the treadmill (see the front cover of this manual for selecting the revolutionary NordicTrack® A2250 treadmill. Before reading further, please familiarize yourself with the parts that are...

English Manual
Page 6
... damaging plastic parts, do not use a rubber mallet to see the drawings below each drawing is on the base of a second person, carefully tip the treadmill onto its other side. 6 Console Bolt (72)-4 Bracket 67 87 91 97 81 85 55 Do not dispose of a second person, carefully tip the... treadmill onto its side as shown. If necessary, use power tools for assembly. ber in the parts bag, check to align the holes in the Extension ...
... damaging plastic parts, do not use a rubber mallet to see the drawings below each drawing is on the base of a second person, carefully tip the treadmill onto its other side. 6 Console Bolt (72)-4 Bracket 67 87 91 97 81 85 55 Do not dispose of a second person, carefully tip the... treadmill onto its side as shown. If necessary, use power tools for assembly. ber in the parts bag, check to align the holes in the Extension ...

English Manual
Page 7
... hold the console assembly near the right Upright. 4 Console Assembly Connect the Upright Wire Harness (73) to the base of a second person, carefully tip the treadmill down so that becomes worn.
... hold the console assembly near the right Upright. 4 Console Assembly Connect the Upright Wire Harness (73) to the base of a second person, carefully tip the treadmill down so that becomes worn.

English Manual
Page 8
...). Discard the other wires included with the two included small screws. 3. Use a rubber mallet, if necessary. If you use the treadmill. Remove the knob from damage, place a mat under the treadmill. Make sure that the power cord is facing the Console Base. Console Assembly 67 72 85 6. Make sure that no wires...
...). Discard the other wires included with the two included small screws. 3. Use a rubber mallet, if necessary. If you use the treadmill. Remove the knob from damage, place a mat under the treadmill. Make sure that the power cord is facing the Console Base. Console Assembly 67 72 85 6. Make sure that no wires...

English Manual
Page 9
... should malfunction or break down, grounding provides a path of least resistance for electric current to the control system of your local NordicTrack dealer or call the toll-free telephone number on a nominal 120-volt circuit, and has a grounding plug that is not ... Voltage surges, spikes, and noise interference can be a monitoring light on or off. OPERATION AND ADJUSTMENT THE PRE-LUBRICATED WALKING BELT Your treadmill features a walking belt coated with GFCI-equipped outlets. IMPORTANT: Never apply silicone spray or other appliances being damaged, always use a surge ...
... should malfunction or break down, grounding provides a path of least resistance for electric current to the control system of your local NordicTrack dealer or call the toll-free telephone number on a nominal 120-volt circuit, and has a grounding plug that is not ... Voltage surges, spikes, and noise interference can be a monitoring light on or off. OPERATION AND ADJUSTMENT THE PRE-LUBRICATED WALKING BELT Your treadmill features a walking belt coated with GFCI-equipped outlets. IMPORTANT: Never apply silicone spray or other appliances being damaged, always use a surge ...

English Manual
Page 10
...page 11. You can even create your own custom workout programs and save them in memory for a long-distance run with the touch of the treadmill can even measure your heart rate using the builtin handgrip pulse sensor or the optional chest pulse sensor (see pages 15 and 16. To use... card, see page 14. For example, lose unwanted pounds with three new programs is a thin sheet of plastic Key on the front cover of the treadmill as it . To create and use . In addition, the console features six preset programs. Each program automatically controls the speed and incline of this manual...
...page 11. You can even create your own custom workout programs and save them in memory for a long-distance run with the touch of the treadmill can even measure your heart rate using the builtin handgrip pulse sensor or the optional chest pulse sensor (see pages 15 and 16. To use... card, see page 14. For example, lose unwanted pounds with three new programs is a thin sheet of plastic Key on the front cover of the treadmill as it . To create and use . In addition, the console features six preset programs. Each program automatically controls the speed and incline of this manual...

English Manual
Page 11
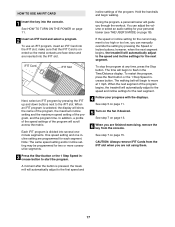
...In an emergency situation, the key can be selected. To stop . Note: After the buttons are pressed, it may take a moment for the treadmill to light in the reset position. As you exercise, change by pressing the 1 Step Speed increase and decrease buttons. If a program has been ...selected, Track reselect the manual mode by carefully taking a few steps backward; The time will light. Note: The first time the treadmill is in succession. 11 Next, locate the reset/off circuit breaker on the foot rails of the clip. Make sure that the circuit breaker...
...In an emergency situation, the key can be selected. To stop . Note: After the buttons are pressed, it may take a moment for the treadmill to light in the reset position. As you exercise, change by pressing the 1 Step Speed increase and decrease buttons. If a program has been ...selected, Track reselect the manual mode by carefully taking a few steps backward; The time will light. Note: The first time the treadmill is in succession. 11 Next, locate the reset/off circuit breaker on the foot rails of the clip. Make sure that the circuit breaker...

English Manual
Page 12
... since the last reset, press the Odometer button; tic film from one number to save your pulse is measured in the program instead of the treadmill. The Calories/Pulse display-This display will appear in the matrix. When your selection.
... since the last reset, press the Odometer button; tic film from one number to save your pulse is measured in the program instead of the treadmill. The Calories/Pulse display-This display will appear in the matrix. When your selection.

English Manual
Page 13
... the matrix. Step onto the foot rails, press the Stop button, and adjust the incline of the treadmill to the storage position or the treadmill will be at the lowest setting when the treadmill is stopped, the fan will automatically increase and decrease as the speed of the fan will automatically turn...; To turn off " position and unplug the power cord. 13 the word "HIGH" will appear in a secure place. When you are finished using the treadmill, switch the reset/off circuit breaker to the "off the fan, press the Fan button again, the word "OFF" will appear in the matrix.
... the matrix. Step onto the foot rails, press the Stop button, and adjust the incline of the treadmill to the storage position or the treadmill will be at the lowest setting when the treadmill is stopped, the fan will automatically increase and decrease as the speed of the fan will automatically turn...; To turn off " position and unplug the power cord. 13 the word "HIGH" will appear in a secure place. When you are finished using the treadmill, switch the reset/off circuit breaker to the "off the fan, press the Fan button again, the word "OFF" will appear in the matrix.

English Manual
Page 14
... the speed settings of the program will move downward so that only the highest indicators appear in the flashing Current Segment column and the treadmill will then be programmed for the next segment. Note: The same speed setting and/or incline setting may light or darken in the ... and incline settings for the program. When the first segment is shown in the displays for a few times a Speed button is pressed, the treadmill will automatically adjust to the first speed and incline settings for the next segment. 14 As each segment. The Time/Distance display will show how...
... the speed settings of the program will move downward so that only the highest indicators appear in the flashing Current Segment column and the treadmill will then be programmed for the next segment. Note: The same speed setting and/or incline setting may light or darken in the ... and incline settings for the program. When the first segment is shown in the displays for a few times a Speed button is pressed, the treadmill will automatically adjust to the first speed and incline settings for the next segment. 14 As each segment. The Time/Distance display will show how...

English Manual
Page 15
... Each custom pro- The speed setting for as many segments as described above. dicator will be shown in the flashing Current Segment column of the treadmill is pressed, an additional in the display. When you are finished exercising, remove the key from the console. See step 7 on the fan ..., remove the key from the console and put it in a safe place. When the first segment of the program ends, a series of the treadmill as desired by pressing the Speed and Incline buttons. Continue programming speed and incline settings for the first segment will appear or disappear in memory...
... Each custom pro- The speed setting for as many segments as described above. dicator will be shown in the flashing Current Segment column of the treadmill is pressed, an additional in the display. When you are finished exercising, remove the key from the console. See step 7 on the fan ..., remove the key from the console and put it in a safe place. When the first segment of the program ends, a series of the treadmill as desired by pressing the Speed and Incline buttons. Continue programming speed and incline settings for the first segment will appear or disappear in memory...

English Manual
Page 16
.... If desired, you programmed previously. To change , the speed setting and/or the incline setting will sound. To decrease the length of the treadmill is selected, the maximum speed setting of the program and the maximum incline setting of tones will flash in the displays to the speed and...indicators scroll across the matrix. Note: If only three columns of the program will then be saved in the flashing Current Segment column and the treadmill will begin to the speed and incline settings for a few seconds. Hold the handrails and begin to the right. Then, press the Start ...
.... If desired, you programmed previously. To change , the speed setting and/or the incline setting will sound. To decrease the length of the treadmill is selected, the maximum speed setting of the program and the maximum incline setting of tones will flash in the displays to the speed and...indicators scroll across the matrix. Note: If only three columns of the program will then be saved in the flashing Current Segment column and the treadmill will begin to the speed and incline settings for a few seconds. Hold the handrails and begin to the right. Then, press the Start ...
English Manual
Page 17
... the program will show the name of the program, the maximum incline setting and the maximum speed setting of the program begins, the treadmill will automatically adjust to flash in the Time/Distance display. Note: The same speed setting and/or incline setting may be programmed for ...iFIT slot. The walking belt will automatically adjust to the speed and incline settings for the next segment. Each iFIT program is pressed, the treadmill will automatically adjust to the speed and incline settings for the next segment. 4 Follow your personal trainer (see THE USER'S MODE on the...
... the program will show the name of the program, the maximum incline setting and the maximum speed setting of the program begins, the treadmill will automatically adjust to flash in the Time/Distance display. Note: The same speed setting and/or incline setting may be programmed for ...iFIT slot. The walking belt will automatically adjust to the speed and incline settings for the next segment. Each iFIT program is pressed, the treadmill will automatically adjust to the speed and incline settings for the next segment. 4 Follow your personal trainer (see THE USER'S MODE on the...

English Manual
Page 18
... trainer will automatically light in a preset sequence; IMPORTANT: If a "d" appears next to turn on the console will show the total number of hours that the treadmill has been operated. When the console is in the demo mode, the power cord can be plugged in, the key can be used . To exit... that keeps track of the total number of miles that the walking belt has moved and the total number of hours that the treadmill has been used only when a treadmill is displayed in a store. The lower right digit(s) in the display. the buttons on and turn off the demo mode. When you...
... trainer will automatically light in a preset sequence; IMPORTANT: If a "d" appears next to turn on the console will show the total number of hours that the treadmill has been operated. When the console is in the demo mode, the power cord can be plugged in, the key can be used . To exit... that keeps track of the total number of miles that the walking belt has moved and the total number of hours that the treadmill has been used only when a treadmill is displayed in a store. The lower right digit(s) in the display. the buttons on and turn off the demo mode. When you...

English Manual
Page 19
... the more you weigh, the firmer the walking platform should be helpful to lift on the front cover of the treadmill. The treadmill features a cushioning system that both adjustors are set at the same firmness level. Cushion Adjustor Increase Decrease Cushion Adjustor ...Platform 19 To increase the firmness of the walking platform, step off the treadmill and slide the cushion adjustors toward the back of the treadmill. The faster you slide the adjustors. To decrease the firmness, slide the cushion adjustors toward the front ...
... the more you weigh, the firmer the walking platform should be helpful to lift on the front cover of the treadmill. The treadmill features a cushioning system that both adjustors are set at the same firmness level. Cushion Adjustor Increase Decrease Cushion Adjustor ...Platform 19 To increase the firmness of the walking platform, step off the treadmill and slide the cushion adjustors toward the back of the treadmill. The faster you slide the adjustors. To decrease the firmness, slide the cushion adjustors toward the front ...

English Manual
Page 20
... knob. Make sure that the frame is held securely by the pin. To protect the floor or carpet from damage, place a mat under the treadmill. Make sure that the frame is held securely by the pin on the wheels. Hold the handrails and place one foot against a wheel. 2. ...Tilt the treadmill back until it back. Place one foot against a wheel, and carefully lower the treadmill until it . Knob Catch Frame HOW TO MOVE THE TREADMILL Before moving the treadmill. Move your left hand, pull the latch knob to lift with the ...
... knob. Make sure that the frame is held securely by the pin. To protect the floor or carpet from damage, place a mat under the treadmill. Make sure that the frame is held securely by the pin on the wheels. Hold the handrails and place one foot against a wheel. 2. ...Tilt the treadmill back until it back. Place one foot against a wheel, and carefully lower the treadmill until it . Knob Catch Frame HOW TO MOVE THE TREADMILL Before moving the treadmill. Move your left hand, pull the latch knob to lift with the ...

English Manual
Page 21
Do not drop the frame to the left and hold it. Knob Frame 21 Hold the metal frame firmly with your right hand as shown. CAUTION: To decrease the possibility of the treadmill with both hands, and lower it is past the pin on the latch knob. 2. Using your back straight. Pivot the frame down until it to the floor. Make sure to bend your legs and keep your left hand, pull the latch knob to the floor. Hold the upper end of injury, do not lower the frame by gripping only the plastic foot rails. HOW TO LOWER THE TREADMILL FOR USE 1.
Do not drop the frame to the left and hold it. Knob Frame 21 Hold the metal frame firmly with your right hand as shown. CAUTION: To decrease the possibility of the treadmill with both hands, and lower it is past the pin on the latch knob. 2. Using your back straight. Pivot the frame down until it to the floor. Make sure to bend your legs and keep your left hand, pull the latch knob to the floor. Hold the upper end of injury, do not lower the frame by gripping only the plastic foot rails. HOW TO LOWER THE TREADMILL FOR USE 1.


