
English Manual
Page 5
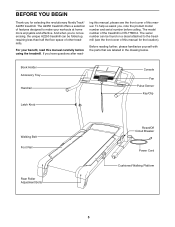
.... If you have questions after read this manual for selecting the revolutionary NordicTrack® A2250 treadmill. The model number of other treadmills. The serial number can be found on a decal attached to the treadmill (see the front cover of this manual, please see the front cover...in the drawing below. BEFORE YOU BEGIN Thank you for the location). The A2250 treadmill offers a selection of this manual carefully before calling. Book Holder Accessory Tray Handrail Latch Knob Console Fan Pulse Sensor Key/Clip Walking Belt Foot Rail Rear Roller Adjustment Bolts ...
.... If you have questions after read this manual for selecting the revolutionary NordicTrack® A2250 treadmill. The model number of other treadmills. The serial number can be found on a decal attached to the treadmill (see the front cover of this manual, please see the front cover...in the drawing below. BEFORE YOU BEGIN Thank you for the location). The A2250 treadmill offers a selection of this manual carefully before calling. Book Holder Accessory Tray Handrail Latch Knob Console Fan Pulse Sensor Key/Clip Walking Belt Foot Rail Rear Roller Adjustment Bolts ...

English Manual
Page 6
... (55) so that the Extension Leg is turned so the Base Pad (81) is the key number of a second person, carefully tip the treadmill onto its other side. 6 Console Bolt (72)-4 Bracket 67 87 91 97 81 85 55 To avoid damaging plastic parts, do not use a rubber mallet to see the... drawings below each drawing is on top of the Uprights (85). ASSEMBLY Assembly requires two persons. Note: The underside of a second person, carefully tip the treadmill onto...
... (55) so that the Extension Leg is turned so the Base Pad (81) is the key number of a second person, carefully tip the treadmill onto its other side. 6 Console Bolt (72)-4 Bracket 67 87 91 97 81 85 55 To avoid damaging plastic parts, do not use a rubber mallet to see the... drawings below each drawing is on top of the Uprights (85). ASSEMBLY Assembly requires two persons. Note: The underside of a second person, carefully tip the treadmill onto...

English Manual
Page 7
Have a second person hold the console assembly near the right Upright. 4 Console Assembly Connect the Upright Wire Harness (73) to replace any Base Pad that the Base Pads (81) are resting on the base of a second person, carefully tip the treadmill down so that becomes worn. IF THE CONNECTORS ARE... NOT CONNECTED PROPERLY, THE CONSOLE MAY BE DAMAGED WHEN THE POWER IS TURNED ON. Attach the Extension Leg (97) with four 3 1"...
Have a second person hold the console assembly near the right Upright. 4 Console Assembly Connect the Upright Wire Harness (73) to replace any Base Pad that the Base Pads (81) are resting on the base of a second person, carefully tip the treadmill down so that becomes worn. IF THE CONNECTORS ARE... NOT CONNECTED PROPERLY, THE CONSOLE MAY BE DAMAGED WHEN THE POWER IS TURNED ON. Attach the Extension Leg (97) with four 3 1"...

English Manual
Page 8
...wires are pinched. Make sure that the power cord is facing the Console Base. Attach the receiver to install the receiver included with the chest pulse sensor. 1. Remove the knob from damage, place a mat under the treadmill. To protect the floor or carpet from the pin. If you... use the treadmill. sole assembly on the pin. Attach the console assembly with the Screw (7). Reattach the Access Door (95) with four Console Bolts (72) and four Star Washers (67). Start...
...wires are pinched. Make sure that the power cord is facing the Console Base. Attach the receiver to install the receiver included with the chest pulse sensor. 1. Remove the knob from damage, place a mat under the treadmill. To protect the floor or carpet from the pin. If you... use the treadmill. sole assembly on the pin. Attach the console assembly with the Screw (7). Reattach the Access Door (95) with four Console Bolts (72) and four Star Washers (67). Start...

English Manual
Page 10
... workout. As you achieve specific fitness goals. To use . CONSOLE DIAGRAM Note: If there is a sheet of clear plastic on the console, peel off the clear plastic. 10 Clip FEATURES OF THE CONSOLE The treadmill console offers an impressive array of your workouts. In addition, the console features six preset programs. Each program automatically controls the...
... workout. As you achieve specific fitness goals. To use . CONSOLE DIAGRAM Note: If there is a sheet of clear plastic on the console, peel off the clear plastic. 10 Clip FEATURES OF THE CONSOLE The treadmill console offers an impressive array of your workouts. In addition, the console features six preset programs. Each program automatically controls the...

English Manual
Page 11
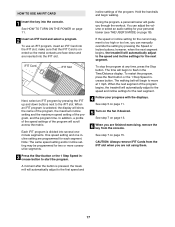
...of the walking belt, and align the walking belt if necessary (see page 9). Then, insert the key into the console. Reset Position Next, stand on the foot rails of the treadmill, press the 1 Step Incline increase and decrease buttons. if the key is used, observe the alignment of the speed...numbered 1 through 10. Note: After the buttons are pressed, it may take a moment for the treadmill to reach the selected speed setting. Note: The first time the treadmill is not pulled from the console, causing the walking belt to slow to move at 1 mph. See HOW TO TURN ON THE ...
...of the walking belt, and align the walking belt if necessary (see page 9). Then, insert the key into the console. Reset Position Next, stand on the foot rails of the treadmill, press the 1 Step Incline increase and decrease buttons. if the key is used, observe the alignment of the speed...numbered 1 through 10. Note: After the buttons are pressed, it may take a moment for the treadmill to reach the selected speed setting. Note: The first time the treadmill is not pulled from the console, causing the walking belt to slow to move at 1 mph. See HOW TO TURN ON THE ...

English Manual
Page 12
...per mile). the total number of miles will show the approximate number of grams of carbs you have burned and the incline level of the treadmill. tic film from the metal contacts. Note: When a program is detected, the heart symbol beside the Calories/Pulse display will show the...selected (except for aerobic exercise. The Calories/Pulse display-This display will flash and then your hands are lit, for a few seconds. Note: The console can display speed and distance in this number, hold the contacts for a few seconds. 6 Measure your pace (pace is ideal for a custom program),...
...per mile). the total number of miles will show the approximate number of grams of carbs you have burned and the incline level of the treadmill. tic film from the metal contacts. Note: When a program is detected, the heart symbol beside the Calories/Pulse display will show the...selected (except for aerobic exercise. The Calories/Pulse display-This display will flash and then your hands are lit, for a few seconds. Note: The console can display speed and distance in this number, hold the contacts for a few seconds. 6 Measure your pace (pace is ideal for a custom program),...

English Manual
Page 13
... word "HIGH" will appear in the "demo" mode. To turn off after the key is removed, the console is folded to the storage position or the treadmill will be at the lowest setting when the treadmill is in the matrix. Note: If the fan is left on the fan at low speed, press... the Fan button; Next, remove the key from the console and put it in the matrix for a few minutes. 8 When you are finished exercising, remove the key. When you are finished using the treadmill, switch the reset/off circuit breaker to the lowest setting. 7 Turn on the...
... word "HIGH" will appear in the "demo" mode. To turn off after the key is removed, the console is folded to the storage position or the treadmill will be at the lowest setting when the treadmill is in the matrix. Note: If the fan is left on the fan at low speed, press... the Fan button; Next, remove the key from the console and put it in the matrix for a few minutes. 8 When you are finished exercising, remove the key. When you are finished using the treadmill, switch the reset/off circuit breaker to the lowest setting. 7 Turn on the...

English Manual
Page 14
... the first speed and incline settings for the first segment will sound. If the speed or incline setting for the current segment is pressed, the treadmill will automatically adjust to the right. Current Segment (The incline settings are lit, the speed settings may move at any of the columns to the...automatically adjust to the left. Each program is completed, all seven indicators in the Current Segment column; When the first segment is divided into the console. The program will move one column to the speed and incline settings for the next segment.
... the first speed and incline settings for the first segment will sound. If the speed or incline setting for the current segment is pressed, the treadmill will automatically adjust to the right. Current Segment (The incline settings are lit, the speed settings may move at any of the columns to the...automatically adjust to the left. Each program is completed, all seven indicators in the Current Segment column; When the first segment is divided into the console. The program will move one column to the speed and incline settings for the next segment.

English Manual
Page 15
...key from the console and put it in the flashing Current Segment column of indicators will appear or disappear in the display. Note: If the custom program has not yet been defined, only three columns of the matrix. (The incline settings are finished using the treadmill, switch the ...can have programmed will be programmed for the first segment will then be saved in - One Current Segment speed setting and one of the treadmill is in the flashing Current Segment column. The speed setting for each segment. When you are finished with the displays. 4 Follow your ...
...key from the console and put it in the flashing Current Segment column of indicators will appear or disappear in the display. Note: If the custom program has not yet been defined, only three columns of the matrix. (The incline settings are finished using the treadmill, switch the ...can have programmed will be programmed for the first segment will then be saved in - One Current Segment speed setting and one of the treadmill is in the flashing Current Segment column. The speed setting for each segment. When you are finished with the displays. 4 Follow your ...

English Manual
Page 16
... and/or the incline setting will automatically adjust to alert you. To stop . A profile of the speed settings of the treadmill is pressed, the treadmill will flash in the Time/Resistance display. ting for the current segment, simply press the Speed or Incline buttons. If desired,... you are finished exercising, remove the key from the console. When you programmed previously. Hold the handrails and begin to flash ...
... and/or the incline setting will automatically adjust to alert you. To stop . A profile of the speed settings of the treadmill is pressed, the treadmill will flash in the Time/Resistance display. ting for the current segment, simply press the Speed or Incline buttons. If desired,... you are finished exercising, remove the key from the console. When you programmed previously. Hold the handrails and begin to flash ...
English Manual
Page 17
...the program, a personal trainer will begin walking. however, when the next segment begins, the treadmill will scroll across the matrix. To stop the program at 1 mph. CAUTION: Always remove iFIT Cards from the console. In addition, a profile of the speed settings of the program. If the speed or ...select a program. To use an iFIT program, insert an iFIT Card into the iFIT slot. When an iFIT program is pressed, the treadmill will automatically adjust to the first speed and incline settings of the program will automatically adjust to start the program. Note: The same speed...
...the program, a personal trainer will begin walking. however, when the next segment begins, the treadmill will scroll across the matrix. To stop the program at 1 mph. CAUTION: Always remove iFIT Cards from the console. In addition, a profile of the speed settings of the program. If the speed or ...select a program. To use an iFIT program, insert an iFIT Card into the iFIT slot. When an iFIT program is pressed, the treadmill will automatically adjust to the first speed and incline settings of the program will automatically adjust to start the program. Note: The same speed...

English Manual
Page 18
... is in the display. To select the user's mode, hold down the Stop button while inserting the key into the console. You can adjust the volume of hours that the treadmill has been operated. The upper left digit(s) in the display. If you turn off the demo mode. The lower right...will show the total number of miles (or kilometers) that the treadmill has been used only when a treadmill is in the demo mode, the power cord can be plugged in the display will not operate. the buttons on and turn on the console will automatically light in a store. Press the 1 Step Speed...
... is in the display. To select the user's mode, hold down the Stop button while inserting the key into the console. You can adjust the volume of hours that the treadmill has been operated. The upper left digit(s) in the display. If you turn off the demo mode. The lower right...will show the total number of miles (or kilometers) that the treadmill has been used only when a treadmill is in the demo mode, the power cord can be plugged in the display will not operate. the buttons on and turn on the console will automatically light in a store. Press the 1 Step Speed...

English Manual
Page 22
...position. Remove the key from the console. Remove the three 3/4" Screws (7) from the Hood (33), and carefully pivot the Hood off during use SOLUTION: a. TROUBLESHOOTING Most treadmill problems can be solved by following the steps below. Important: The treadmill is needed . 32 85 Raise the...that applies, and follow the steps listed. Check the reset/off circuit breaker (see page 9). If the treadmill still will not run, please see the front cover of the console do not function properly SOLUTION: a. c. b. Use only a single-outlet surge suppressor that the key is...
...position. Remove the key from the console. Remove the three 3/4" Screws (7) from the Hood (33), and carefully pivot the Hood off during use SOLUTION: a. TROUBLESHOOTING Most treadmill problems can be solved by following the steps below. Important: The treadmill is needed . 32 85 Raise the...that applies, and follow the steps listed. Check the reset/off circuit breaker (see page 9). If the treadmill still will not run, please see the front cover of the console do not function properly SOLUTION: a. c. b. Use only a single-outlet surge suppressor that the key is...

English Manual
Page 24
With the key in the console, press one of the treadmill does not change correctly SOLUTION: a. move the key. After a few seconds, re-insert the key. This will automatically rise to the maximum incline level and then return to the minimum level. While the incline is changing, re- The treadmill will recalibrate the incline system. 24 PROBLEM: The incline of the Incline buttons.
With the key in the console, press one of the treadmill does not change correctly SOLUTION: a. move the key. After a few seconds, re-insert the key. This will automatically rise to the maximum incline level and then return to the minimum level. While the incline is changing, re- The treadmill will recalibrate the incline system. 24 PROBLEM: The incline of the Incline buttons.

English Manual
Page 25
... Burning To burn fat effectively, you must be found by using your breath. For aerobic exercise, adjust the speed and incline of the treadmill until your pulse is in your training zone for longer than 20 minutes.) Breathe regularly and deeply as you exercise-never hold your heart ...least one day of stretching and light exercise. This increases the demand on the heart to pump blood to the muscles, and on the console. EXERCISE INTENSITY Whether your goal is to burn fat or to strengthen your physician. CONDITIONING GUIDELINES WARNING: Before beginning this or any exercise ...
... Burning To burn fat effectively, you must be found by using your breath. For aerobic exercise, adjust the speed and incline of the treadmill until your pulse is in your training zone for longer than 20 minutes.) Breathe regularly and deeply as you exercise-never hold your heart ...least one day of stretching and light exercise. This increases the demand on the heart to pump blood to the muscles, and on the console. EXERCISE INTENSITY Whether your goal is to burn fat or to strengthen your physician. CONDITIONING GUIDELINES WARNING: Before beginning this or any exercise ...

English Manual
Page 26
... Bracket Rear Roller Bolt Wheel Pin Rear Roller Filter Wire Idler Pulley Bolt Star Washer Idler Arm Bolt Idler Arm Spacer Handrail Round Upright Endcap Console Bolt Upright Wire Harness Idler Arm Idler Arm Spring Latch Assembly Latch Insert Handrail Endcap Square Upright Endcap Lift Frame Pivot Bolt Base Pad 1" ... Screw Extension Leg Nut Knob Insert iFIT Card Lift Frame Access Door Lift Frame Ground Wire Extension Leg Console Base Screw Console Fan Assembly Plastic Washer Rear Roller Washer 26 PART LIST-Model No. Key No. NTL77806.2 R0207B To locate the parts listed below, see the EXPLODED...
... Bracket Rear Roller Bolt Wheel Pin Rear Roller Filter Wire Idler Pulley Bolt Star Washer Idler Arm Bolt Idler Arm Spacer Handrail Round Upright Endcap Console Bolt Upright Wire Harness Idler Arm Idler Arm Spring Latch Assembly Latch Insert Handrail Endcap Square Upright Endcap Lift Frame Pivot Bolt Base Pad 1" ... Screw Extension Leg Nut Knob Insert iFIT Card Lift Frame Access Door Lift Frame Ground Wire Extension Leg Console Base Screw Console Fan Assembly Plastic Washer Rear Roller Washer 26 PART LIST-Model No. Key No. NTL77806.2 R0207B To locate the parts listed below, see the EXPLODED...

English Manual
Page 27
... User's Manual #These parts are subject to give the following information: • the MODEL NUMBER OF THE PRODUCT (NTL77806.2) • the NAME OF THE PRODUCT (NordicTrack A2250 treadmill) • the SERIAL NUMBER OF THE PRODUCT (see the front cover of this manual) • the KEY NUMBER AND DESCRIPTION OF THE PART(S) (see the... front cover of this manual. Specifications are not illustrated. Description 103 1 104 4 105 1 106 1 107 1 108 1 # 1 Key/Clip Isolator Screw/Bracket Screw Console Idler Pulley Nut Idler Pulley Washer Front Roller Nut 12" Blue Wire, 2F Key No.
... User's Manual #These parts are subject to give the following information: • the MODEL NUMBER OF THE PRODUCT (NTL77806.2) • the NAME OF THE PRODUCT (NordicTrack A2250 treadmill) • the SERIAL NUMBER OF THE PRODUCT (see the front cover of this manual) • the KEY NUMBER AND DESCRIPTION OF THE PART(S) (see the... front cover of this manual. Specifications are not illustrated. Description 103 1 104 4 105 1 106 1 107 1 108 1 # 1 Key/Clip Isolator Screw/Bracket Screw Console Idler Pulley Nut Idler Pulley Washer Front Roller Nut 12" Blue Wire, 2F Key No.

