
Installation Guide
Page 5
... 24 Hard-Disk Drive Hot Swap Feature 24 Hard-Disk Drive LEDs 24 Power Supplies and Fan Unit 25 Power Supplies 26 Fan Unit 28 Site Requirements 28 Safety Warnings and Cautions 28 Software Requirements 30 Product Disposal 30 2 Installing the Nokia IP1200 Series Appliance 33 Rack Mounting the Appliance 33 Before You Begin 34 IP1220 and IP1260 Security Platforms Installation...
... 24 Hard-Disk Drive Hot Swap Feature 24 Hard-Disk Drive LEDs 24 Power Supplies and Fan Unit 25 Power Supplies 26 Fan Unit 28 Site Requirements 28 Safety Warnings and Cautions 28 Software Requirements 30 Product Disposal 30 2 Installing the Nokia IP1200 Series Appliance 33 Rack Mounting the Appliance 33 Before You Begin 34 IP1220 and IP1260 Security Platforms Installation...
Installation Guide
Page 7
...and Replacing a Hard-Disk Drive 83 Installing a PC Card 88 Storing System Logs on the Flash-Memory PC Card 94 Disabling Flash-Memory PC Cards 94 Transferring Files with the Flash-Memory PC Card 95 Replacing the Compact Flash Memory Card 96 Replacing or Upgrading Memory 99 Before You Begin 99 Installing a Nokia Encryption Accelerator... Information 113 A Technical Specifications 119 Space Requirements 119 B Compliance Information 121 Declaration of Conformity 121 Compliance Statements 122 FCC Notice (US 123 Index 125 IP1220 and IP1260 Security Platforms Installation Guide 7
...and Replacing a Hard-Disk Drive 83 Installing a PC Card 88 Storing System Logs on the Flash-Memory PC Card 94 Disabling Flash-Memory PC Cards 94 Transferring Files with the Flash-Memory PC Card 95 Replacing the Compact Flash Memory Card 96 Replacing or Upgrading Memory 99 Before You Begin 99 Installing a Nokia Encryption Accelerator... Information 113 A Technical Specifications 119 Space Requirements 119 B Compliance Information 121 Declaration of Conformity 121 Compliance Statements 122 FCC Notice (US 123 Index 125 IP1220 and IP1260 Security Platforms Installation Guide 7

Installation Guide
Page 9
... Front View 20 Figure 2 Ethernet Management Ports Details 20 Figure 3 Pin Assignments for Console and AUX Connections 22 Figure 4 Nokia IP1200 Series Appliance System Status LEDs 23 Figure 5 Hard-Disk Drive Front Pane 24 Figure 6 Power Supply and Fan Unit Locations 26 Figure 7 AC Power Supply, Cooling Fan, and Power ... Short-Range Gigabit Ethernet NIC 64 Figure 20 PMC Two-Port Long-Range Gigabit Ethernet NIC 65 Figure 21 Location of Hard-Disk Drives 82 Figure 22 Slot 3 PC Card Location 88 Figure 23 DIMM Socket Locations 99 IP1220 and IP1260 Security Platforms Installation Guide 9
... Front View 20 Figure 2 Ethernet Management Ports Details 20 Figure 3 Pin Assignments for Console and AUX Connections 22 Figure 4 Nokia IP1200 Series Appliance System Status LEDs 23 Figure 5 Hard-Disk Drive Front Pane 24 Figure 6 Power Supply and Fan Unit Locations 26 Figure 7 AC Power Supply, Cooling Fan, and Power ... Short-Range Gigabit Ethernet NIC 64 Figure 20 PMC Two-Port Long-Range Gigabit Ethernet NIC 65 Figure 21 Location of Hard-Disk Drives 82 Figure 22 Slot 3 PC Card Location 88 Figure 23 DIMM Socket Locations 99 IP1220 and IP1260 Security Platforms Installation Guide 9
Installation Guide
Page 11
... and DB25 Interface Cables 22 Table 6 System Status LEDs 23 Table 7 Hard-Disk Drive LEDs 25 Table 8 Power Supply Status LEDs 28 Table 9 Nokia IP1200 Series Disk-Based Platform Software Requirements . . . . 30 Table 10 Nokia IP1200 Series Flash-Based Platform Software Requirements . . 30 Table 11 NIC PCI Frequency 57 IP1220 and IP1260 Security Platforms Installation Guide 11
... and DB25 Interface Cables 22 Table 6 System Status LEDs 23 Table 7 Hard-Disk Drive LEDs 25 Table 8 Power Supply Status LEDs 28 Table 9 Nokia IP1200 Series Disk-Based Platform Software Requirements . . . . 30 Table 10 Nokia IP1200 Series Flash-Based Platform Software Requirements . . 30 Table 11 NIC PCI Frequency 57 IP1220 and IP1260 Security Platforms Installation Guide 11
Installation Guide
Page 13
..., hard-disk drives, and power supplies. „ Chapter 8, "Troubleshooting" discusses problems you might encounter and proposes solutions to and use of the supported NICs. „ Chapter 6, "Installing and Replacing ADP Modules" describes how to connect to these problems. „ Appendix A, "Technical Specifications" provides technical specifications such as interface characteristics. IP1220 and IP1260 Security Platforms Installation Guide...
..., hard-disk drives, and power supplies. „ Chapter 8, "Troubleshooting" discusses problems you might encounter and proposes solutions to and use of the supported NICs. „ Chapter 6, "Installing and Replacing ADP Modules" describes how to connect to these problems. „ Appendix A, "Technical Specifications" provides technical specifications such as interface characteristics. IP1220 and IP1260 Security Platforms Installation Guide...
Installation Guide
Page 18
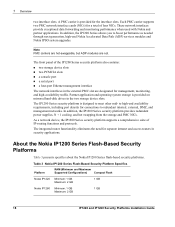
... drives in security applications. About the Nokia IP1200 Series Flash-Based Security Platforms Table 3 presents specifics about the Nokia IP1200 Series flash-based security platforms. Table 3 Nokia IP1200 Series Flash-Based Security Platform Specifics Platform RAM (Minimum and Maximum Supported Configurations) Compact Flash Nokia IP1220 Minimum: 1 GB Maximum: 2 GB 1 GB Nokia IP1260 Minimum: 1 GB Maximum: 2 GB 1 GB 18 IP1220 and IP1260 Security Platforms Installation...
... drives in security applications. About the Nokia IP1200 Series Flash-Based Security Platforms Table 3 presents specifics about the Nokia IP1200 Series flash-based security platforms. Table 3 Nokia IP1200 Series Flash-Based Security Platform Specifics Platform RAM (Minimum and Maximum Supported Configurations) Compact Flash Nokia IP1220 Minimum: 1 GB Maximum: 2 GB 1 GB Nokia IP1260 Minimum: 1 GB Maximum: 2 GB 1 GB 18 IP1220 and IP1260 Security Platforms Installation...

Installation Guide
Page 20
... expansion slots 1 and 2 hard-disk drive A hard-disk drive B Console port Grounding plug Serial (AUX) port PCMCIA slots 00307a.3 Ethernet management ports (slot 3) Ethernet Management Ports The Ethernet management ports are intended for management purposes. The top link LED represents the left to prevent potential data loss. 20 IP1220 and IP1260 Security Platforms Installation Guide These ports...
... expansion slots 1 and 2 hard-disk drive A hard-disk drive B Console port Grounding plug Serial (AUX) port PCMCIA slots 00307a.3 Ethernet management ports (slot 3) Ethernet Management Ports The Ethernet management ports are intended for management purposes. The top link LED represents the left to prevent potential data loss. 20 IP1220 and IP1260 Security Platforms Installation Guide These ports...

Installation Guide
Page 24
... details, see "Replacing a Hard-Disk Drive" on page 82. Figure 5 Hard-Disk Drive Front Pane l Hard-disk drive LEDs Hot swap button 00319 24 IP1220 and IP1260 Security Platforms Installation Guide The mirror hard-disk drive contains a copy of all of the operating system) and mirror hard-disk drive. Hard-Disk Drive LEDs The hard-disk drive LEDs are running. The IP1200 Series appliance continues to operate normally...
... details, see "Replacing a Hard-Disk Drive" on page 82. Figure 5 Hard-Disk Drive Front Pane l Hard-disk drive LEDs Hot swap button 00319 24 IP1220 and IP1260 Security Platforms Installation Guide The mirror hard-disk drive contains a copy of all of the operating system) and mirror hard-disk drive. Hard-Disk Drive LEDs The hard-disk drive LEDs are running. The IP1200 Series appliance continues to operate normally...

Installation Guide
Page 25
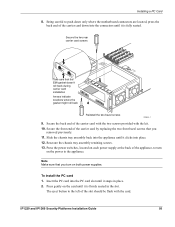
...and locking lever, loosen the two retaining screws before you remove the hard-disk drive. Nokia IP1200 Series Security Platform Overview Caution To avoid damage to be removed using the hot swap feature. hard-disk drive is turned on but is functioning. Power Supplies and Fan Unit ... following : • System is booting. • hard-disk drive is starting up. • System is on the opposite side. One of the IP1200 Series appliance, as shown in Figure 6. IP1220 and IP1260 Security Platforms Installation Guide 25 hard-disk drive is turned on and is malfunctioning. Once screw is ...
...and locking lever, loosen the two retaining screws before you remove the hard-disk drive. Nokia IP1200 Series Security Platform Overview Caution To avoid damage to be removed using the hot swap feature. hard-disk drive is turned on but is functioning. Power Supplies and Fan Unit ... following : • System is booting. • hard-disk drive is starting up. • System is on the opposite side. One of the IP1200 Series appliance, as shown in Figure 6. IP1220 and IP1260 Security Platforms Installation Guide 25 hard-disk drive is turned on and is malfunctioning. Once screw is ...

Installation Guide
Page 81
... appliance (shown in Figure 1 on page 20) provides a chassis grounding point. Caution To protect the IP1200 Series and the memory modules from electrostatic discharge damage, make sure you are covered: „ Replacing a Hard-Disk Drive „ Installing a PC Card „ Replacing the Compact Flash Memory Card „ Replacing or Upgrading Memory „ Installing a Nokia... procedures described in this chapter. Use a grounding wrist strap and follow the instructions provided with the wrist strap before you touch these components. IP1220 and IP1260 Security Platforms Installation Guide 81
... appliance (shown in Figure 1 on page 20) provides a chassis grounding point. Caution To protect the IP1200 Series and the memory modules from electrostatic discharge damage, make sure you are covered: „ Replacing a Hard-Disk Drive „ Installing a PC Card „ Replacing the Compact Flash Memory Card „ Replacing or Upgrading Memory „ Installing a Nokia... procedures described in this chapter. Use a grounding wrist strap and follow the instructions provided with the wrist strap before you touch these components. IP1220 and IP1260 Security Platforms Installation Guide 81
Installation Guide
Page 82
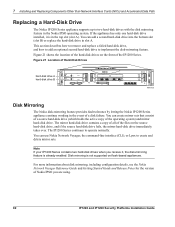
... the IP1200 Series. Note If your IP1200 Series contains two hard-disk drives when you are using. 82 IP1220 and IP1260 Security Platforms Installation Guide If the appliance has only one hard-disk drive installed, it , the disk-mirroring feature is in the Nokia IPSO operating system. You can use Nokia Network Voyager, the command-line interface (CLI), or Lynx to...
... the IP1200 Series. Note If your IP1200 Series contains two hard-disk drives when you are using. 82 IP1220 and IP1260 Security Platforms Installation Guide If the appliance has only one hard-disk drive installed, it , the disk-mirroring feature is in the Nokia IPSO operating system. You can use Nokia Network Voyager, the command-line interface (CLI), or Lynx to...

Installation Guide
Page 83
... and enabled disk mirroring. Pressing the hot swap button allows you to the appliance „ Nokia hard-disk drive kit and accompanying documentation „ Phillips-head screwdriver Removing and Replacing a Hard-Disk Drive If you have a grounding wrist strap, make sure you touch any electronic component...you might lose data. The grounding plug on the front of each hard-disk drive. IP1220 and IP1260 Security Platforms Installation Guide 83 Handle them with the wrist strap before you are occupied. • The appliance is turned on. • Disk mirroring is not enabled. •...
... and enabled disk mirroring. Pressing the hot swap button allows you to the appliance „ Nokia hard-disk drive kit and accompanying documentation „ Phillips-head screwdriver Removing and Replacing a Hard-Disk Drive If you have a grounding wrist strap, make sure you touch any electronic component...you might lose data. The grounding plug on the front of each hard-disk drive. IP1220 and IP1260 Security Platforms Installation Guide 83 Handle them with the wrist strap before you are occupied. • The appliance is turned on. • Disk mirroring is not enabled. •...

Installation Guide
Page 84
... the hot swap feature. 1. The status LED blinks. 84 IP1220 and IP1260 Security Platforms Installation Guide 7 Installing and Replacing Components Other than Network Interface Cards (NICs) and Accelerated Data Path You must have disk mirroring implemented to remove. 2. To replace a hard-disk drive by using , or the Nokia Horizon Manager User Guide and online help. Loosen the...
... the hot swap feature. 1. The status LED blinks. 84 IP1220 and IP1260 Security Platforms Installation Guide 7 Installing and Replacing Components Other than Network Interface Cards (NICs) and Accelerated Data Path You must have disk mirroring implemented to remove. 2. To replace a hard-disk drive by using , or the Nokia Horizon Manager User Guide and online help. Loosen the...

Installation Guide
Page 85
...Series recognizes the new hard-disk drive. 10. Use Nokia Network Voyager, Lynx, or the CLI to disengage lock Release or lock into the empty hard-disk drive bay. 7. Push red button to implement disk mirroring. Gently pull the hard-disk drive forward to remove it...to the hard-disk drive. Install a replacement hard-disk drive into place 00320 5. Tighten the screws on both sides of the hard-disk drive. 9. Press the recessed hot swap button again to restore power to eject the hard-disk drive from the appliance. IP1220 and IP1260 Security Platforms Installation Guide 85...
...Series recognizes the new hard-disk drive. 10. Use Nokia Network Voyager, Lynx, or the CLI to disengage lock Release or lock into the empty hard-disk drive bay. 7. Push red button to implement disk mirroring. Gently pull the hard-disk drive forward to remove it...to the hard-disk drive. Install a replacement hard-disk drive into place 00320 5. Tighten the screws on both sides of the hard-disk drive. 9. Press the recessed hot swap button again to restore power to eject the hard-disk drive from the appliance. IP1220 and IP1260 Security Platforms Installation Guide 85...

Installation Guide
Page 86
... related reference materials, see "Using Nokia Network Voyager" on the back panel to step 3. Wait until the activity LED for the hard-disk drive is not active you remove the hard-disk drive. 86 IP1220 and IP1260 Security Platforms Installation Guide Use power switch on page ...132; You are removing a hard-disk drive used as part of the hard-disk drive. e. Loosen the retaining screws on the hard-disk drive and proceed to turn the appliance off. 2. d. Caution To avoid damage to shut down the operating system. c. f. 7 Installing and Replacing Components Other than ...
... related reference materials, see "Using Nokia Network Voyager" on the back panel to step 3. Wait until the activity LED for the hard-disk drive is not active you remove the hard-disk drive. 86 IP1220 and IP1260 Security Platforms Installation Guide Use power switch on page ...132; You are removing a hard-disk drive used as part of the hard-disk drive. e. Loosen the retaining screws on the hard-disk drive and proceed to turn the appliance off. 2. d. Caution To avoid damage to shut down the operating system. c. f. 7 Installing and Replacing Components Other than ...

Installation Guide
Page 87
... 4. The IP1200 Series recognizes the new hard-disk drive. 8. Use Nokia Network Voyager, Lynx, or the CLI to the hard-disk drive. IP1220 and IP1260 Security Platforms Installation Guide 87 Push red button to disengage ...lock Release or lock into place. IP1260 00316.2 5. Use your thumb or forefinger to press the ejector and locking lever on both sides of the hard-disk drive. 7. Gently pull the hard-disk drive forward to eject the hard-disk drive from the appliance...
... 4. The IP1200 Series recognizes the new hard-disk drive. 8. Use Nokia Network Voyager, Lynx, or the CLI to the hard-disk drive. IP1220 and IP1260 Security Platforms Installation Guide 87 Push red button to disengage ...lock Release or lock into place. IP1260 00316.2 5. Use your thumb or forefinger to press the ejector and locking lever on both sides of the hard-disk drive. 7. Gently pull the hard-disk drive forward to eject the hard-disk drive from the appliance...

Installation Guide
Page 91
Remove the two front bezel screws and remove the slot 3 filler panel or installed NIC. IP1220 and IP1260 Security Platforms Installation Guide 91 Remove any installed PMC carriers or ADP module so that both slot 1 and slot 2 are not occupied. Remove six screws and PMC carrier and ADP module shield HARD DRIVE STATUS ACTIVITY HARD DRIVE STATUS ACTIVITY CONSOLE HDD A POWER HOT SWAP HOT SWAP POWER HOT SWAP HDD B HOT SWAP AUX AUX2 SLOT 3 SLOT 2 IP1260 1000BaseT 1 2 3 4 SLOT 4 RESET Remove PMC carriers or ADP module 00654b.1 6. Installing a PC Card 5.
Remove the two front bezel screws and remove the slot 3 filler panel or installed NIC. IP1220 and IP1260 Security Platforms Installation Guide 91 Remove any installed PMC carriers or ADP module so that both slot 1 and slot 2 are not occupied. Remove six screws and PMC carrier and ADP module shield HARD DRIVE STATUS ACTIVITY HARD DRIVE STATUS ACTIVITY CONSOLE HDD A POWER HOT SWAP HOT SWAP POWER HOT SWAP HDD B HOT SWAP AUX AUX2 SLOT 3 SLOT 2 IP1260 1000BaseT 1 2 3 4 SLOT 4 RESET Remove PMC carriers or ADP module 00654b.1 6. Installing a PC Card 5.

Installation Guide
Page 92
HARD DRIVE STATUS ACTIVITY HARD DRIVE STATUS ACTIVITY CONSOLE HDD A POWER HOT SWAP HOT SWAP POWER HOT SWAP HDD B HOT SWAP AUX AUX2 1000BaseT V2 1000BaseT V2 LINK ACT LINK ACT SLOT 3 SLOT 1 LINK ACT LINK ACT SLOT 2 IP1260 1000BaseT 1 2 3 4 SLOT 4 RESET 00657b.1 92 IP1220 and IP1260 Security Platforms Installation Guide Raise the back end of the PCMCIA carrier card approximately 45 degrees as you insert the front end into slot 3 in the front panel. 7 Installing and Replacing Components Other than Network Interface Cards (NICs) and Accelerated Data Path 7.
HARD DRIVE STATUS ACTIVITY HARD DRIVE STATUS ACTIVITY CONSOLE HDD A POWER HOT SWAP HOT SWAP POWER HOT SWAP HDD B HOT SWAP AUX AUX2 1000BaseT V2 1000BaseT V2 LINK ACT LINK ACT SLOT 3 SLOT 1 LINK ACT LINK ACT SLOT 2 IP1260 1000BaseT 1 2 3 4 SLOT 4 RESET 00657b.1 92 IP1220 and IP1260 Security Platforms Installation Guide Raise the back end of the PCMCIA carrier card approximately 45 degrees as you insert the front end into slot 3 in the front panel. 7 Installing and Replacing Components Other than Network Interface Cards (NICs) and Accelerated Data Path 7.
Installation Guide
Page 93
...eject button to turn on both power supplies. Being careful to the appliance. Secure the two rear carrier card screws 1000BaseT 1000BaseT 1000BaseT HARD DRIVE LINK APCCT CARD STATUS ACTIVITY HDD A HARD DRIVE STATUS ACTIVITY POWER HOT SWAP HOT SWAP LINK ACT POWER Take care ...chassis tray assembly back into the appliance until it clicks into the connectors until it is firmly seated in place. 2. To install the PC card 1. IP1220 and IP1260 Security Platforms Installation Guide 93 Resecure the chassis tray assembly retaining screws. 13. Installing a PC Card 8. Note Make...
...eject button to turn on both power supplies. Being careful to the appliance. Secure the two rear carrier card screws 1000BaseT 1000BaseT 1000BaseT HARD DRIVE LINK APCCT CARD STATUS ACTIVITY HDD A HARD DRIVE STATUS ACTIVITY POWER HOT SWAP HOT SWAP LINK ACT POWER Take care ...chassis tray assembly back into the appliance until it clicks into the connectors until it is firmly seated in place. 2. To install the PC card 1. IP1220 and IP1260 Security Platforms Installation Guide 93 Resecure the chassis tray assembly retaining screws. 13. Installing a PC Card 8. Note Make...
Installation Guide
Page 96
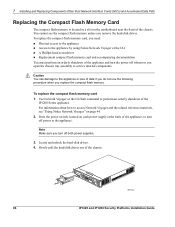
...orderly shutdown of the chassis. IP1260 00316a.2 96 IP1220 and IP1260 Security Platforms Installation Guide To replace the compact flash memory card, you need: „ Physical access to the appliance „ Access to the appliance by using Nokia Network Voyager or the CLI „ A ...You risk damage to service internal components. Slowly pull the hard-disk drives out of the IP1200 Series appliance. You cannot see "Using Nokia Network Voyager" on page 44. 2. Locate and unlock the hard-disk drives. 4. 7 Installing and Replacing Components Other than Network Interface Cards (NICs)...
...orderly shutdown of the chassis. IP1260 00316a.2 96 IP1220 and IP1260 Security Platforms Installation Guide To replace the compact flash memory card, you need: „ Physical access to the appliance „ Access to the appliance by using Nokia Network Voyager or the CLI „ A ...You risk damage to service internal components. Slowly pull the hard-disk drives out of the IP1200 Series appliance. You cannot see "Using Nokia Network Voyager" on page 44. 2. Locate and unlock the hard-disk drives. 4. 7 Installing and Replacing Components Other than Network Interface Cards (NICs)...
