
Installation Guide
Page 5
...Text Conventions 14 Related Documentation 15 1 Overview 17 About the Nokia IP1200 Series Security Platform 17 About the Nokia IP1200 Series Flash-Based Security Platforms 18 Managing the Nokia IP1200 Series Security Platform 19 Nokia IP1200 Series Security Platform Overview 19 Ethernet Management Ports 20 PMC Expansion Slots ... Requirements 28 Safety Warnings and Cautions 28 Software Requirements 30 Product Disposal 30 2 Installing the Nokia IP1200 Series Appliance 33 Rack Mounting the Appliance 33 Before You Begin 34 IP1220 and IP1260 Security Platforms Installation Guide 5
...Text Conventions 14 Related Documentation 15 1 Overview 17 About the Nokia IP1200 Series Security Platform 17 About the Nokia IP1200 Series Flash-Based Security Platforms 18 Managing the Nokia IP1200 Series Security Platform 19 Nokia IP1200 Series Security Platform Overview 19 Ethernet Management Ports 20 PMC Expansion Slots ... Requirements 28 Safety Warnings and Cautions 28 Software Requirements 30 Product Disposal 30 2 Installing the Nokia IP1200 Series Appliance 33 Rack Mounting the Appliance 33 Before You Begin 34 IP1220 and IP1260 Security Platforms Installation Guide 5

Installation Guide
Page 9
... 20 Figure 2 Ethernet Management Ports Details 20 Figure 3 Pin Assignments for Console and AUX Connections 22 Figure 4 Nokia IP1200 Series Appliance System Status LEDs 23 Figure 5 Hard-Disk Drive Front Pane 24 Figure 6 Power Supply and Fan Unit Locations ...(DC version 27 Figure 9 Rack-Mounting Screw Locations 34 Figure 10 Power Switch Location 41 Figure 11 Nokia Network Voyager Reference Access Points 45 Figure 12 Four-Port 10/100 Ethernet NIC Front Panel Details 59 ...3 PC Card Location 88 Figure 23 DIMM Socket Locations 99 IP1220 and IP1260 Security Platforms Installation Guide 9
... 20 Figure 2 Ethernet Management Ports Details 20 Figure 3 Pin Assignments for Console and AUX Connections 22 Figure 4 Nokia IP1200 Series Appliance System Status LEDs 23 Figure 5 Hard-Disk Drive Front Pane 24 Figure 6 Power Supply and Fan Unit Locations ...(DC version 27 Figure 9 Rack-Mounting Screw Locations 34 Figure 10 Power Switch Location 41 Figure 11 Nokia Network Voyager Reference Access Points 45 Figure 12 Four-Port 10/100 Ethernet NIC Front Panel Details 59 ...3 PC Card Location 88 Figure 23 DIMM Socket Locations 99 IP1220 and IP1260 Security Platforms Installation Guide 9
Installation Guide
Page 13
IP1220 and IP1260 Security Platforms Installation Guide 13 About this Guide This guide is organized into the following chapters and appendixes: „ Chapter 1, "Overview" presents a general overview of the Nokia IP1200 Series Security Platform. „ Chapter 2, "Installing the Nokia IP1200 Series Appliance" describes how to install the Nokia IP1200 Series appliance. „ Chapter 3, "Performing the Initial Configuration" describes how...
IP1220 and IP1260 Security Platforms Installation Guide 13 About this Guide This guide is organized into the following chapters and appendixes: „ Chapter 1, "Overview" presents a general overview of the Nokia IP1200 Series Security Platform. „ Chapter 2, "Installing the Nokia IP1200 Series Appliance" describes how to install the Nokia IP1200 Series appliance. „ Chapter 3, "Performing the Initial Configuration" describes how...
Installation Guide
Page 17
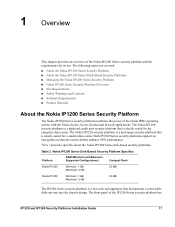
... 2 presents specifics about the Nokia IP1200 Series disk-based security platforms. Table 2 Nokia IP1200 Series Disk-Based Security Platform Specifics Platform RAM (Minimum and Maximum Supported Configurations) Compact Flash Nokia IP1260 Minimum: 1 GB Maximum: 2 GB 32 MB Nokia IP1220 Minimum: 1 GB Maximum: 2 GB 32 MB The IP1200 Series security platform is a two-rack unit appliance that is a high-end...
... 2 presents specifics about the Nokia IP1200 Series disk-based security platforms. Table 2 Nokia IP1200 Series Disk-Based Security Platform Specifics Platform RAM (Minimum and Maximum Supported Configurations) Compact Flash Nokia IP1260 Minimum: 1 GB Maximum: 2 GB 32 MB Nokia IP1220 Minimum: 1 GB Maximum: 2 GB 32 MB The IP1200 Series security platform is a two-rack unit appliance that is a high-end...
Installation Guide
Page 23
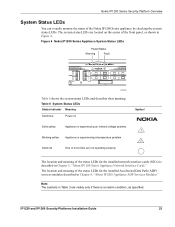
... for the installed Accelerated Data Path (ADP) services modules described in Chapter 5, "About IP1200 Series Appliance Network Interface Cards." Blinking yellow Appliance is experiencing an internal voltage problem. ! IP1220 and IP1260 Security Platforms Installation Guide 23 Figure 4 Nokia IP1200 Series Appliance System Status LEDs Power/Status Warning Fault E D N P SD COMMO OINT GROUN 00307d Table 6 shows the...
... for the installed Accelerated Data Path (ADP) services modules described in Chapter 5, "About IP1200 Series Appliance Network Interface Cards." Blinking yellow Appliance is experiencing an internal voltage problem. ! IP1220 and IP1260 Security Platforms Installation Guide 23 Figure 4 Nokia IP1200 Series Appliance System Status LEDs Power/Status Warning Fault E D N P SD COMMO OINT GROUN 00307d Table 6 shows the...

Installation Guide
Page 24
...described in the event of the operating system) and mirror hard-disk drive. 1 Overview Hard-Disk Drives The Nokia IP1200 Series appliance supports up to your data connections. You can create mirror sets that consist of a source hard-disk drive (...Nokia Network Voyager, the command-line interface (CLI), or Lynx to continue working in Table 7. Figure 5 Hard-Disk Drive Front Pane l Hard-disk drive LEDs Hot swap button 00319 24 IP1220 and IP1260 Security Platforms Installation Guide For more information about how to remove or replace a hard-disk drive without shutting the appliance...
...described in the event of the operating system) and mirror hard-disk drive. 1 Overview Hard-Disk Drives The Nokia IP1200 Series appliance supports up to your data connections. You can create mirror sets that consist of a source hard-disk drive (...Nokia Network Voyager, the command-line interface (CLI), or Lynx to continue working in Table 7. Figure 5 Hard-Disk Drive Front Pane l Hard-disk drive LEDs Hot swap button 00319 24 IP1220 and IP1260 Security Platforms Installation Guide For more information about how to remove or replace a hard-disk drive without shutting the appliance...

Installation Guide
Page 26
...power supplies are installed, increasing the life of the specified output voltage. The power supplies are not turned on . Caution The Nokia IP1200 Series appliance power supply might be turned on for load sharing and redundancy. 1 Overview Figure 6 Power Supply and Fan Unit Locations Power... an appliance with two active power supplies installed, both power supplies are autosensing and can accept input voltages between 85 VAC and 264 VAC. For more information about the power supply status LEDs, see "Power Supply Status LEDs" on . 26 IP1220 and IP1260 Security Platforms Installation...
...power supplies are installed, increasing the life of the specified output voltage. The power supplies are not turned on . Caution The Nokia IP1200 Series appliance power supply might be turned on for load sharing and redundancy. 1 Overview Figure 6 Power Supply and Fan Unit Locations Power... an appliance with two active power supplies installed, both power supplies are autosensing and can accept input voltages between 85 VAC and 264 VAC. For more information about the power supply status LEDs, see "Power Supply Status LEDs" on . 26 IP1220 and IP1260 Security Platforms Installation...
Installation Guide
Page 30
..., contact your appliance and all applicable national, state, and local laws and regulations. 1 Overview Software Requirements Table 9 and Table 10 describe operating system and applications requirements for the Nokia IP1200 Series appliances. Product Disposal At the end of the product covering material use, packaging, disassembly, and recycling. 30 IP1220 and IP1260 Security Platforms Installation Guide...
..., contact your appliance and all applicable national, state, and local laws and regulations. 1 Overview Software Requirements Table 9 and Table 10 describe operating system and applications requirements for the Nokia IP1200 Series appliances. Product Disposal At the end of the product covering material use, packaging, disassembly, and recycling. 30 IP1220 and IP1260 Security Platforms Installation Guide...

Installation Guide
Page 33
IP1220 and IP1260 Security Platforms Installation Guide 33 Rack Mounting the Appliance The Nokia IP1200 Series appliance mounts in Figure 1 on the rack. Note To avoid damaging your equipment, Nokia recommends that you use all four rack-mounting bolts when you install your appliance on page 20) provides a..., make sure you handle the components or open the appliance. 2 Installing the Nokia IP1200 Series Appliance This chapter describes how to install the Nokia IP1200 Series appliance. The grounding plug on the front of the appliance (shown in a standard 19-inch equipment rack with ...
IP1220 and IP1260 Security Platforms Installation Guide 33 Rack Mounting the Appliance The Nokia IP1200 Series appliance mounts in Figure 1 on the rack. Note To avoid damaging your equipment, Nokia recommends that you use all four rack-mounting bolts when you install your appliance on page 20) provides a..., make sure you handle the components or open the appliance. 2 Installing the Nokia IP1200 Series Appliance This chapter describes how to install the Nokia IP1200 Series appliance. The grounding plug on the front of the appliance (shown in a standard 19-inch equipment rack with ...

Installation Guide
Page 34
... shown in damage to place the chassis tray assembly Before you rack mount the appliance, you can be attached further back on . 2 Installing the Nokia IP1200 Series Appliance Figure 9 Rack-Mounting Screw Locations 00307a.3 Rack-mounting screw locations Two rack-mounting positions allow you to finish...„ Suitable, grounded work surface on which to the appliance when it is insufficient, the rack mounting brackets can ground it by threading the nuts onto each of your installation site. 34 IP1220 and IP1260 Security Platforms Installation Guide If the space behind the rack is ...
... shown in damage to place the chassis tray assembly Before you rack mount the appliance, you can be attached further back on . 2 Installing the Nokia IP1200 Series Appliance Figure 9 Rack-Mounting Screw Locations 00307a.3 Rack-mounting screw locations Two rack-mounting positions allow you to finish...„ Suitable, grounded work surface on which to the appliance when it is insufficient, the rack mounting brackets can ground it by threading the nuts onto each of your installation site. 34 IP1220 and IP1260 Security Platforms Installation Guide If the space behind the rack is ...

Installation Guide
Page 36
... appliance. 2 Installing the Nokia IP1200 Series Appliance 3. a. c. Optionally, remove the chassis tray assembly from the rear of the appliance (shown in Figure 1 on the back of the chassis tray assembly. 00317.1 4. Remove the two retaining screws. d. Optionally, remove the power supplies from the appliance. Locate the power supply on page 20) provides a 36 IP1220 and IP1260 Security...
... appliance. 2 Installing the Nokia IP1200 Series Appliance 3. a. c. Optionally, remove the chassis tray assembly from the rear of the appliance (shown in Figure 1 on the back of the chassis tray assembly. 00317.1 4. Remove the two retaining screws. d. Optionally, remove the power supplies from the appliance. Locate the power supply on page 20) provides a 36 IP1220 and IP1260 Security...

Installation Guide
Page 38
2 Installing the Nokia IP1200 Series Appliance 38 IP1220 and IP1260 Security Platforms Installation Guide
2 Installing the Nokia IP1200 Series Appliance 38 IP1220 and IP1260 Security Platforms Installation Guide
Installation Guide
Page 39
... Interface Cards (NICs) and Accelerated Data Path (ADP) Services Modules." This process enables you to configure the network settings and provides access to a Nokia IP1200 Series appliance, the initial configuration process begins. It includes the following sections: „ Using a Console Connection „ Connecting Power and Turning the Power On...on power to the admin account. You can perform the initial configuration in two ways: „ Configure a DHCP server to Configure Your Appliance, included with the appliance. IP1220 and IP1260 Security Platforms Installation Guide 39
... Interface Cards (NICs) and Accelerated Data Path (ADP) Services Modules." This process enables you to configure the network settings and provides access to a Nokia IP1200 Series appliance, the initial configuration process begins. It includes the following sections: „ Using a Console Connection „ Connecting Power and Turning the Power On...on power to the admin account. You can perform the initial configuration in two ways: „ Configure a DHCP server to Configure Your Appliance, included with the appliance. IP1220 and IP1260 Security Platforms Installation Guide 39

Installation Guide
Page 40
...1 stop bit To connect to the console 1. Connect the other end of the IP1200 Series appliance. Use only the DB9 port labeled Console on the back of your Nokia IP1200 Series appliance, you no longer need the console connection. the serial (AUX) port is Cisco compatible.... Initial Configuration Using a Console Connection If you do not use DHCP to perform the initial configuration of the appliance as shown in Figure 10. 40 IP1220 and IP1260 Security Platforms Installation Guide emulation program. You can use a serial console connection (cable included). After you perform the...
...1 stop bit To connect to the console 1. Connect the other end of the IP1200 Series appliance. Use only the DB9 port labeled Console on the back of your Nokia IP1200 Series appliance, you no longer need the console connection. the serial (AUX) port is Cisco compatible.... Initial Configuration Using a Console Connection If you do not use DHCP to perform the initial configuration of the appliance as shown in Figure 10. 40 IP1220 and IP1260 Security Platforms Installation Guide emulation program. You can use a serial console connection (cable included). After you perform the...
Installation Guide
Page 42
...Performing the Initial Configuration If you do not see the Nokia IPSO Boot Manager Reference Guide. At the console a series of your Nokia IP1200 Series appliance, you must use a serial console connection (cable included). The prompt remains on the appliance. 3 Performing the Initial Configuration „ That power ...to use the boot manager, see either the BOOTMGR> or Hostname? Respond to prevent the DHCP client from starting. 42 IP1220 and IP1260 Security Platforms Installation Guide If the fans are correct. If you verify the console connections and still do not use DHCP to ...
...Performing the Initial Configuration If you do not see the Nokia IPSO Boot Manager Reference Guide. At the console a series of your Nokia IP1200 Series appliance, you must use a serial console connection (cable included). The prompt remains on the appliance. 3 Performing the Initial Configuration „ That power ...to use the boot manager, see either the BOOTMGR> or Hostname? Respond to prevent the DHCP client from starting. 42 IP1220 and IP1260 Security Platforms Installation Guide If the fans are correct. If you verify the console connections and still do not use DHCP to ...

Installation Guide
Page 46
... you initially log on secure software image, inventory, and platform management of Nokia IP security platforms. 46 IP1220 and IP1260 Security Platforms Installation Guide Enter any CLI commands in an interactive mode with Network Voyager you can view configuration settings, but you cannot change and view configuration settings on to the appliance by using . The argument...
... you initially log on secure software image, inventory, and platform management of Nokia IP security platforms. 46 IP1220 and IP1260 Security Platforms Installation Guide Enter any CLI commands in an interactive mode with Network Voyager you can view configuration settings, but you cannot change and view configuration settings on to the appliance by using . The argument...

Installation Guide
Page 47
... learn more . For information about how to obtain Horizon Manager or to manage and configure a large number of Nokia security appliances that reside on page 3. 051115 IP1220 and IP1260 Security Platforms Installation Guide 47 Using Horizon Manager, a network security professional can obtain configuration information, upgrade (or downgrade) the operating system, perform application installations, and distribute necessary...
... learn more . For information about how to obtain Horizon Manager or to manage and configure a large number of Nokia security appliances that reside on page 3. 051115 IP1220 and IP1260 Security Platforms Installation Guide 47 Using Horizon Manager, a network security professional can obtain configuration information, upgrade (or downgrade) the operating system, perform application installations, and distribute necessary...
Installation Guide
Page 49
.... If you do not have a working knowledge of the appliance to ADP modules. 4 Installing and Replacing Network Interface Cards and Accelerated Data Path (ADP) Services Modules The Nokia IP1200 Series appliance may come with the wrist strap before you observe proper procedures... install and replace NICs. Caution You should review Chapter 6, "About IP1200 Appliance ADP Services Modules" to ensure that you handle the components or open the appliance. The grounding plug on page 20) provides a chassis grounding point. IP1220 and IP1260 Security Platforms Installation Guide 49
.... If you do not have a working knowledge of the appliance to ADP modules. 4 Installing and Replacing Network Interface Cards and Accelerated Data Path (ADP) Services Modules The Nokia IP1200 Series appliance may come with the wrist strap before you observe proper procedures... install and replace NICs. Caution You should review Chapter 6, "About IP1200 Appliance ADP Services Modules" to ensure that you handle the components or open the appliance. The grounding plug on page 20) provides a chassis grounding point. IP1220 and IP1260 Security Platforms Installation Guide 49

Installation Guide
Page 56
... the NICs or the ADP module in Chapter 6, "About IP1200 Appliance ADP Services Modules." Monitoring Network Interface Cards You can also use the Nokia IPSO tcpdump command to configure and activate the logical and physical interfaces on a specific port. 56 IP1220 and IP1260 Security Platforms Installation Guide The status indicators for each NIC are...
... the NICs or the ADP module in Chapter 6, "About IP1200 Appliance ADP Services Modules." Monitoring Network Interface Cards You can also use the Nokia IPSO tcpdump command to configure and activate the logical and physical interfaces on a specific port. 56 IP1220 and IP1260 Security Platforms Installation Guide The status indicators for each NIC are...
Installation Guide
Page 57
Use this information to plan your NIC installation to your appliance. IP1220 and IP1260 Security Platforms Installation Guide 57 5 About IP1200 Series Appliance Network Interface Cards This chapter describes the network interface cards available for the Nokia IP1200 Series appliance and how to connect those NICs to maximize data throughput on your network. For example, if a two...
Use this information to plan your NIC installation to your appliance. IP1220 and IP1260 Security Platforms Installation Guide 57 5 About IP1200 Series Appliance Network Interface Cards This chapter describes the network interface cards available for the Nokia IP1200 Series appliance and how to connect those NICs to maximize data throughput on your network. For example, if a two...


