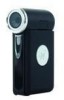
User Guide
Page 2
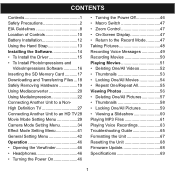
... Inserting the SD Memory Card ...........17 Downloading and Transferring Files ...18 Safely Removing Hardware 19 Using Mediaconverter 20 Using MediaImpression 22 Connecting Another Unit to a NonHigh Definition TV 27 Connecting Another Unit to an HD TV 28 Movie Mode Setting Menu 29 Camera Mode Setting Menu 34 Effect Mode Setting Menu 41...
... Inserting the SD Memory Card ...........17 Downloading and Transferring Files ...18 Safely Removing Hardware 19 Using Mediaconverter 20 Using MediaImpression 22 Connecting Another Unit to a NonHigh Definition TV 27 Connecting Another Unit to an HD TV 28 Movie Mode Setting Menu 29 Camera Mode Setting Menu 34 Effect Mode Setting Menu 41...

User Guide
Page 4
... bookcase or rack unless proper ventilation is of power source indicated on an unstable the type of the product should be tripod, bracket or table connected to overturn. 4. For example, this product near a swimming pool. 10. RETAIN INSTRUCTIONS use a mounting accessory recommended by the product's manufacturer as a Do not use attachments...
... bookcase or rack unless proper ventilation is of power source indicated on an unstable the type of the product should be tripod, bracket or table connected to overturn. 4. For example, this product near a swimming pool. 10. RETAIN INSTRUCTIONS use a mounting accessory recommended by the product's manufacturer as a Do not use attachments...

User Guide
Page 5
POWER-CORD PROTECTION If an outside antenna is connected to the Power-supply cords should not be taken to battery power or other electric light or power circuits, EXAMPLE OF ANTENNA GROUNDING AS PER ...
POWER-CORD PROTECTION If an outside antenna is connected to the Power-supply cords should not be taken to battery power or other electric light or power circuits, EXAMPLE OF ANTENNA GROUNDING AS PER ...

User Guide
Page 6
... the service technician uses f. heat sources such as 22. the grounding system of yourself as recommended by a qualified hazards. connection to its service personnel. normal operation. 19. and supporting structure, grounding of grounding conductors, c. NOTE TO CATV SYSTEM INSTALLER... the following the operating instructions. If the product does not operate normally by requirements for The product should be connected to qualified service personnel 5 DAMAGE REQUIRING SERVICE close to the point of any service or repairs to (including ...
... the service technician uses f. heat sources such as 22. the grounding system of yourself as recommended by a qualified hazards. connection to its service personnel. normal operation. 19. and supporting structure, grounding of grounding conductors, c. NOTE TO CATV SYSTEM INSTALLER... the following the operating instructions. If the product does not operate normally by requirements for The product should be connected to qualified service personnel 5 DAMAGE REQUIRING SERVICE close to the point of any service or repairs to (including ...

User Guide
Page 7
...equipment off and on, the user is encouraged to try to correct the interference by the manufacturer may create a traffic hazard, and it is connected. • Consult the dealer or an experienced radio/TV technician for a Class B digital device, pursuant to Part 15 of excessive heat.... of the following measures: • Reorient or relocate the receiving antenna. • Increase the separation between the equipment and receiver. • Connect the equipment to an outlet on a circuit different from that interference will not affect the unit. However, dropping the unit or dropping a heavy...
...equipment off and on, the user is encouraged to try to correct the interference by the manufacturer may create a traffic hazard, and it is connected. • Consult the dealer or an experienced radio/TV technician for a Class B digital device, pursuant to Part 15 of excessive heat.... of the following measures: • Reorient or relocate the receiving antenna. • Increase the separation between the equipment and receiver. • Connect the equipment to an outlet on a circuit different from that interference will not affect the unit. However, dropping the unit or dropping a heavy...
User Guide
Page 19
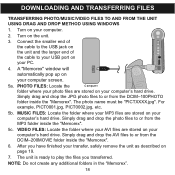
... remove the unit as described on your computer's hard drive. Simply drag and drop the photo files to or from the MP3 folder inside the "Memorex". 6. After you transferred. For example, PICT0001.jpg, PICT0002.jpg, etc. 5b. Simply drag and drop the AVI files to your USB port on...stored on the unit and the larger end of the cable to or from the DCIM-100PHOTO folder inside the "Memorex". NOTE: Do not create any additional folders in the "Memorex". 18 Connect the smaller end of the cable to the USB jack on your computer's hard drive. DOWNLOADING AND TRANSFERRING FILES...
... remove the unit as described on your computer's hard drive. Simply drag and drop the photo files to or from the MP3 folder inside the "Memorex". 6. After you transferred. For example, PICT0001.jpg, PICT0002.jpg, etc. 5b. Simply drag and drop the AVI files to your USB port on...stored on the unit and the larger end of the cable to or from the DCIM-100PHOTO folder inside the "Memorex". NOTE: Do not create any additional folders in the "Memorex". 18 Connect the smaller end of the cable to the USB jack on your computer's hard drive. DOWNLOADING AND TRANSFERRING FILES...
User Guide
Page 22
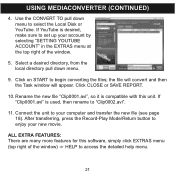
USING MEDIACONVERTER (CONTINUED) 4. Click on START to select the Local Disk or YouTube. the file will convert and then the Task window will appear. Connect the unit to access the detailed help menu. 21 Select a desired directory, from the local directory pull down menu to begin converting the files; Rename ...
USING MEDIACONVERTER (CONTINUED) 4. Click on START to select the Local Disk or YouTube. the file will convert and then the Task window will appear. Connect the unit to access the detailed help menu. 21 Select a desired directory, from the local directory pull down menu to begin converting the files; Rename ...

User Guide
Page 27
.... 8. Press the Record-Play Mode/Return button to switch to adjust the capture settings, such as a WebCam 1. The connect icon only appears when your WebCam. SNAPSHOT AND VIDEO: Select to your WebCam is disconnected. 10. Stop the recording by clicking "Capture...(CONTINUED) Using the Unit as video device, burst number, etc. 7. After installing (see page 14), click START menu c PROGRAMS c ARCSOFT MEDIAIMPRESSION. Connect the unit to adjust your desktop; Capture a still image by clicking "Stop recording". 6. WEBCAM SETTINGS: Use to the computer. DISCONNECT: Click to access...
.... 8. Press the Record-Play Mode/Return button to switch to adjust the capture settings, such as a WebCam 1. The connect icon only appears when your WebCam. SNAPSHOT AND VIDEO: Select to your WebCam is disconnected. 10. Stop the recording by clicking "Capture...(CONTINUED) Using the Unit as video device, burst number, etc. 7. After installing (see page 14), click START menu c PROGRAMS c ARCSOFT MEDIAIMPRESSION. Connect the unit to adjust your desktop; Capture a still image by clicking "Stop recording". 6. WEBCAM SETTINGS: Use to the computer. DISCONNECT: Click to access...

User Guide
Page 28
...the Navigation/Zoom/OK control, then press the Navigation/Zoom/OK control. 3. CONNECTING THE UNIT TO A NON-HIGH DEFINITION TV You can connect this manual, but the information that usually appears in the display will now ...Earphone/TV option will allow you to your TV color system as shown on page 44, then connect as described in this unit to the AV IN jack. 4. This will appear. First, make...TV SYSTEM to NTSC or PAL, corresponding to view the unit's videos and pictures on the unit and connect the single plug to the unit's TV OUT/ Headphones jack and the other to the television's AV IN...
...the Navigation/Zoom/OK control, then press the Navigation/Zoom/OK control. 3. CONNECTING THE UNIT TO A NON-HIGH DEFINITION TV You can connect this manual, but the information that usually appears in the display will now ...Earphone/TV option will allow you to your TV color system as shown on page 44, then connect as described in this unit to the AV IN jack. 4. This will appear. First, make...TV SYSTEM to NTSC or PAL, corresponding to view the unit's videos and pictures on the unit and connect the single plug to the unit's TV OUT/ Headphones jack and the other to the television's AV IN...
User Guide
Page 29
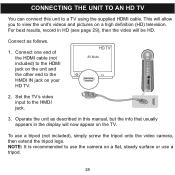
Connect one end of the HDMI cable (not included) to the HDMI jack on the unit and the other end...view the unit's videos and pictures on your HD TV. 2. Set the TV's video input to a TV using the supplied HDMI cable. Connect as described in this unit to the HMDI jack. 3. Operate the unit as follows. 1. For best results, record in HD (see page... 29), then the video will be HD. CONNECTING THE UNIT TO AN HD TV You can connect this manual, but the info that usually appears in the display will now appear on the TV. To use a ...
Connect one end of the HDMI cable (not included) to the HDMI jack on the unit and the other end...view the unit's videos and pictures on your HD TV. 2. Set the TV's video input to a TV using the supplied HDMI cable. Connect as described in this unit to the HMDI jack. 3. Operate the unit as follows. 1. For best results, record in HD (see page... 29), then the video will be HD. CONNECTING THE UNIT TO AN HD TV You can connect this manual, but the info that usually appears in the display will now appear on the TV. To use a ...

User Guide
Page 45
... Navigation/Zoom/OK control. Enter the Setting mode menu as shown on the card/memory. Then press the Navigation/Zoom/OK control. TV SYSTEM: When connecting the unit to a TV using the AV/Headphones Out jacks, select the TV System used on your area. 1 Enter the Setting mode menu as shown...
... Navigation/Zoom/OK control. Enter the Setting mode menu as shown on the card/memory. Then press the Navigation/Zoom/OK control. TV SYSTEM: When connecting the unit to a TV using the AV/Headphones Out jacks, select the TV System used on your area. 1 Enter the Setting mode menu as shown...

User Guide
Page 68
... USB cable to close the Format window. 67 FORMATTING THE UNIT Formatting the Player WARNING! Double click on My Computer, then right 34.4MB click "Memorex" and left click on "Format". 3. Do not format this player unless it stops working and you have selected "FAT 32" at the file system pull...
... USB cable to close the Format window. 67 FORMATTING THE UNIT Formatting the Player WARNING! Double click on My Computer, then right 34.4MB click "Memorex" and left click on "Format". 3. Do not format this player unless it stops working and you have selected "FAT 32" at the file system pull...