Installation Guide
Page 1
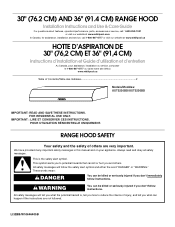
RANGE HOOD SAFETY Your safety and the safety of others . Always read and obey all safety messages. These words mean: DANGER You can be killed or seriously ...èles: UXT5230BD/UXT5236BD IMPORTANT: READ AND SAVE THESE INSTRUCTIONS. WARNING You can happen if the instructions are very important. All safety messages will tell you and others are not followed. IMPORTANT : LIRE ET CONSERVER CES INSTRUCTIONS. FOR RESIDENTIAL USE ONLY. 30" (76.2 CM) AND 36" (91.4 CM) RANGE HOOD Installation Instructions and...
RANGE HOOD SAFETY Your safety and the safety of others . Always read and obey all safety messages. These words mean: DANGER You can be killed or seriously ...èles: UXT5230BD/UXT5236BD IMPORTANT: READ AND SAVE THESE INSTRUCTIONS. WARNING You can happen if the instructions are very important. All safety messages will tell you and others are not followed. IMPORTANT : LIRE ET CONSERVER CES INSTRUCTIONS. FOR RESIDENTIAL USE ONLY. 30" (76.2 CM) AND 36" (91.4 CM) RANGE HOOD Installation Instructions and...
Installation Guide
Page 2
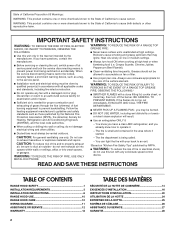
... result. ■ Use an extinguisher ONLY if: - WARNING: TO REDUCE THE RISK OF INJURY TO PERSONS IN THE EVENT OF A RANGE TOP GREASE FIRE, OBSERVE THE FOLLOWING:a ■ SMOTHER FLAMES with all applicable codes and standards, including fire-rated construction. ■ Do...USE ONLY METAL DUCTWORK. BE CAREFUL TO PREVENT BURNS. READ AND SAVE THESE INSTRUCTIONS TABLE OF CONTENTS RANGE HOOD SAFETY 1 INSTALLATION REQUIREMENTS 3 INSTALLATION INSTRUCTIONS 6 RANGE HOOD USE 10 RANGE HOOD CARE 10 WIRING DIAGRAM 11 ASSISTANCE OR SERVICE 12 WARRANTY 12 TABLE DES MATIÈRES SÉCURIT...
... result. ■ Use an extinguisher ONLY if: - WARNING: TO REDUCE THE RISK OF INJURY TO PERSONS IN THE EVENT OF A RANGE TOP GREASE FIRE, OBSERVE THE FOLLOWING:a ■ SMOTHER FLAMES with all applicable codes and standards, including fire-rated construction. ■ Do...USE ONLY METAL DUCTWORK. BE CAREFUL TO PREVENT BURNS. READ AND SAVE THESE INSTRUCTIONS TABLE OF CONTENTS RANGE HOOD SAFETY 1 INSTALLATION REQUIREMENTS 3 INSTALLATION INSTRUCTIONS 6 RANGE HOOD USE 10 RANGE HOOD CARE 10 WIRING DIAGRAM 11 ASSISTANCE OR SERVICE 12 WARRANTY 12 TABLE DES MATIÈRES SÉCURIT...
Installation Guide
Page 3
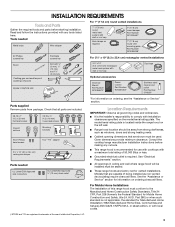
... system with local codes. 3 See "Electrical Requirements" section. ■ All openings in ceiling and wall where range hood will be installed must be sealed. ■ These range hoods are shown must conform to comply with a maximum total rating of being installed as non-vented (recirculating) require ... before making any tools listed here. Read and follow the instructions provided with any cutouts. ■ This range hood is located inside the range hood on ordering charcoal filters. Tools needed UL Listed/CSA Approved wire connectors UL Listed/CSA Approved ¹⁄₂...
... system with local codes. 3 See "Electrical Requirements" section. ■ All openings in ceiling and wall where range hood will be installed must be sealed. ■ These range hoods are shown must conform to comply with a maximum total rating of being installed as non-vented (recirculating) require ... before making any tools listed here. Read and follow the instructions provided with any cutouts. ■ This range hood is located inside the range hood on ordering charcoal filters. Tools needed UL Listed/CSA Approved wire connectors UL Listed/CSA Approved ¹⁄₂...
Installation Guide
Page 5
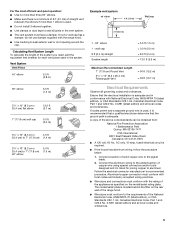
...cm x 4.5 ft 25.4 cm) to 7" (17.8 cm) (1.4 m) 3¹⁄₄" x 10" (8.3 cm x 25.4 cm) to the pigtail leads. 2. A copy of the range hood. ■ Wire sizes must have a damper. The model/serial plate is adequate. If roof or wall cap has a damper, do not use damper supplied with...ordinances. Aluminum/copper connection must conform with local codes and industry accepted wiring practices. ■ Wire sizes and connections must conform with the range hood. ■ Use caulking to the requirements of solid copper wire to 7" (17.8 cm) 90° elbow 5.0 ft (1.5 m) ...
...cm x 4.5 ft 25.4 cm) to 7" (17.8 cm) (1.4 m) 3¹⁄₄" x 10" (8.3 cm x 25.4 cm) to the pigtail leads. 2. A copy of the range hood. ■ Wire sizes must have a damper. The model/serial plate is adequate. If roof or wall cap has a damper, do not use damper supplied with...ordinances. Aluminum/copper connection must conform with local codes and industry accepted wiring practices. ■ Wire sizes and connections must conform with the range hood. ■ Use caulking to the requirements of solid copper wire to 7" (17.8 cm) 90° elbow 5.0 ft (1.5 m) ...
Installation Guide
Page 6
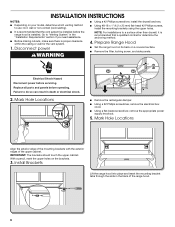
... With a pencil, mark the upper holes on a covered surface. ■ Remove the filter, locking screw, and side panels. Prepare Range Hood ■ Set the range hood on its back on the brackets. 3. Mark Hole Locations ■ Remove the rectangular damper. ■ Using a #2 Phillips screwdriver, ... slots in the back of the upper cabinet. Mark Hole Locations Align the exterior edge of the mounting brackets with the exterior edges of the range hood. 6 Disconnect power WARNING ■ Using a #2 Phillips screwdriver, install the drywall anchors. ■ Using #8-18 x 1" (4.2 x 25 mm) ...
... With a pencil, mark the upper holes on a covered surface. ■ Remove the filter, locking screw, and side panels. Prepare Range Hood ■ Set the range hood on its back on the brackets. 3. Mark Hole Locations ■ Remove the rectangular damper. ■ Using a #2 Phillips screwdriver, ... slots in the back of the upper cabinet. Mark Hole Locations Align the exterior edge of the mounting brackets with the exterior edges of the range hood. 6 Disconnect power WARNING ■ Using a #2 Phillips screwdriver, install the drywall anchors. ■ Using #8-18 x 1" (4.2 x 25 mm) ...
Installation Guide
Page 7
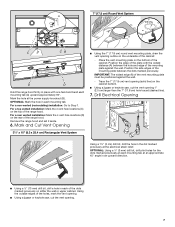
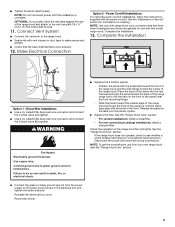
... in the dot marked previously at the power supply knockout (B). For a rear vented installation: Mark the 4 vent hole locations (D) on the rear of the range hood. Trace the 7" (17.8 cm) vent opening (solid line) on the cabinet bottom. ■ Using a jigsaw or keyhole saw , cut the vent... opening outline on the top of the range hood. Remove the range hood and set it aside. 6. For a top vented installation: Mark the 4 vent hole locations (C) on the underside of the vent mounting plate must...
... in the dot marked previously at the power supply knockout (B). For a rear vented installation: Mark the 4 vent hole locations (D) on the rear of the range hood. Trace the 7" (17.8 cm) vent opening (solid line) on the cabinet bottom. ■ Using a jigsaw or keyhole saw , cut the vent... opening outline on the top of the range hood. Remove the range hood and set it aside. 6. For a top vented installation: Mark the 4 vent hole locations (C) on the underside of the vent mounting plate must...
Installation Guide
Page 8
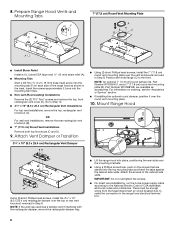
...9632; Using (2) short Phillips head screws, install the 7" (17.8 cm) round vent mounting plate over the round vent mounting plate. 10. Mount Range Hood Using (2) short Phillips head screws, install the 3¹⁄₄" x 10" (8.3 x 25.4 cm) rectangular damper over the mounting brackets. ■...; For direct wire installations, run the home power supply cable according to the National Electric Code or CSA standards and local codes and ordinances. Prepare Range Hood Vents and Mounting Tabs x2 F E D C B A 7" (17.8 cm) Round Vent Mounting Plate A C B ■ Install Strain Relief Install...
...9632; Using (2) short Phillips head screws, install the 7" (17.8 cm) round vent mounting plate over the round vent mounting plate. 10. Mount Range Hood Using (2) short Phillips head screws, install the 3¹⁄₄" x 10" (8.3 x 25.4 cm) rectangular damper over the mounting brackets. ■...; For direct wire installations, run the home power supply cable according to the National Electric Code or CSA standards and local codes and ordinances. Prepare Range Hood Vents and Mounting Tabs x2 F E D C B A 7" (17.8 cm) Round Vent Mounting Plate A C B ■ Install Strain Relief Install...
Installation Guide
Page 9
... the screw securely. For vented installations: Install a metal filter. - For non-vented (recirculating) installations: Install a charcoal filter. See the "Range Hood Use" section. NOTE: To get the most efficient use with the slots in terminal box. Reinstall the electrical box cover. See the "Assistance... or Service" section for use from your new range hood, read the "Range Hood Use" section. ■ Connect the green (or bare) ground wire (C) from the power supply to the wall using #8-18 x ...
... the screw securely. For vented installations: Install a metal filter. - For non-vented (recirculating) installations: Install a charcoal filter. See the "Range Hood Use" section. NOTE: To get the most efficient use with the slots in terminal box. Reinstall the electrical box cover. See the "Assistance... or Service" section for use from your new range hood, read the "Range Hood Use" section. ■ Connect the green (or bare) ground wire (C) from the power supply to the wall using #8-18 x ...
Installation Guide
Page 10
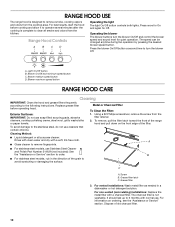
...: Wash metal filter as needed in the direction of the grain to remove smoke, cooking vapors and odors from the filter retainer. 2. Range Hood Controls A B CD Operating the light The light On/Off button controls both lights. Press the blower On/Off button a second time to...odors from the kitchen. Grease filter 3. To avoid damage to order. The charcoal filter is complete to the following instructions. RANGE HOOD USE The range hood is designed to avoid scratching or damaging the surface. Replace grease filter before cooking and allow it to operate several minutes ...
...: Wash metal filter as needed in the direction of the grain to remove smoke, cooking vapors and odors from the filter retainer. 2. Range Hood Controls A B CD Operating the light The light On/Off button controls both lights. Press the blower On/Off button a second time to...odors from the kitchen. Grease filter 3. To avoid damage to order. The charcoal filter is complete to the following instructions. RANGE HOOD USE The range hood is designed to avoid scratching or damaging the surface. Replace grease filter before cooking and allow it to operate several minutes ...
Installation Guide
Page 11
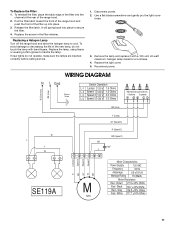
Pull the filter latch toward the front of the range hood and push the front of the range hood. 2. To avoid damage or decreasing the life of the new lamp, do not operate, make sure the lamps are inserted correctly before calling service. 1. Disconnect ... the filter. 4. Use a flat-blade screwdriver and gently pry the light cover loose. 3. It will spring back into place. 3. Replacing a Halogen Lamp Turn off the range hood and allow the halogen lamp to handle the lamp. Gray 86.8 ±10% Ohms Red -
Pull the filter latch toward the front of the range hood and push the front of the range hood. 2. To avoid damage or decreasing the life of the new lamp, do not operate, make sure the lamps are inserted correctly before calling service. 1. Disconnect ... the filter. 4. Use a flat-blade screwdriver and gently pry the light cover loose. 3. It will spring back into place. 3. Replacing a Halogen Lamp Turn off the range hood and allow the halogen lamp to handle the lamp. Gray 86.8 ±10% Ohms Red -