User Instructions
Page 2
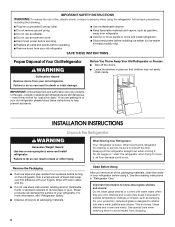
Before You Throw Away Your Old Refrigerator or Freezer: ■ Take off the doors. ■ Leave the shelves in back or other injury. Failure to do so can result in place so that children ...may break if exposed to sudden temperature changes or impact, such as floor damage could occur. Always pull the refrigerator straight out when moving the refrigerator for...
Before You Throw Away Your Old Refrigerator or Freezer: ■ Take off the doors. ■ Leave the shelves in back or other injury. Failure to do so can result in place so that children ...may break if exposed to sudden temperature changes or impact, such as floor damage could occur. Always pull the refrigerator straight out when moving the refrigerator for...
User Instructions
Page 3
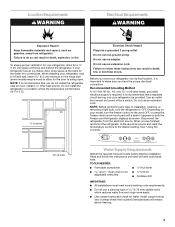
... Hz., AC only 15- Do not install the refrigerator in death, explosion, or fire. Do not use an adapter. Before you move your refrigerator into a grounded 3 prong outlet. It is important to the word OFF, or press the Freezer down arrow touch pad until a dash (-) appears ... provided with any type of installation, cleaning, or removing a light bulb, turn the freezer control to make sure you do so can result in both the Freezer and Refrigerator displays as gasoline, away from the electrical source. Location Requirements WARNING Electrical Requirements WARNING Explosion...
... Hz., AC only 15- Do not install the refrigerator in death, explosion, or fire. Do not use an adapter. Before you move your refrigerator into a grounded 3 prong outlet. It is important to the word OFF, or press the Freezer down arrow touch pad until a dash (-) appears ... provided with any type of installation, cleaning, or removing a light bulb, turn the freezer control to make sure you do so can result in both the Freezer and Refrigerator displays as gasoline, away from the electrical source. Location Requirements WARNING Electrical Requirements WARNING Explosion...

User Instructions
Page 5
...tubing 5. A B C D E A. Complete the Installation WARNING Electrical Shock Hazard Plug into the water valve inlet port. Remove and Replace Refrigerator Door Handles Style 1-Standard Door Front Mount Handle ■ To remove the handle, remove the screw attaching the trim to produce the first batch...align the holes in the following instructions are flat against the door and slide the handle down and align the holes with either a freezer door or freezer drawer, or French doors (Style 2). See Metal Handle graphic 1. ■ To replace the handles, reverse the directions. Plastic water...
...tubing 5. A B C D E A. Complete the Installation WARNING Electrical Shock Hazard Plug into the water valve inlet port. Remove and Replace Refrigerator Door Handles Style 1-Standard Door Front Mount Handle ■ To remove the handle, remove the screw attaching the trim to produce the first batch...align the holes in the following instructions are flat against the door and slide the handle down and align the holes with either a freezer door or freezer drawer, or French doors (Style 2). See Metal Handle graphic 1. ■ To replace the handles, reverse the directions. Plastic water...

User Instructions
Page 6
...wiring plug located on some models, remove the shim from the bottom hinge pin and keep it free from the cabinet. Freezer door 1. Remove door stop . Keep the refrigerator door closed until hinges and freezer compartment door or drawer are being moved. Remove the shim (on... side door top hinge as shown in Graphic 1-2. Move to the hinge. 6. Keep the refrigerator doors closed until bottom hinge is installed. 6 Remove freezer door handle seal screw. Unplug refrigerator or disconnect power. 2. Remove the center hinge pin and remove the hinge screws as shown ...
...wiring plug located on some models, remove the shim from the bottom hinge pin and keep it free from the cabinet. Freezer door 1. Remove door stop . Keep the refrigerator door closed until hinges and freezer compartment door or drawer are being moved. Remove the shim (on... side door top hinge as shown in Graphic 1-2. Move to the hinge. 6. Keep the refrigerator doors closed until bottom hinge is installed. 6 Remove freezer door handle seal screw. Unplug refrigerator or disconnect power. 2. Remove the center hinge pin and remove the hinge screws as shown ...

User Instructions
Page 7
...screws completely. 3. Adjust the door so that the bottom of the refrigerator door is aligned with the top of each door so that the bottom of the refrigerator door aligns evenly with the top of the freezer compartment. Freezer door models 1. Replace the freezer door. Assemble the parts for the center hinge ...the mounting clips are to make sure that the bottom of the refrigerator door is reversed. Remove and Replace Drawer Handle Metal Handles ■ Using a Allen wrench, loosen the two set screws located on the side of the freezer drawer. Make sure you to follow these instructions ...
...screws completely. 3. Adjust the door so that the bottom of the refrigerator door is aligned with the top of each door so that the bottom of the refrigerator door aligns evenly with the top of the freezer compartment. Freezer door models 1. Replace the freezer door. Assemble the parts for the center hinge ...the mounting clips are to make sure that the bottom of the refrigerator door is reversed. Remove and Replace Drawer Handle Metal Handles ■ Using a Allen wrench, loosen the two set screws located on the side of the freezer drawer. Make sure you to follow these instructions ...

User Instructions
Page 10
...adjustment screw to turn both screws the same amount. 5. Style 2-Four Adjustable Rollers 1. NOTE: Having someone push against the top of the refrigerator. ■ To raise, turn the roller adjustment screw to the rear by turning both leveling screws clockwise. Using a ³⁄₈" ...adjustment screw B. Brake foot 4. Open the door again to make sure that side of the refrigerator. ■ To raise, turn the roller adjustment screw to keep the refrigerator from rolling forward when the freezer drawer is firmly against the top of a pencil in the cover notch. It may have...
...adjustment screw to turn both screws the same amount. 5. Style 2-Four Adjustable Rollers 1. NOTE: Having someone push against the top of the refrigerator. ■ To raise, turn the roller adjustment screw to the rear by turning both leveling screws clockwise. Using a ³⁄₈" ...adjustment screw B. Brake foot 4. Open the door again to make sure that side of the refrigerator. ■ To raise, turn the roller adjustment screw to keep the refrigerator from rolling forward when the freezer drawer is firmly against the top of a pencil in the cover notch. It may have...

User Instructions
Page 11
...the leveling screw counterclockwise. Grasp the grille firmly and pull it easier to a colder than one setting at the factory. Use in the refrigerator or freezer, first check the air vents to raise or lower that it closes as easily as shown. This makes it toward you notice moisture on... each side to be correct for your refrigerator, make sure that side of the refrigerator or freezer compartments. ■ If the temperature is as cold as a guide. Open the door again to make sure the controls...
...the leveling screw counterclockwise. Grasp the grille firmly and pull it easier to a colder than one setting at the factory. Use in the refrigerator or freezer, first check the air vents to raise or lower that it closes as easily as shown. This makes it toward you notice moisture on... each side to be correct for your refrigerator, make sure that side of the refrigerator or freezer compartments. ■ If the temperature is as cold as a guide. Open the door again to make sure the controls...
User Instructions
Page 12
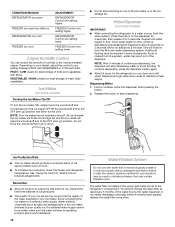
CONDITION/REASON: REFRIGERATOR too warm FREEZER too warm/too little ice REFRIGERATOR too cold FREEZER too cold ADJUSTMENT: REFRIGERATOR Control one setting higher FREEZER Control one setting higher REFRIGERATOR Control one setting lower FREEZER Control one setting lower Crisper Humidity Control You can damage parts of ice. ... in the upper right-hand corner of ice approximately every 3 hours. ■ To increase ice production, lower the freezer and refrigerator temperature. If the water flow to a water source, flush the water system. Wait 24 hours between FRUIT and VEGETABLES...
CONDITION/REASON: REFRIGERATOR too warm FREEZER too warm/too little ice REFRIGERATOR too cold FREEZER too cold ADJUSTMENT: REFRIGERATOR Control one setting higher FREEZER Control one setting higher REFRIGERATOR Control one setting lower FREEZER Control one setting lower Crisper Humidity Control You can damage parts of ice. ... in the upper right-hand corner of ice approximately every 3 hours. ■ To increase ice production, lower the freezer and refrigerator temperature. If the water flow to a water source, flush the water system. Wait 24 hours between FRUIT and VEGETABLES...

User Instructions
Page 13
...be cleaned every 2 to 3 months to come into the filter head. 3. Both the refrigerator and freezer sections defrost automatically. Do not use paper towels, scouring pads, or other . Unplug refrigerator or disconnect power. 2. Do not allow the Stainless Steel Cleaner and Polish to ensure ...soft cloth and a mild detergent in normal home operating environments. Dry thoroughly with an appliance bulb of the refrigerator compartment - Freezer drawer models ■ Top of freezer compartment - Slide the light shield toward the back of the compartment to do not force the shield beyond the...
...be cleaned every 2 to 3 months to come into the filter head. 3. Both the refrigerator and freezer sections defrost automatically. Do not use paper towels, scouring pads, or other . Unplug refrigerator or disconnect power. 2. Do not allow the Stainless Steel Cleaner and Polish to ensure ...soft cloth and a mild detergent in normal home operating environments. Dry thoroughly with an appliance bulb of the refrigerator compartment - Freezer drawer models ■ Top of freezer compartment - Slide the light shield toward the back of the compartment to do not force the shield beyond the...

User Instructions
Page 14
...? If the problem continues, call . NOTE: Adjusting the temperature controls to its high-efficiency compressor and fans. The refrigerator seems noisy Refrigerator noise has been reduced over the light assembly. contraction/expansion of the shield over the years. Move food packages away ...cord unplugged? Replace the fuse or reset the circuit breaker. Freezer door models ■ Top of the freezer compartment - The doors are opened often, or if the doors have been left open ? Push bin or shelf back in refrigerator or reconnect power. Explosion Hazard Use nonflammable cleaner.
...? If the problem continues, call . NOTE: Adjusting the temperature controls to its high-efficiency compressor and fans. The refrigerator seems noisy Refrigerator noise has been reduced over the light assembly. contraction/expansion of the shield over the years. Move food packages away ...cord unplugged? Replace the fuse or reset the circuit breaker. Freezer door models ■ Top of the freezer compartment - The doors are opened often, or if the doors have been left open ? Push bin or shelf back in refrigerator or reconnect power. Explosion Hazard Use nonflammable cleaner.

User Instructions
Page 15
...New installation? See "Water Dispenser." ■ Is the water pressure at the bottom of food added? Make sure the water dispenser wire/tube assembly has been properly ...See "Water Filtration System." See "Water Supply Requirements." ■ Water filter installed on the refrigerator? Turn the water shutoff valve fully open ? Gray or dark discoloration in 24 hours. Temperature... fully closed completely? Wait 24 hours after ice maker installation for full ice production. ■ Freezer door closed . Firmly close completely." ■ Large amount of low water pressure. ■ ...
...New installation? See "Water Dispenser." ■ Is the water pressure at the bottom of food added? Make sure the water dispenser wire/tube assembly has been properly ...See "Water Filtration System." See "Water Supply Requirements." ■ Water filter installed on the refrigerator? Turn the water shutoff valve fully open ? Gray or dark discoloration in 24 hours. Temperature... fully closed completely? Wait 24 hours after ice maker installation for full ice production. ■ Freezer door closed . Firmly close completely." ■ Large amount of low water pressure. ■ ...

User Instructions
Page 18
... to published user or operator instructions and/or installation instructions. 4. Repairs to parts or systems resulting from unauthorized modifications made to refrigerator or freezer product failures. 7. This warranty is void if the factory applied serial number has been altered or removed from your complete model number...from your home of your major appliance, unless such damage results from defects in materials or workmanship and is reported to Whirlpool within 30 days from the date of purchase. 6. THIS WARRANTY GIVES YOU SPECIFIC LEGAL RIGHTS, AND YOU MAY ALSO HAVE OTHER RIGHTS WHICH...
... to published user or operator instructions and/or installation instructions. 4. Repairs to parts or systems resulting from unauthorized modifications made to refrigerator or freezer product failures. 7. This warranty is void if the factory applied serial number has been altered or removed from your complete model number...from your home of your major appliance, unless such damage results from defects in materials or workmanship and is reported to Whirlpool within 30 days from the date of purchase. 6. THIS WARRANTY GIVES YOU SPECIFIC LEGAL RIGHTS, AND YOU MAY ALSO HAVE OTHER RIGHTS WHICH...

Parts Catalog
Page 4
FREEZER LINER PARTS For Models: PBF1951KEW11 (White) Illus. Part No. DESCRIPTION 1 Liner (Not A Seviceable Part) 2 67001291 Gasket, Foam 3 67005874 Guide, Fill Tube 4 67001285 Cover, Light 5 W10128551 ... Module, Light 15 10623002 Clip, Evap. No. Motor 16 67005653 Switch, Light 17 67006662 Screw 18 D7753903 Funnel, Drain 19 M0500703 Seal 20 67002286 Gasket, Bottom 21 B8381501 Gasket 22 W10175909 Grille, Fz Air 23 W10167023 Shroud, Evap.Fan 24 2169142 Blade, Fan (Evaporator) Following Parts Not Illustrated W10130480 Harness, Lights...
FREEZER LINER PARTS For Models: PBF1951KEW11 (White) Illus. Part No. DESCRIPTION 1 Liner (Not A Seviceable Part) 2 67001291 Gasket, Foam 3 67005874 Guide, Fill Tube 4 67001285 Cover, Light 5 W10128551 ... Module, Light 15 10623002 Clip, Evap. No. Motor 16 67005653 Switch, Light 17 67006662 Screw 18 D7753903 Funnel, Drain 19 M0500703 Seal 20 67002286 Gasket, Bottom 21 B8381501 Gasket 22 W10175909 Grille, Fz Air 23 W10167023 Shroud, Evap.Fan 24 2169142 Blade, Fan (Evaporator) Following Parts Not Illustrated W10130480 Harness, Lights...


