

Installation Instructions
Page 2
..." (14 mm) 4" min (102 mm) Level Wood block Ruler or measuring tape Pliers that open to toll-free phone numbers on back page of the washer. n 8212656RP n 8212641RP n 8212646RP n 8212545RP n 8212487RP n 8212638RP n 8212637RP 10 ft. (3.0 m) Inlet hose, Black EPDM (2 pack) 5 ft. (1.5 m) Inlet hose, Black EPDM (2...required tools and parts before starting installation. Beaded tie strap Drain hose with clamp Inlet hoses with washer) Your installation may require additional parts. Install your washer in the top of your Use and Care Guide. If you have: You will need: ...
..." (14 mm) 4" min (102 mm) Level Wood block Ruler or measuring tape Pliers that open to toll-free phone numbers on back page of the washer. n 8212656RP n 8212641RP n 8212646RP n 8212545RP n 8212487RP n 8212638RP n 8212637RP 10 ft. (3.0 m) Inlet hose, Black EPDM (2 pack) 5 ft. (1.5 m) Inlet hose, Black EPDM (2...required tools and parts before starting installation. Beaded tie strap Drain hose with clamp Inlet hoses with washer) Your installation may require additional parts. Install your washer in the top of your Use and Care Guide. If you have: You will need: ...

Installation Instructions
Page 3
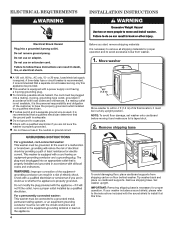
...(990 mm) above floor; DRAIN SYSTEM Drain system can be needed.) Laundry tub drain system Minimum capacity: 20 gal. (76 L). Water remaining in washer after use may cause damage in door are minimum required. Minimum carry-away capacity: 17 gal. (64 L) per minute. If a closet door or ... walls, doors, and floor moldings. Select method you need a sump pump system. Floor standpipe drain system IMPORTANT: Do not install, store, or operate washer where it will be at least 39" (990 mm) high; Floor drain system requires a Siphon Break Kit (Part Number 285834), 2 Connector Kits (...
...(990 mm) above floor; DRAIN SYSTEM Drain system can be needed.) Laundry tub drain system Minimum capacity: 20 gal. (76 L). Water remaining in washer after use may cause damage in door are minimum required. Minimum carry-away capacity: 17 gal. (64 L) per minute. If a closet door or ... walls, doors, and floor moldings. Select method you need a sump pump system. Floor standpipe drain system IMPORTANT: Do not install, store, or operate washer where it will be at least 39" (990 mm) high; Floor drain system requires a Siphon Break Kit (Part Number 285834), 2 Connector Kits (...
Installation Instructions
Page 4
...must be plugged into a mating, 3 prong, grounding-type outlet, grounded in accordance with a power supply cord having a 3 prong grounding plug. Set washer upright. n If codes permit and a separate ground wire is used, it is the personal responsibility and obligation of its final location; n Do not...properly grounded. or 20-amp, fused electrical supply is recommended. Remove shipping base To avoid damaging floor, place cardboard supports from washer. 1. IMPORTANT: Removing shipping base is recommended that the ground path is adequate. It is necessary for proper operation and to ...
...must be plugged into a mating, 3 prong, grounding-type outlet, grounded in accordance with a power supply cord having a 3 prong grounding plug. Set washer upright. n If codes permit and a separate ground wire is used, it is the personal responsibility and obligation of its final location; n Do not...properly grounded. or 20-amp, fused electrical supply is recommended. Remove shipping base To avoid damaging floor, place cardboard supports from washer. 1. IMPORTANT: Removing shipping base is recommended that the ground path is adequate. It is necessary for proper operation and to ...

Installation Instructions
Page 5
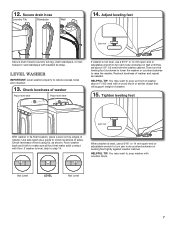
Be sure to back of washer. 4.5" (113 mm) Place hose into standpipe or lay on elbow end of drain hose, slide it over side ...If clamp is not already in standpipe Drain hose form Firmly grasp power cord plug and pull to drain port Remove tape from washer lid, open lid and remove cardboard packing tray from tray. Squeeze clamp with pliers and slide black elbow end of laundry ...Remove packing tray from rear panel. NOTE: Keep tray in Step 7. For a laundry tub or standpipe drain, go to move washer later. 4. You may need to step 6. IMPORTANT: 4.5" (113 mm) of laundry tub. 3.
Be sure to back of washer. 4.5" (113 mm) Place hose into standpipe or lay on elbow end of drain hose, slide it over side ...If clamp is not already in standpipe Drain hose form Firmly grasp power cord plug and pull to drain port Remove tape from washer lid, open lid and remove cardboard packing tray from tray. Squeeze clamp with pliers and slide black elbow end of laundry ...Remove packing tray from rear panel. NOTE: Keep tray in Step 7. For a laundry tub or standpipe drain, go to move washer later. 4. You may need to step 6. IMPORTANT: 4.5" (113 mm) of laundry tub. 3.

Installation Instructions
Page 6
... or bucket to check for leaks Turn on coupling by hand until it is connected to hot water to help in attaching hoses to washer correctly. Water should run until it is snug. Record hose installation or replacement dates for cold water faucet. Check for leaks. 7. ...See "Tools and Parts". Do not use a Y-adapter (not provided). 8. Repeat with flat washers (not provided). A small amount of hose failure, replace the hoses every 5 years. Connect Inlet Hoses Washer must be attached and have water flowing to hot water inlet valve marked with separate directions. Damage ...
... or bucket to check for leaks Turn on coupling by hand until it is connected to hot water to help in attaching hoses to washer correctly. Water should run until it is snug. Record hose installation or replacement dates for cold water faucet. Check for leaks. 7. ...See "Tools and Parts". Do not use a Y-adapter (not provided). 8. Repeat with flat washers (not provided). A small amount of hose failure, replace the hoses every 5 years. Connect Inlet Hoses Washer must be attached and have water flowing to hot water inlet valve marked with separate directions. Damage ...
Installation Instructions
Page 7
...16" or 14 mm open -end or adjustable wrench to turn jam nuts counterclockwise on top edges of washer about 1/2" (13 mm) from the washer cabinet. HELPFUL TIP: You may want to raise the washer. When washer is not level, use a 9/16" or 14 mm open -end or adjustable wrench to turn the ...sure all four feet make solid contact with beaded tie strap. Recheck levelness of front using lid, as shown. Check levelness of washer and repeat as a guide to prop washer with a wood block or similar object that will support weight of sides. 12. Secure drain hose Laundry Tub Standpipe Wall 14...
...16" or 14 mm open -end or adjustable wrench to turn jam nuts counterclockwise on top edges of washer about 1/2" (13 mm) from the washer cabinet. HELPFUL TIP: You may want to raise the washer. When washer is not level, use a 9/16" or 14 mm open -end or adjustable wrench to turn the ...sure all four feet make solid contact with beaded tie strap. Recheck levelness of front using lid, as shown. Check levelness of washer and repeat as a guide to prop washer with a wood block or similar object that will support weight of sides. 12. Secure drain hose Laundry Tub Standpipe Wall 14...

Installation Instructions
Page 8
... cycle. 8 q Check for leaks around faucets and inlet hoses. q Read "Washer Use" in your washer, measure 1/2 of normal recommended amount of powdered or liquid detergent and pour it into washer basket or detergent dispenser (on some models). Select any tape remaining on . Close... outlet. q Check that water faucets are now installed. q To test and clean your Washer User Instructions. q Check that all parts are on washer. q Dispose of/recycle all of washer. Be sure you have correct electrical supply and recommended grounding method. q Remove protective film from...
... cycle. 8 q Check for leaks around faucets and inlet hoses. q Read "Washer Use" in your washer, measure 1/2 of normal recommended amount of powdered or liquid detergent and pour it into washer basket or detergent dispenser (on some models). Select any tape remaining on . Close... outlet. q Check that water faucets are now installed. q To test and clean your Washer User Instructions. q Check that all parts are on washer. q Dispose of/recycle all of washer. Be sure you have correct electrical supply and recommended grounding method. q Remove protective film from...
Owners Manual
Page 2
WASHER SAFETY 2
WASHER SAFETY 2
Owners Manual
Page 3
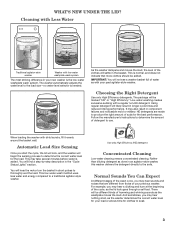
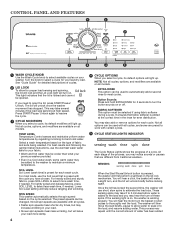
...HE detergents are different from those of humming and whirring sounds as the washplate moves the load. When loading the washer with a regular non-HE detergent. You will not see a washer basket full of suds for clothes to the load size-no water level selector is the low-water washplate wash system..., fill it evenly around the basket wall. WHAT'S NEW UNDER THE LID? Normal Sounds You Can Expect At different stages of the cycle, as the washer determines the correct water level for the load. And sometimes, you may hear a clicking and hum at all, as the lid lock goes through a ...
...HE detergents are different from those of humming and whirring sounds as the washplate moves the load. When loading the washer with a regular non-HE detergent. You will not see a washer basket full of suds for clothes to the load size-no water level selector is the low-water washplate wash system..., fill it evenly around the basket wall. WHAT'S NEW UNDER THE LID? Normal Sounds You Can Expect At different stages of the cycle, as the washer determines the correct water level for the load. And sometimes, you may hear a clicking and hum at all, as the lid lock goes through a ...
Owners Manual
Page 4
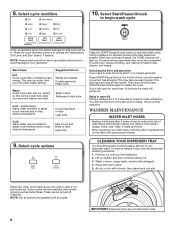
...water may repeat until the correct amount of fabric and soils being washed. The lid will unlock briefly before water is pressed, the washer will help reduce tangling and wrinkling. For best results and following the garment label instructions, use short, slow spins to select available cycles.../Pause/ Unlock. TEMP LEVEL Temperature Control senses and maintains uniform water temperatures by regulating incoming hot and cold water. SPIN SPEED This washer automatically selects the spin speed based on the type of water has been added Not all cycles, options, and modifiers are available on...
...water may repeat until the correct amount of fabric and soils being washed. The lid will unlock briefly before water is pressed, the washer will help reduce tangling and wrinkling. For best results and following the garment label instructions, use short, slow spins to select available cycles.../Pause/ Unlock. TEMP LEVEL Temperature Control senses and maintains uniform water temperatures by regulating incoming hot and cold water. SPIN SPEED This washer automatically selects the spin speed based on the type of water has been added Not all cycles, options, and modifiers are available on...
Owners Manual
Page 5
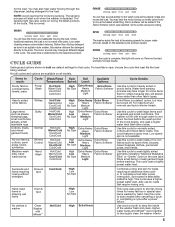
... added if the Fabric Softener option was selected. Fabric softener will be turned off. Some cycles use liquid chlorine bleach. Unlike traditional washers, the load is not available. Low-water cleaning means concentrated cleaning. Extra Rinse is a default option, but may also come on...the cycle that require rinsing only. Low speed spin is not covered with water. Use once a month to the soils. Use this washer delivers the detergent directly to keep the inside of no-iron fabrics such as sheets, sleeping bags, small comforters, jackets, small washable ...
... added if the Fabric Softener option was selected. Fabric softener will be turned off. Some cycles use liquid chlorine bleach. Unlike traditional washers, the load is not available. Low-water cleaning means concentrated cleaning. Extra Rinse is a default option, but may also come on...the cycle that require rinsing only. Low speed spin is not covered with water. Use once a month to the soils. Use this washer delivers the detergent directly to keep the inside of no-iron fabrics such as sheets, sleeping bags, small comforters, jackets, small washable ...
Owners Manual
Page 6
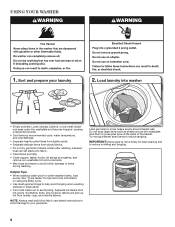
... from sturdy fabrics. • Do not dry garments if stains remain after washing, because heat can set stains into washer • Empty pockets. Try mixing different sized items to reduce tangling. USING YOUR WASHER 1. Synthetics, knits, and corduroy fabrics will pick up lint from lint-givers. Load garments in loose piles around...
... from sturdy fabrics. • Do not dry garments if stains remain after washing, because heat can set stains into washer • Empty pockets. Try mixing different sized items to reduce tangling. USING YOUR WASHER 1. Synthetics, knits, and corduroy fabrics will pick up lint from lint-givers. Load garments in loose piles around...
Owners Manual
Page 7
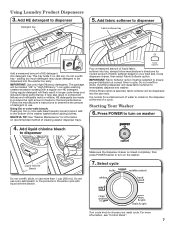
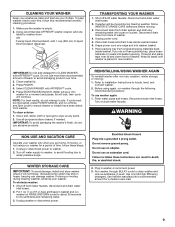
... into detergent tray. HE detergents are made to produce the right amount of suds for a small amount of HE detergent into the washer too early. Press POWER to remain in the dispenser at correct time in component failures and noticeable mold or mildew. Select cycle Do...same cycle with a regular non-HE detergent. It is closed completely, then press POWER/cancel to turn on your wash cycle. HELPFUL TIP: See "Washer Maintenance" for correct amount of a cycle. IMPORTANT: Fabric Softener option must be marked "HE" or "High Efficiency." Using Laundry Product Dispensers 3. ...
... into detergent tray. HE detergents are made to produce the right amount of suds for a small amount of HE detergent into the washer too early. Press POWER to remain in the dispenser at correct time in component failures and noticeable mold or mildew. Select cycle Do...same cycle with a regular non-HE detergent. It is closed completely, then press POWER/cancel to turn on your wash cycle. HELPFUL TIP: See "Washer Maintenance" for correct amount of a cycle. IMPORTANT: Fabric Softener option must be marked "HE" or "High Efficiency." Using Laundry Product Dispensers 3. ...
Owners Manual
Page 8
...residue leftover in soil removal and to help dissolve detergents. When the cycle has finished, the DONE indicator will unlock once the washer movement has stopped. Promptly remove garments after 5 years of use to check for load unbalance. Select cycle options CLEANING YOUR ...water, using a mild detergent. 4. This is delayed for more than your dispenser trays. WASHER MAINTENANCE WATER INLET HOSES Replace inlet hoses after cycle has completed to save energy. When replacing your previous washer provided. Lift up . Rinse with a towel, then place back into slot. Air ...
...residue leftover in soil removal and to help dissolve detergents. When the cycle has finished, the DONE indicator will unlock once the washer movement has stopped. Promptly remove garments after 5 years of use to check for load unbalance. Select cycle options CLEANING YOUR ...water, using a mild detergent. 4. This is delayed for more than your dispenser trays. WASHER MAINTENANCE WATER INLET HOSES Replace inlet hoses after cycle has completed to save energy. When replacing your previous washer provided. Lift up . Rinse with a towel, then place back into slot. Air ...
Owners Manual
Page 9
...during freezing weather, follow WINTER STORAGE CARE directions before moving , or not using liquid chlorine bleach, add 1 cup (250 mL) to washer. 2. Use only HE High Efficiency detergent. Use half the manufacturer's recommended amount for about 30 seconds to ensure cleaner or bleach have ...Shut off both water faucets. Close lid and place tape over lid and down front of bleach to CLEAN WASHER with AFFRESH™ cycle. 6. Keep lid taped until washer is empty. 2. bleach dispenser Liquid chlorine IMPORTANT: Do not add detergent to avoid damaging product over edge and...
...during freezing weather, follow WINTER STORAGE CARE directions before moving , or not using liquid chlorine bleach, add 1 cup (250 mL) to washer. 2. Use only HE High Efficiency detergent. Use half the manufacturer's recommended amount for about 30 seconds to ensure cleaner or bleach have ...Shut off both water faucets. Close lid and place tape over lid and down front of bleach to CLEAN WASHER with AFFRESH™ cycle. 6. Keep lid taped until washer is empty. 2. bleach dispenser Liquid chlorine IMPORTANT: Do not add detergent to avoid damaging product over edge and...
Owners Manual
Page 10
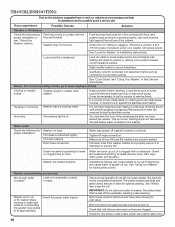
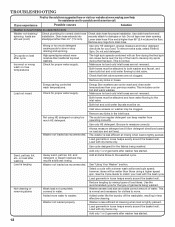
... Humming The sensing light is not level. IMPORTANT: Do not add more water to www.maytag.com/help for oversized, non-absorbent items such as expected Not enough water in washer Load not completely covered in water. Load dry items in this Use and Care Guide. Check... or clogged sink or drain. TROUBLESHOOTING First try the solutions suggested here or visit our website at www.maytag.com/help Clicking or metallic noises Objects caught in washer drain system. Wash smaller loads to drainpipe or laundry tub. Check that inlet valve screens have started the...
... Humming The sensing light is not level. IMPORTANT: Do not add more water to www.maytag.com/help for oversized, non-absorbent items such as expected Not enough water in washer Load not completely covered in water. Load dry items in this Use and Care Guide. Check... or clogged sink or drain. TROUBLESHOOTING First try the solutions suggested here or visit our website at www.maytag.com/help Clicking or metallic noises Objects caught in washer drain system. Wash smaller loads to drainpipe or laundry tub. Check that inlet valve screens have started the...
Owners Manual
Page 11
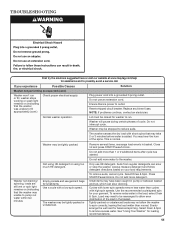
...detergent and follow detergent directions based on (indicating that may have been caught in the basket. Reset a tripped circuit breaker. Washer will pause during certain phases of the spins. Do not add more detergent. Tightly packed or unbalanced loads may hear the hum.... To remove suds, cancel cycle. TROUBLESHOOTING First try the solutions suggested here or visit our website at www.maytag.com/help for loading recommendations. 11 Normal washer operation. Ensure there is normal. Replace any blown fuses. NOTE: If problems continue, contact an electrician. Lid...
...detergent and follow detergent directions based on (indicating that may have been caught in the basket. Reset a tripped circuit breaker. Washer will pause during certain phases of the spins. Do not add more detergent. Tightly packed or unbalanced loads may hear the hum.... To remove suds, cancel cycle. TROUBLESHOOTING First try the solutions suggested here or visit our website at www.maytag.com/help for loading recommendations. 11 Normal washer operation. Ensure there is normal. Replace any blown fuses. NOTE: If problems continue, contact an electrician. Lid...
Owners Manual
Page 12
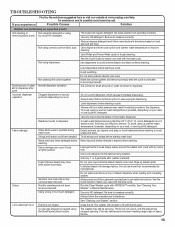
...cold inlet hoses are not clogged. Both hoses must be attached and have both hot and cold water flowing to measure correctly. Washer is less efficient at rinsing when load is normal. Remove any kinks in hoses. This includes cooler hot and warm washes. ... tightly packed. TROUBLESHOOTING First try the solutions suggested here or visit our website at www.maytag.com/help for assistance and to develop dry spots during the final spin can keep washer from operating correctly. To remove extra suds, select RInse & Spin. The high spin speeds...
...cold inlet hoses are not clogged. Both hoses must be attached and have both hot and cold water flowing to measure correctly. Washer is less efficient at rinsing when load is normal. Remove any kinks in hoses. This includes cooler hot and warm washes. ... tightly packed. TROUBLESHOOTING First try the solutions suggested here or visit our website at www.maytag.com/help for assistance and to develop dry spots during the final spin can keep washer from operating correctly. To remove extra suds, select RInse & Spin. The high spin speeds...
Owners Manual
Page 13
... if possible, depending on load size and soil level. The washer may have been damaged before starting a cycle. TROUBLESHOOTING First try the solutions suggested here or visit our website at www.maytag.com/help for assistance and to improve cleaning. If you experience... Possible Causes Solution Washer not performing as recommended. Residual powder in Washer Maintenance. Sharp items were in seams before starting a cycle. ...
... if possible, depending on load size and soil level. The washer may have been damaged before starting a cycle. TROUBLESHOOTING First try the solutions suggested here or visit our website at www.maytag.com/help for assistance and to improve cleaning. If you experience... Possible Causes Solution Washer not performing as recommended. Residual powder in Washer Maintenance. Sharp items were in seams before starting a cycle. ...
Owners Manual
Page 14
... limitations and exclusions may not apply to resolve the problem after checking "Troubleshooting," additional help can be provided by calling Maytag. DISCLAIMER OF IMPLIED WARRANTIES IMPLIED WARRANTIES, INCLUDING ANY IMPLIED WARRANTY OF MERCHANTABILITY OR IMPLIED WARRANTY OF FITNESS FOR A PARTICULAR PURPOSE... provinces do not allow the exclusion or limitation of incidental or consequential damages, so these parts that prevent function of the washer and that existed when this major appliance is operated and maintained according to instructions attached to the appliance. 8. If you ...
... limitations and exclusions may not apply to resolve the problem after checking "Troubleshooting," additional help can be provided by calling Maytag. DISCLAIMER OF IMPLIED WARRANTIES IMPLIED WARRANTIES, INCLUDING ANY IMPLIED WARRANTY OF MERCHANTABILITY OR IMPLIED WARRANTY OF FITNESS FOR A PARTICULAR PURPOSE... provinces do not allow the exclusion or limitation of incidental or consequential damages, so these parts that prevent function of the washer and that existed when this major appliance is operated and maintained according to instructions attached to the appliance. 8. If you ...


